
Advanced Cluster Management Updates (Part 2 of 2)
In the first part of this series, I covered how to generate ACM policies using PolicyGenerator and how to source a policy from a GitHub repo.
In this second part, I'm going to rehash some of the information I covered in the following article in regards to creating a hub SNO cluster and enabling CIM/Assisted-Service.

The next part (which is unique to this article) will be how to provision bare-metal hosts and build clusters using the ACM GUI.
This is the opposite of the article referenced above in the sense that my first article provided YAML definitions which could be pushed directly from the command-line. In this article, I'm going to use the GUI to build a spoke cluster. When I use the GUI, I get the benefit of all of the objects getting created from the GUI (without having to worry about constructing my own YAMLs). If I decide to later reference the YAMLs generated by the GUI in a GitHub repo (for GitOps purposes), I can do that as well.
Let's start by following the same steps I presented in my other article
Setting Up Environment to Demonstrate Process
This tutorial will demonstrate how to setup a single hub cluster (ztp-hub-01) and a cluster called ztp-spoke-01 which will be automatically provisioned based on the information contained in this blog post.
LibVirt/KVM is being used in this environment. Both the ztp-hub-01 and ztp-spoke-01 nodes have the following specs.
CPU: 8 VCPU
RAM: 32GB
Boot order for both VMs is to look at the primary boot disk first and then the CD-ROM ISO.
At least one NIC card needs to be used on each VM. Take note of the mac-addresses as this information will be needed later. I am using a NAT to allow my VMs to reach the Internet for now. Doing this in a disconnected manner will be described in a follow-on article.
ztp-hub-01 has two virtio disks. The first is the boot disk (/dev/vda) and the second is (/dev/vdb) which will be used to provision the topoLVM. This operator takes the raw block device (/dev/vdb) and allows dynamic provisioning of persistent volumes to be used for the assisted-service. The primary drive needs to be at least 120GB in size. The secondary drive is 200GB in this example. The drive can be larger depending on the total size of persistent volumes the cluster will need.
ztp-spoke-01 only needs 8VCPU and 16GB of RAM based on the latest 4.11 SNO documentation, but I have additional available so made it 32GB.
At the time of this writing, OCP 4.11.17 is being used.
Installing SNO (Single-Node Cluster) Hub
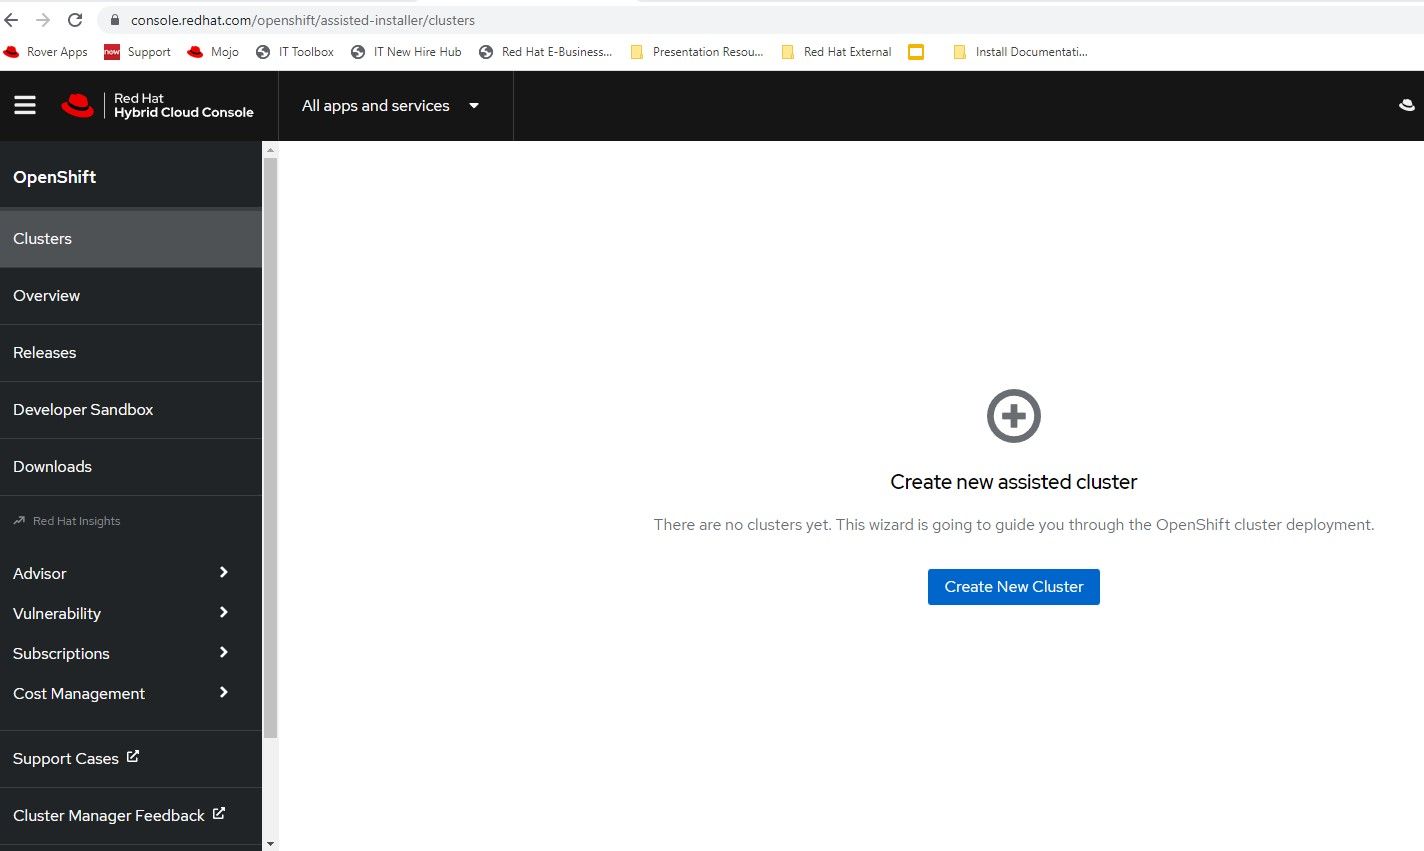
Once the VMs are setup, the cloud-based assisted installer will be used to setup the hub cluster. This is located at https://console.redhat.com/openshift/assisted-installer/
- Click "Create New Cluster"
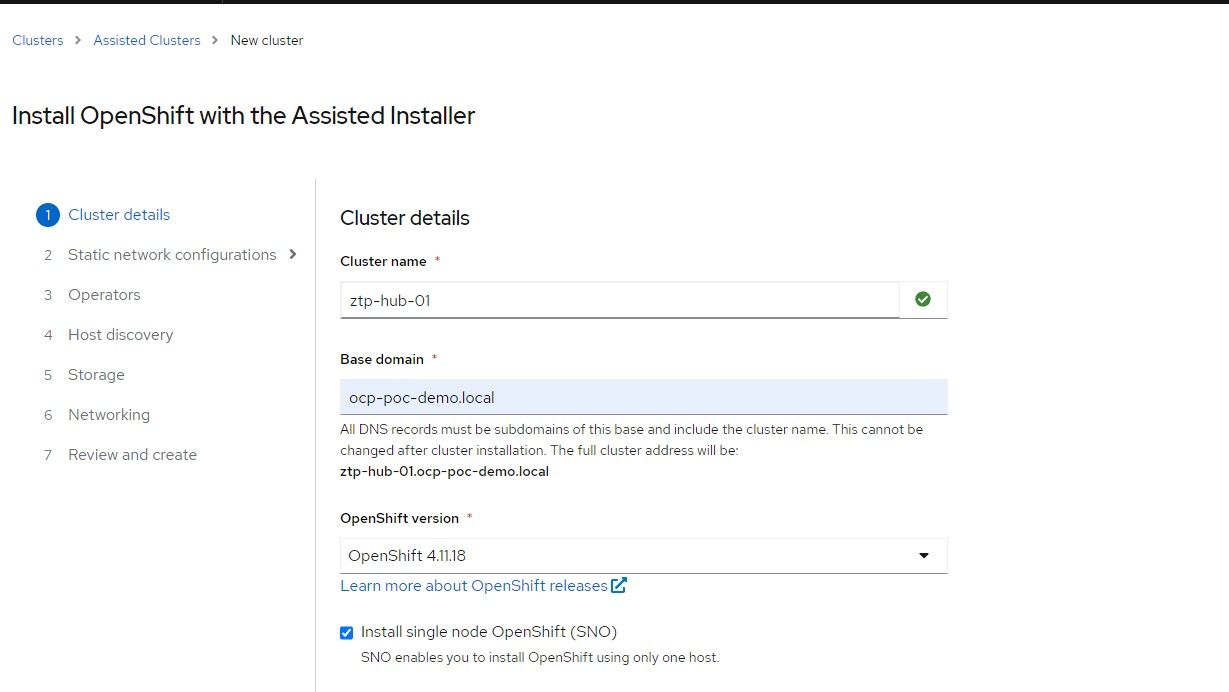
2. The cluster-name will be ztp-hub-01 in the ocp-poc-demo.local domain. Be sure to have DNS entries for api, api-int, and *.apps.<clustername>.<domain> that point to the node's IP.
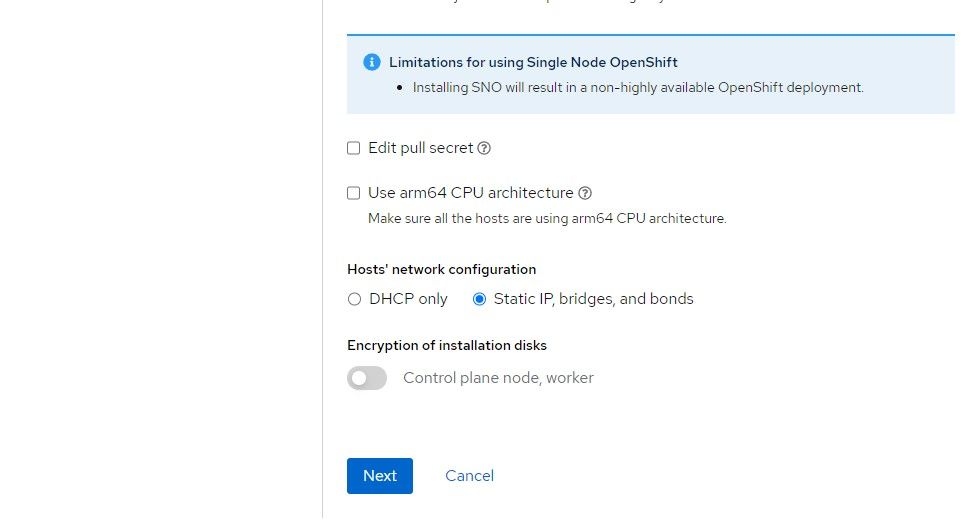
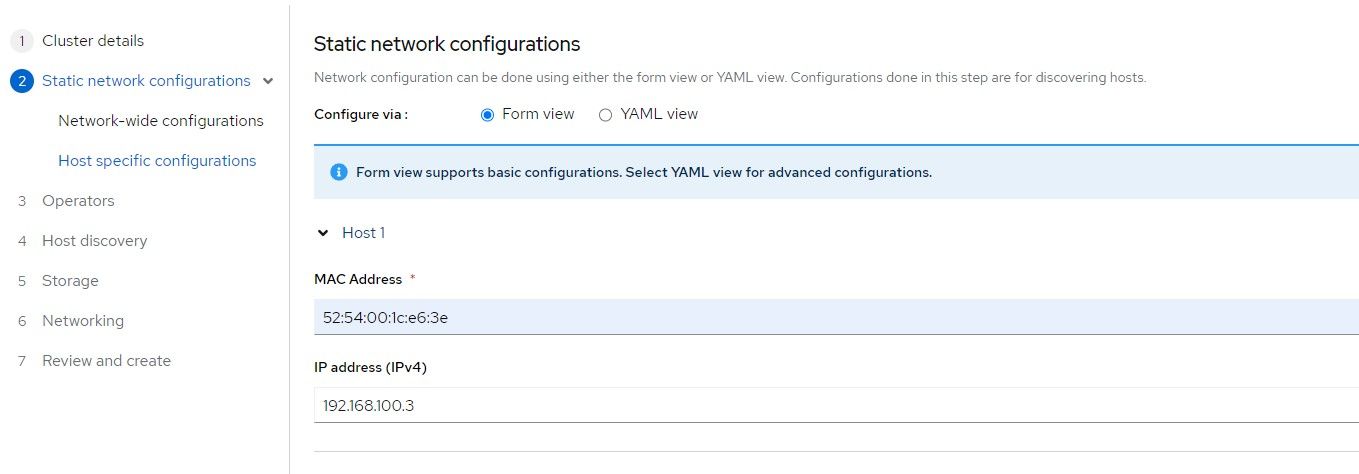
3. Check the box for static IP configuration which means that a network state needs to be defined to allow the ISO to assign the appropriate IP to the node based on the mac-address. Click "Next"
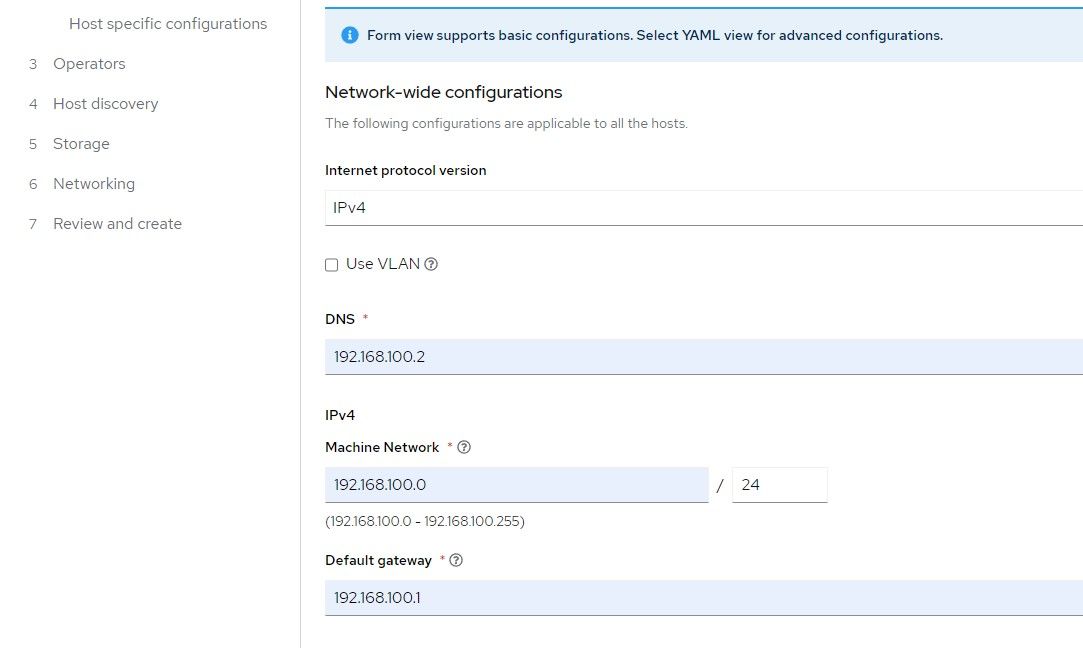
4. Provide the IP schema that will be used. The choices are either IPv4 or dual-stack (both IPv4 and IPv6).
Provide the IP address of the name-server
Machine network is the network that the node will boot to
Gateway is the default route for the Machine network
Click "Next"
5. Find the mac address of the ztp-hub-01 VM and a free IP address on the Machine network to assign to this node. This will end up being the IP associated with the API and Ingress/Apps since this is a SNO cluster.
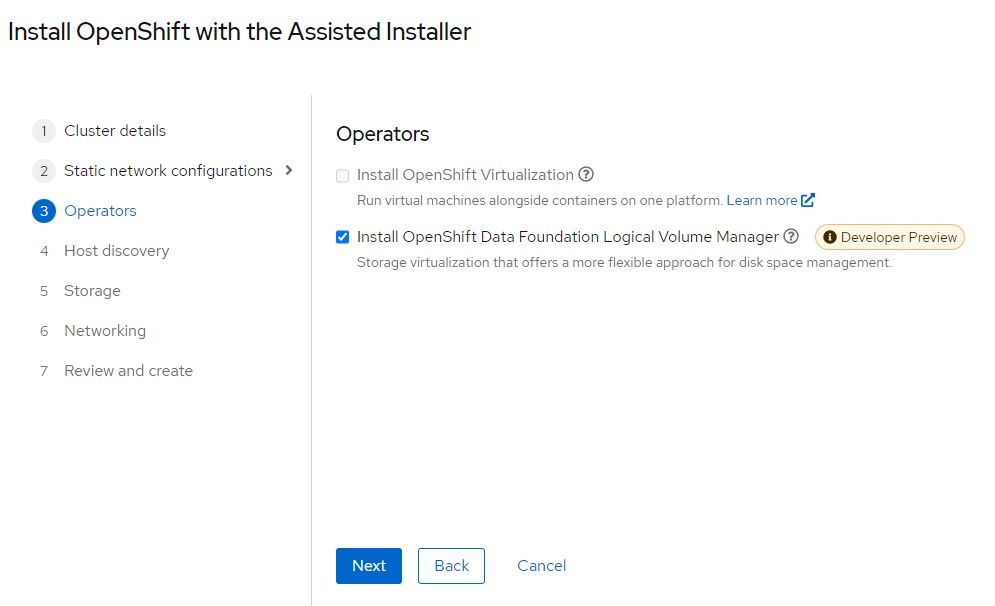
6. Openshift Data Foundation Logical Volume Manager is based off of TopoLVM which was described previously. Check this box.
Click "Next"
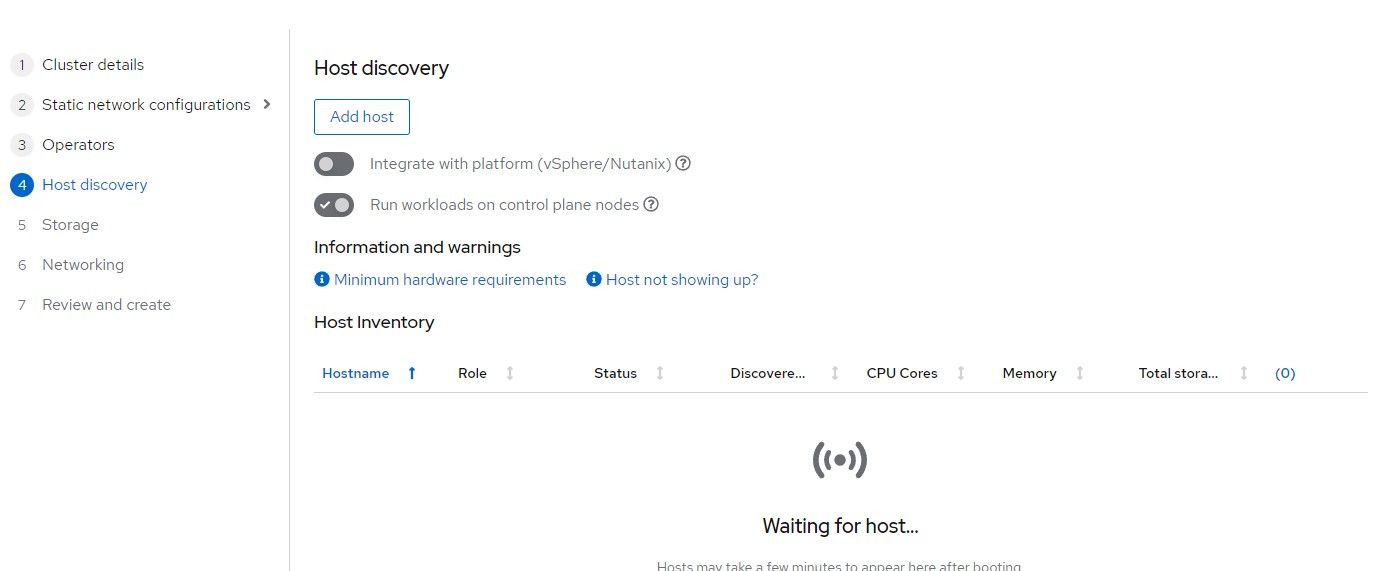
7. Click "Add-Host"
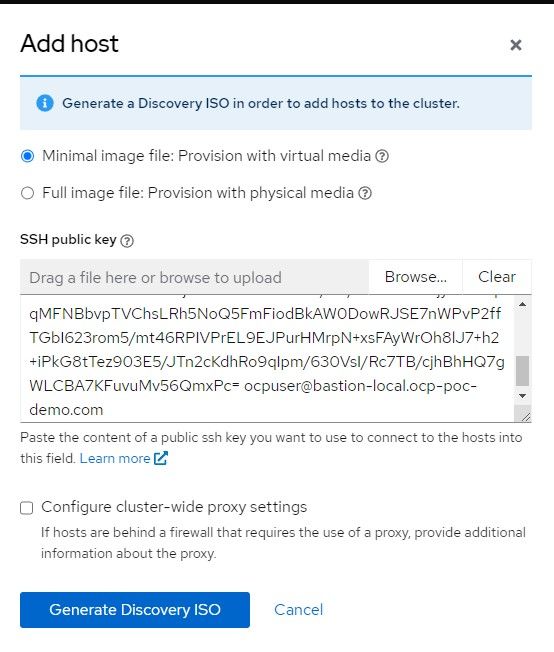
8. Select Minimal image and copy/paste your SSH public key in the box provided. This will be used mostly to troubleshoot install problems. Once the cluster is built, there is an "oc debug node" command that does the same thing.
Click "Generate ISO"
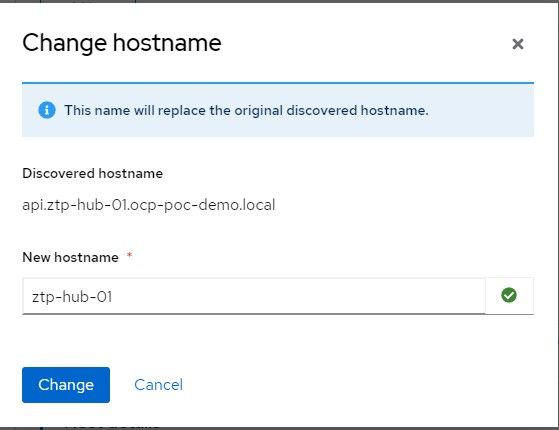
9. Point to that ISO in your VM settings (virt-manager). This will allow the node to be discovered to install the cluster. Some requirements are checked to ensure the minimum required CPU, memory, disk are setup. You can change the hostname here if you'd like.

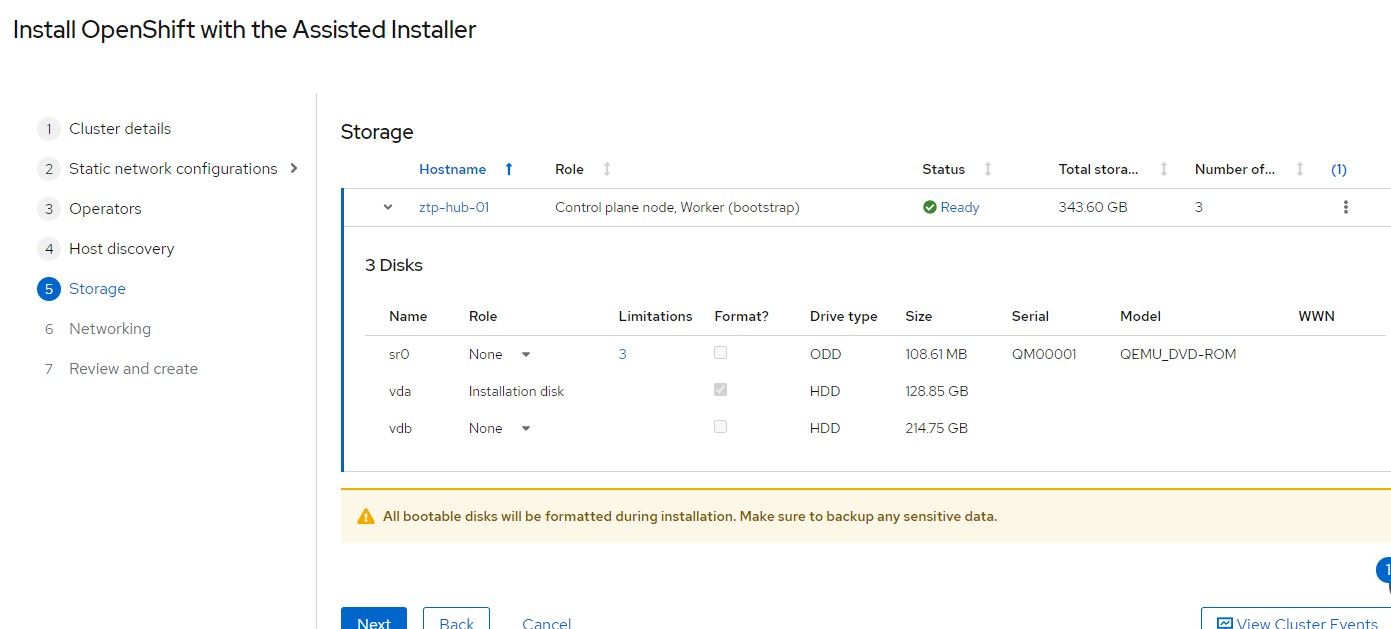
10. On the bottom of this screen, the disks that were detected are shown. /dev/vda is the installation disk and /dev/vdb will be used Logical Volume Manager/TopoLVM.
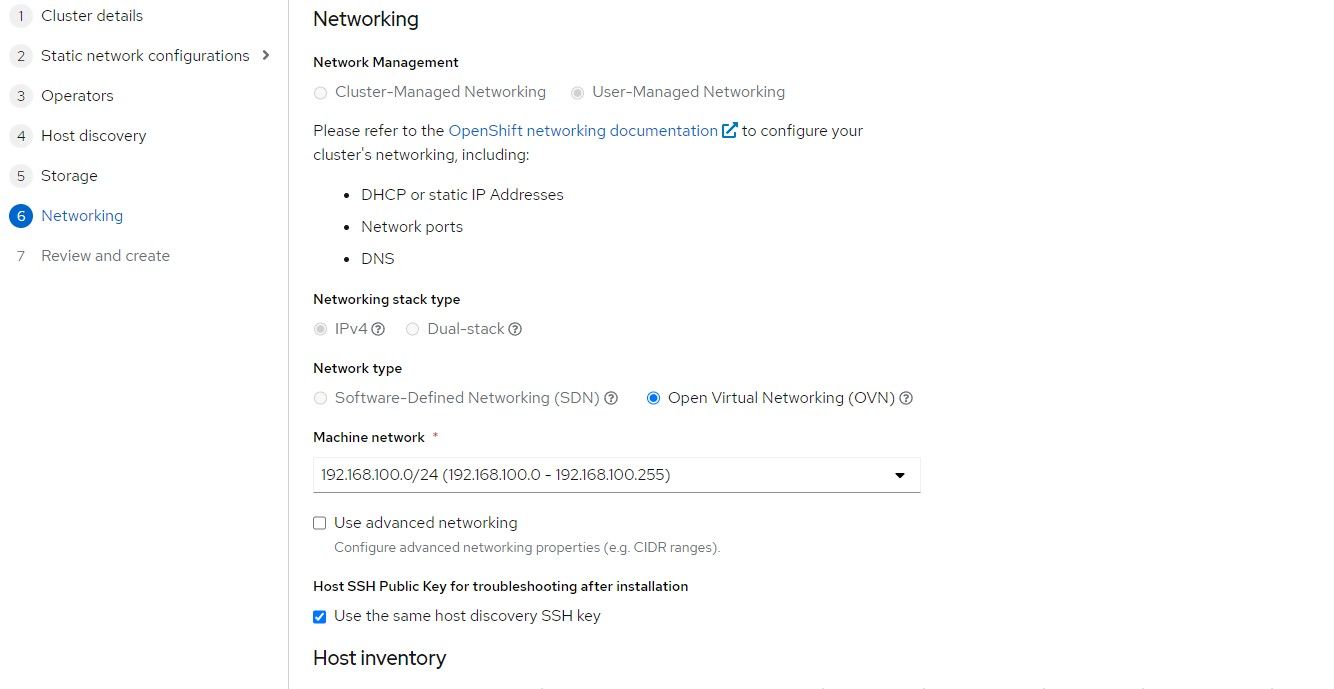
11. The default settings on the next screen will be sufficient.
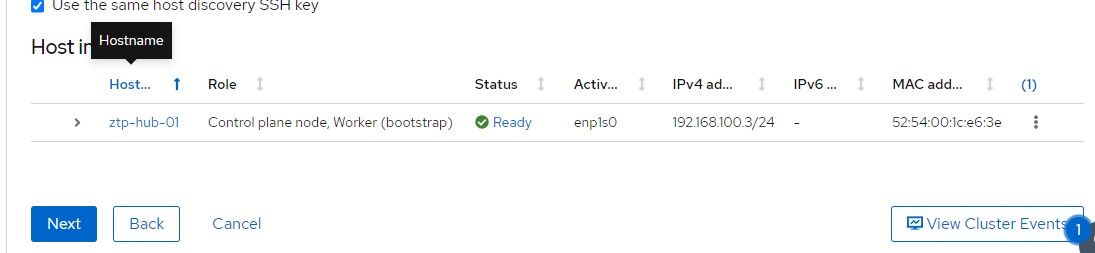
12. Once the host shows "Ready" status, the "Next" button can be clicked.
13. The last screen can be used to confirm everything. If it looks ok, click "Install Cluster"

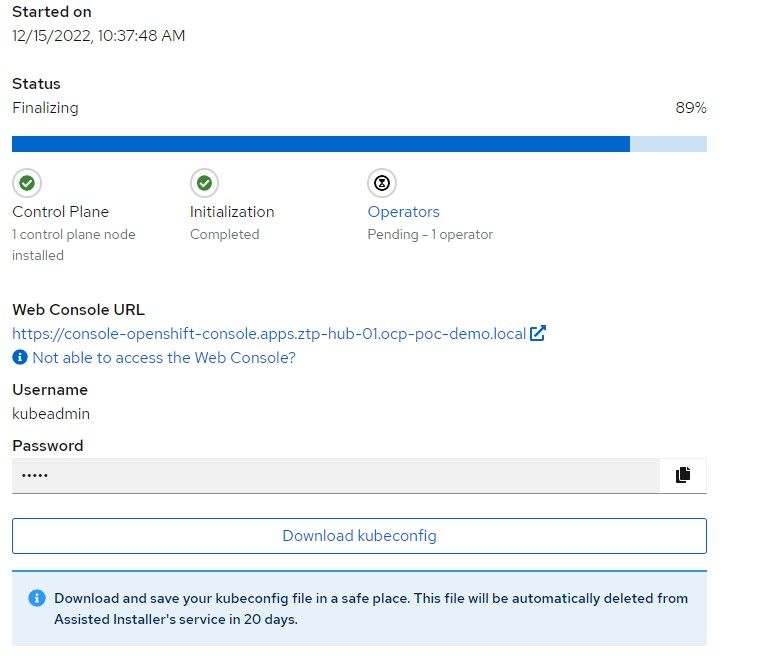
14. The install should start and a progress will show within a few minutes.
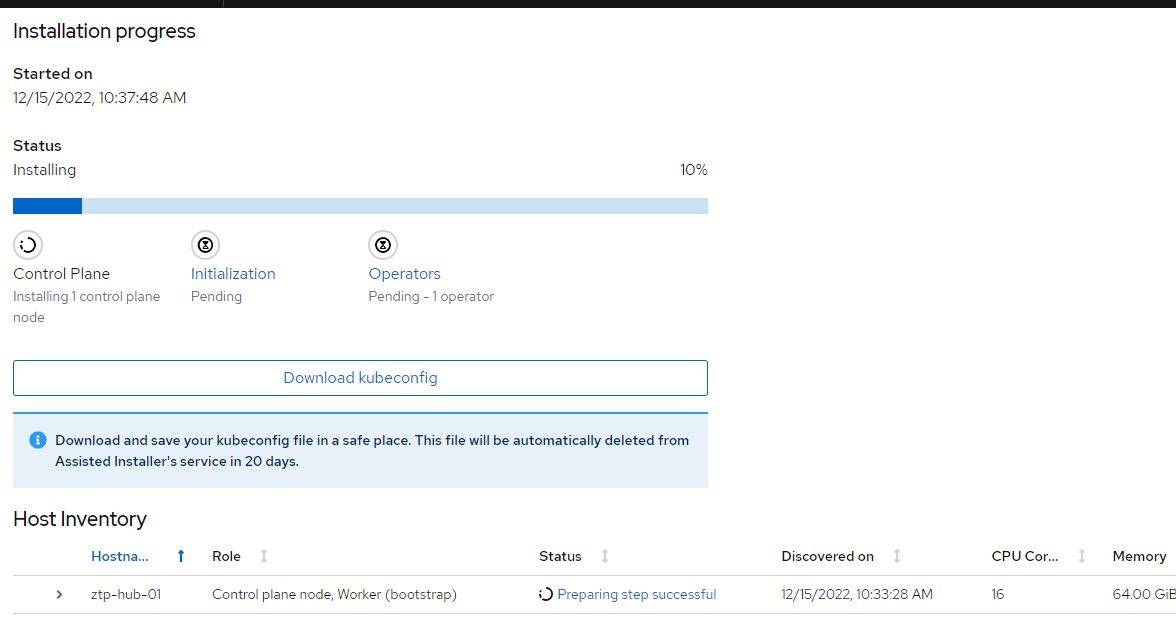
15. When the cluster is almost finished building, the kubeadmin password (used int the console) will be provided along with the kubeconfig. Save the kubeconfig file and make a backup.
Installing ACM on Hub Cluster
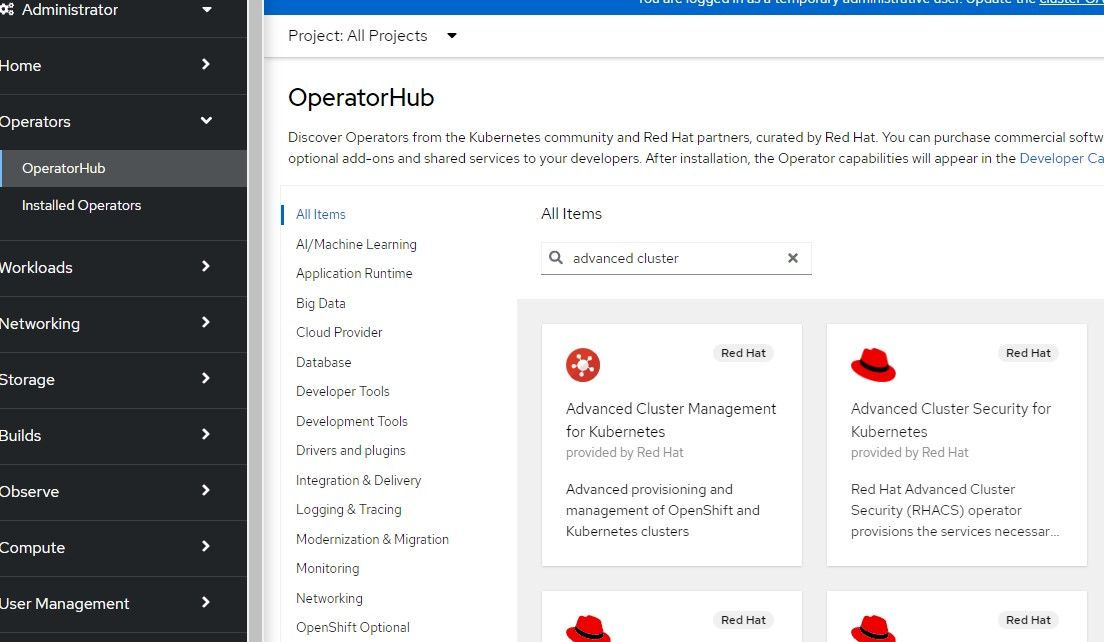
- On the Openshift Web Console, go to Operators --> OperatorHub and search for "Advanced Cluster". The first link will be the Advanced Cluster Management for Kubernetes Operator. Click on that.
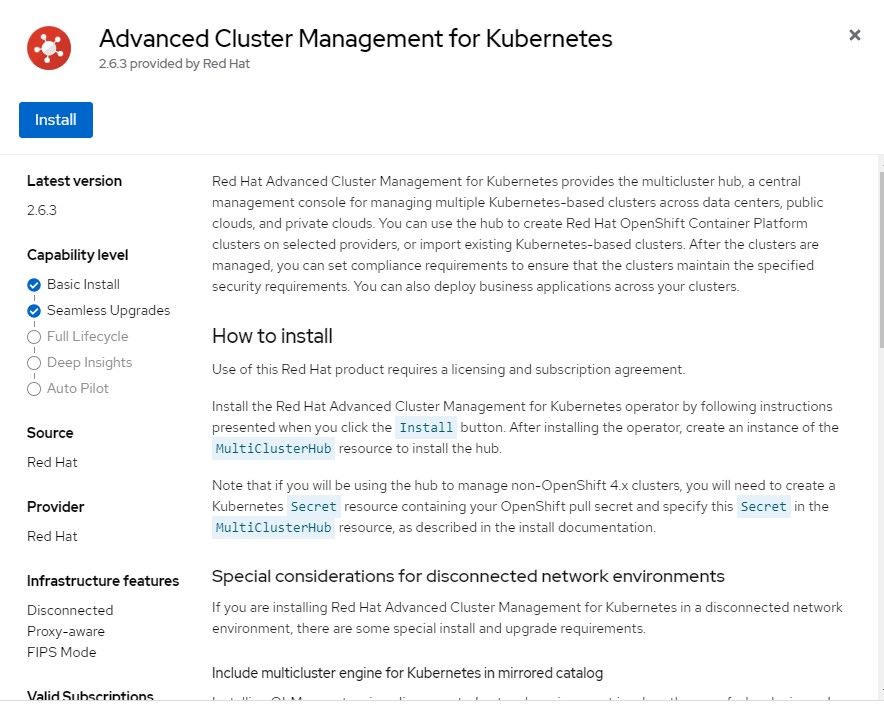
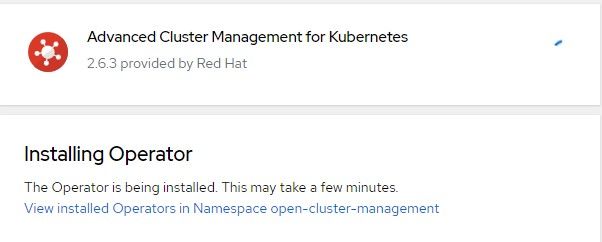
2. The default settings can be applied which will instal version 2.6.3 (at time of this writing).
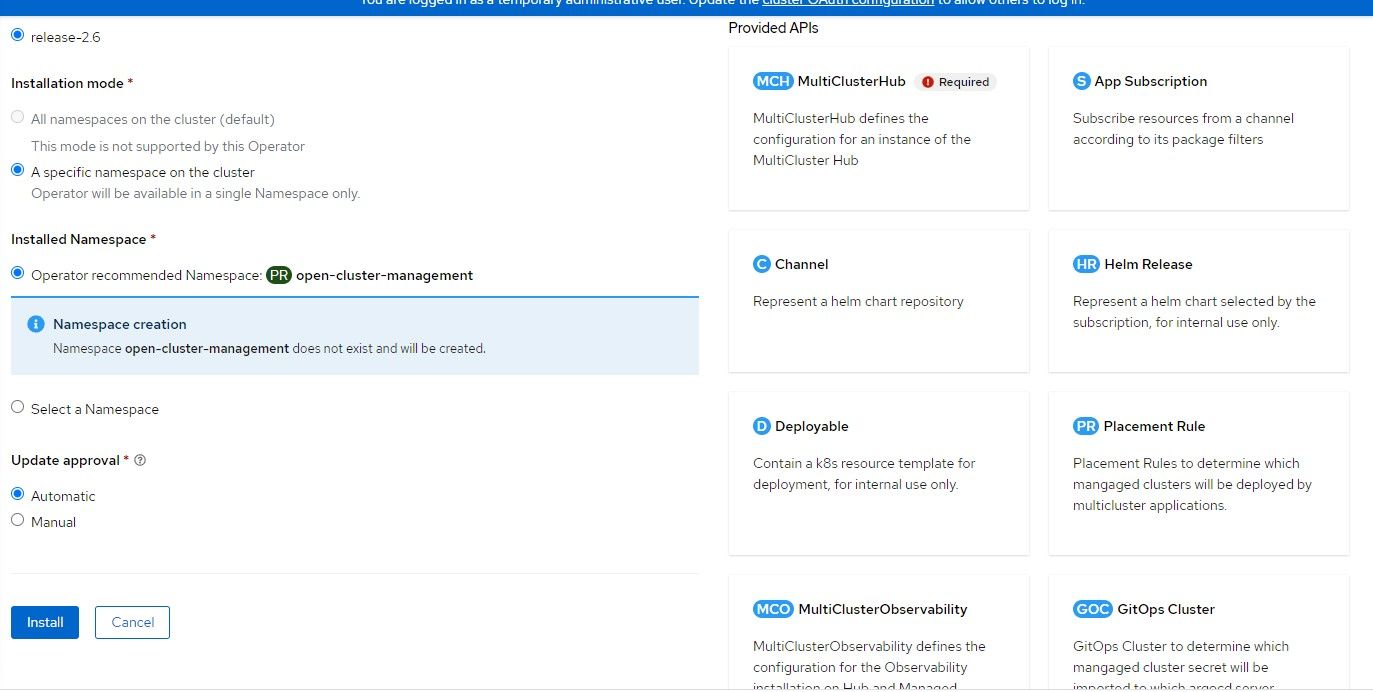
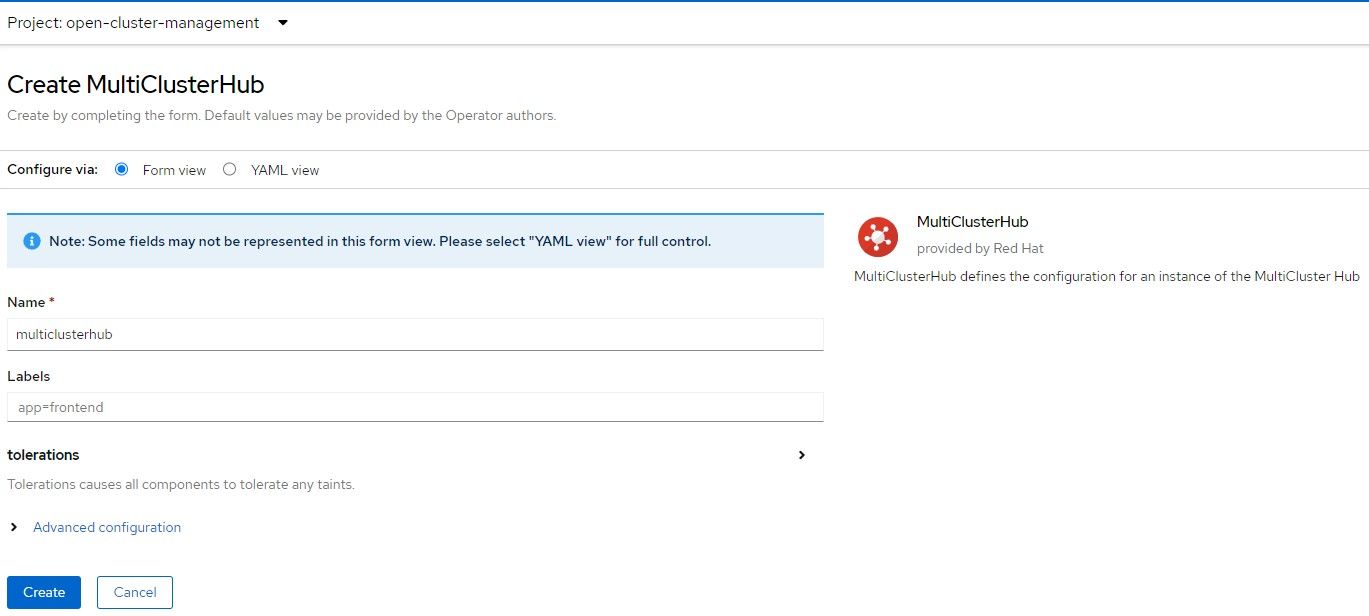
3. After the operator install shows as completed, an option will appear to implement the MultiClusterHub. Click on that box.
4. Accept the default settings for MultiClusterHub
5. The MultiClusterHub will progress from installing status to completed/finished.
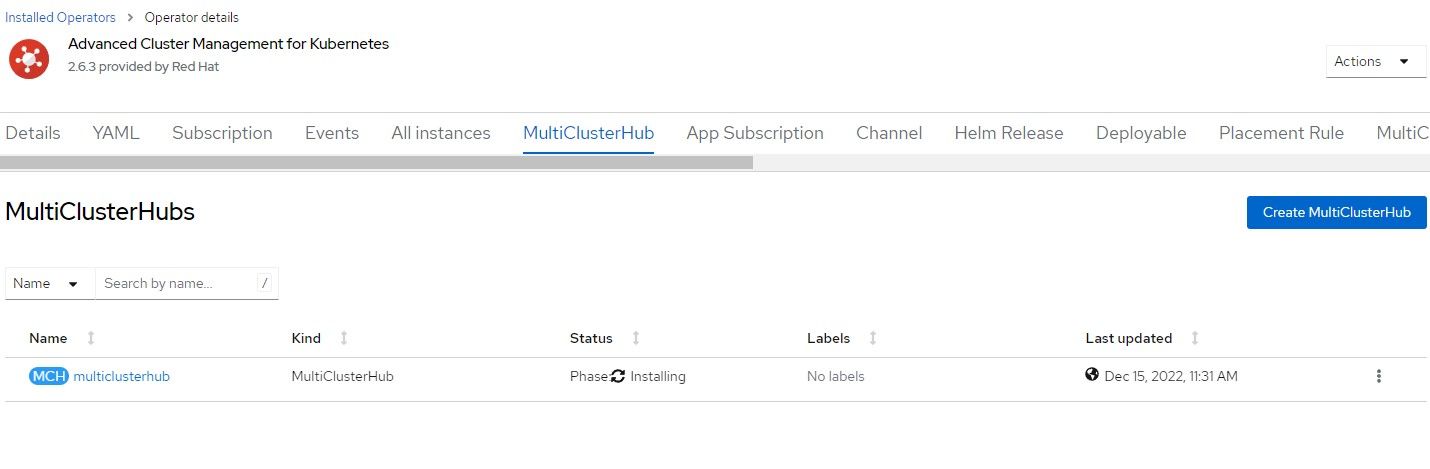
6. Once that object is created, the MultiClusterHub route will be created at multicloud-console.apps.<clustername>.<domainname>. We will visit this again later.
Configuring Provisioning Resources
The GitHub site I mentioned previously will be used from this point on.
Once ACM and the MultiClusterHub are installed, you will want to go to the command line to run some "OC" commands.
- Set your environment variable called KUBECONFIG to point to kubeconfig file that was downloaded earlier.
export KUBECONFIG=<absolute path to kubeconfig>2. Download the OC client if you don't already have it.
3. Clone the GitRepo if you wish.
4. Patch the Hive operator.
oc patch hiveconfig hive --type merge -p '{"spec":{"targetNamespace":"hive","logLevel":"debug","featureGates":{"custom":{"enabled":["AlphaAgentInstallStrategy"]},"featureSet":"Custom"}}}'5. Apply the following provisioning resource (named 00-provsioning.yaml)
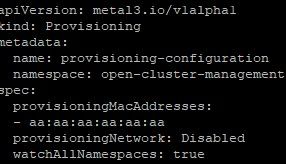
oc apply -f 00-provisioning.yaml
6. To make sure this provisioning resource was created properly, check the openshift-machine-api namespace to see if there are 3 new (metal) pods.
oc project openshift-machine-api
oc get po
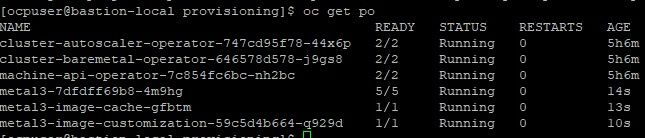
In this output, there are 3 metal pods that were created within the last 15 seconds or so.
7. Now apply the assisted-service configuration as provided in 01-assisted-service-config.yaml
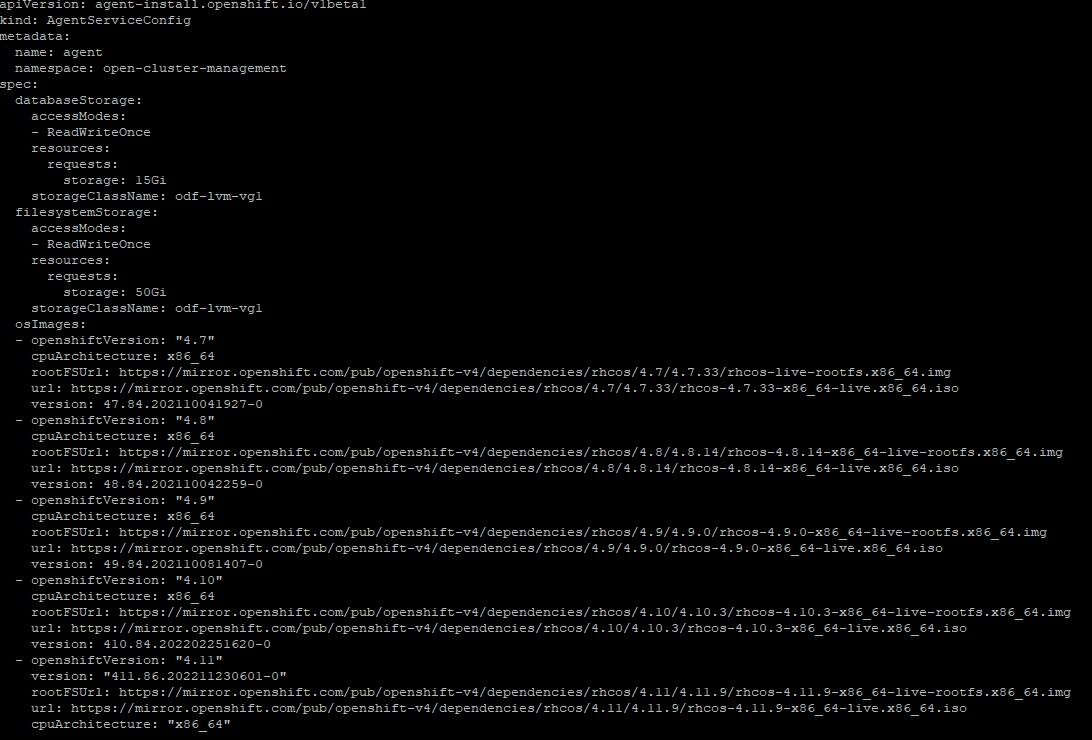
oc apply -f 01-assisted-service-config.yaml

8. Check the "multicluster-engine" namespace for 4 new pods
oc project multicluster-engine
oc get po
The pods associated with the assisted-service and assisted-image service are either started or in the process of starting so this is a good sign.
9. Create the assisted-service configmap which turns more verbose logging on.
oc create -f assisted-service-cm.yamlEnabling RedFish/SushyTools on Libvirt Hypervisor
I followed another article by Brandon Josza for this. I won't explain the steps in detail since Brandon already explains.

- On the Hypervisor, run the following commands. Some of these packages/services will already be installed but it is ok to make sure.
sudo dnf install bind-utils libguestfs-tools cloud-init -yy
sudo dnf module install virt -yy
sudo dnf install virt-install -yy
sudo systemctl enable libvirtd --now
2. Install podman
sudo dnf install podman -yy
3. The Sushy container will mount the /etc/sushy directory to the same directory so we will create this configuration.
sudo mkdir -p /etc/sushy/
cat << "EOF" | sudo tee /etc/sushy/sushy-emulator.conf
SUSHY_EMULATOR_LISTEN_IP = u'0.0.0.0'
SUSHY_EMULATOR_LISTEN_PORT = 8000
SUSHY_EMULATOR_SSL_CERT = None
SUSHY_EMULATOR_SSL_KEY = None
SUSHY_EMULATOR_OS_CLOUD = None
SUSHY_EMULATOR_LIBVIRT_URI = u'qemu:///system'
SUSHY_EMULATOR_IGNORE_BOOT_DEVICE = True
SUSHY_EMULATOR_BOOT_LOADER_MAP = {
    u'UEFI': {
        u'x86_64': u'/usr/share/OVMF/OVMF_CODE.secboot.fd'
    },
    u'Legacy': {
        u'x86_64': None
    }
}
EOF
4. Now, let's start the SushyTools container
export SUSHY_TOOLS_IMAGE=${SUSHY_TOOLS_IMAGE:-"quay.io/metal3-io/sushy-tools"}
sudo podman create --net host --privileged --name sushy-emulator -v "/etc/sushy":/etc/sushy -v "/var/run/libvirt":/var/run/libvirt "${SUSHY_TOOLS_IMAGE}" sushy-emulator -i :: -p 8000 --config /etc/sushy/sushy-emulator.conf
5. Open up port 8000 on firewall if you are running it.
firewall-cmd --add-port=8000/tcp --permanent
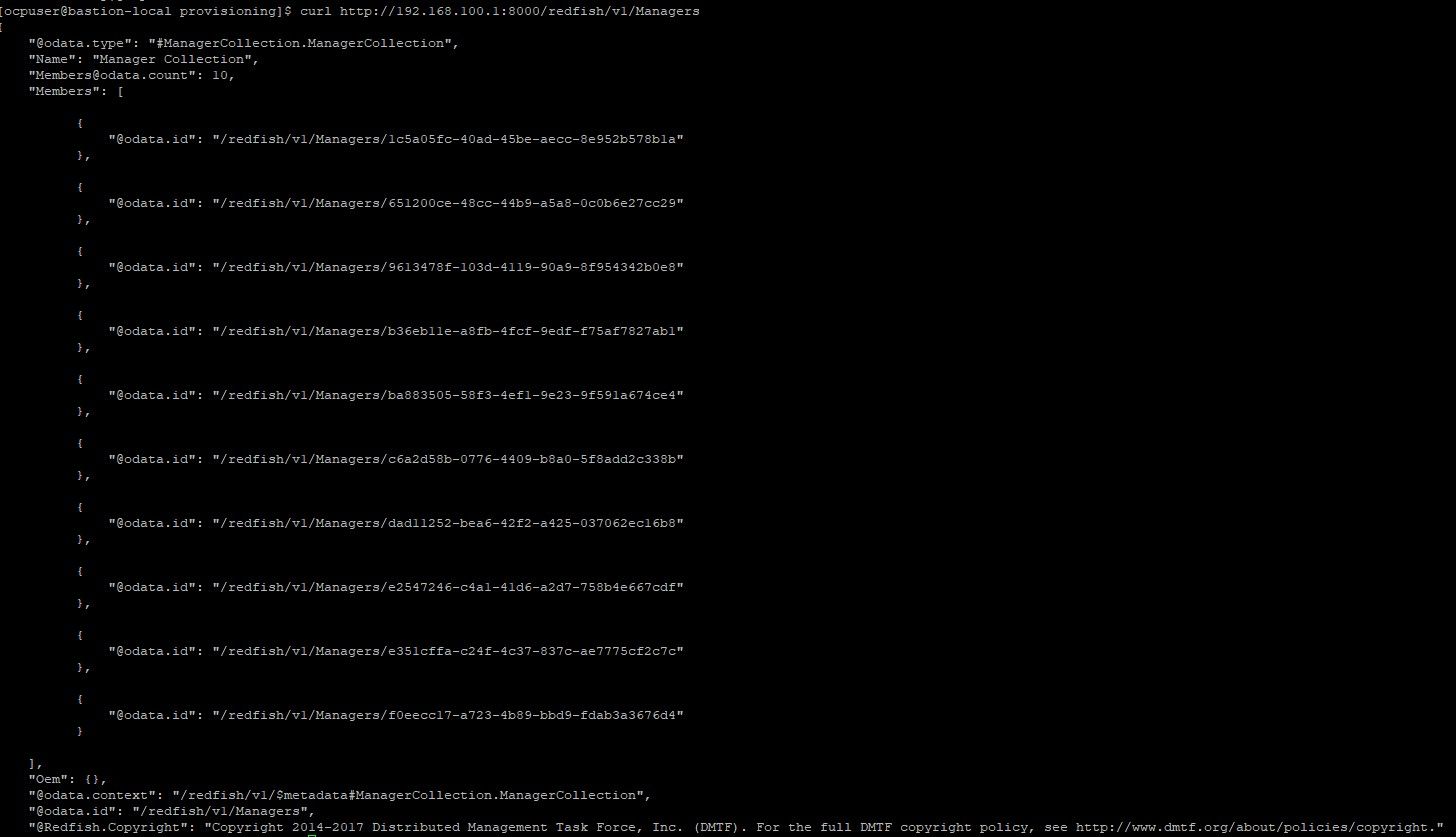
firewall-cmd --reload6. Run a curl command against the following endpoint to ensure your VMs can be discovered. Replace the IP with your appropriate Hypervisor IP.
curl http://192.168.100.1:8000/redfish/v1/ManagersHere is some sample output
7. To find the VM that is associated with ztp-spoke-01 (in my environment), open up Virt-Manager
Take note of the UUID which is e2547246-c4a1-41d6-a2d7-758b4e667cdf
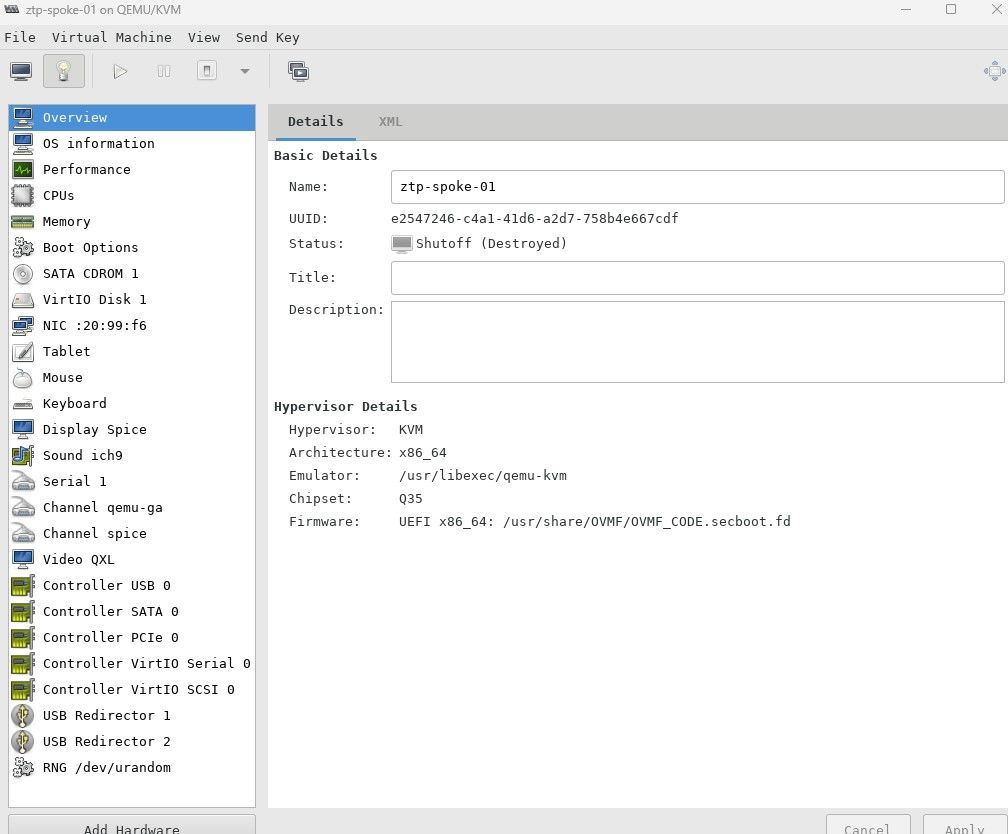
8. In the BareMetal host definition that will be configured in a little bit, this UUID will be used. We can curl this VMs properties by issuing the following command:
curl http://192.168.100.1:8000/redfish/v1/Systems/e2547246-c4a1-41d6-a2d7-758b4e667cdf
The name matches the VM that was created for ztp-spoke-01.
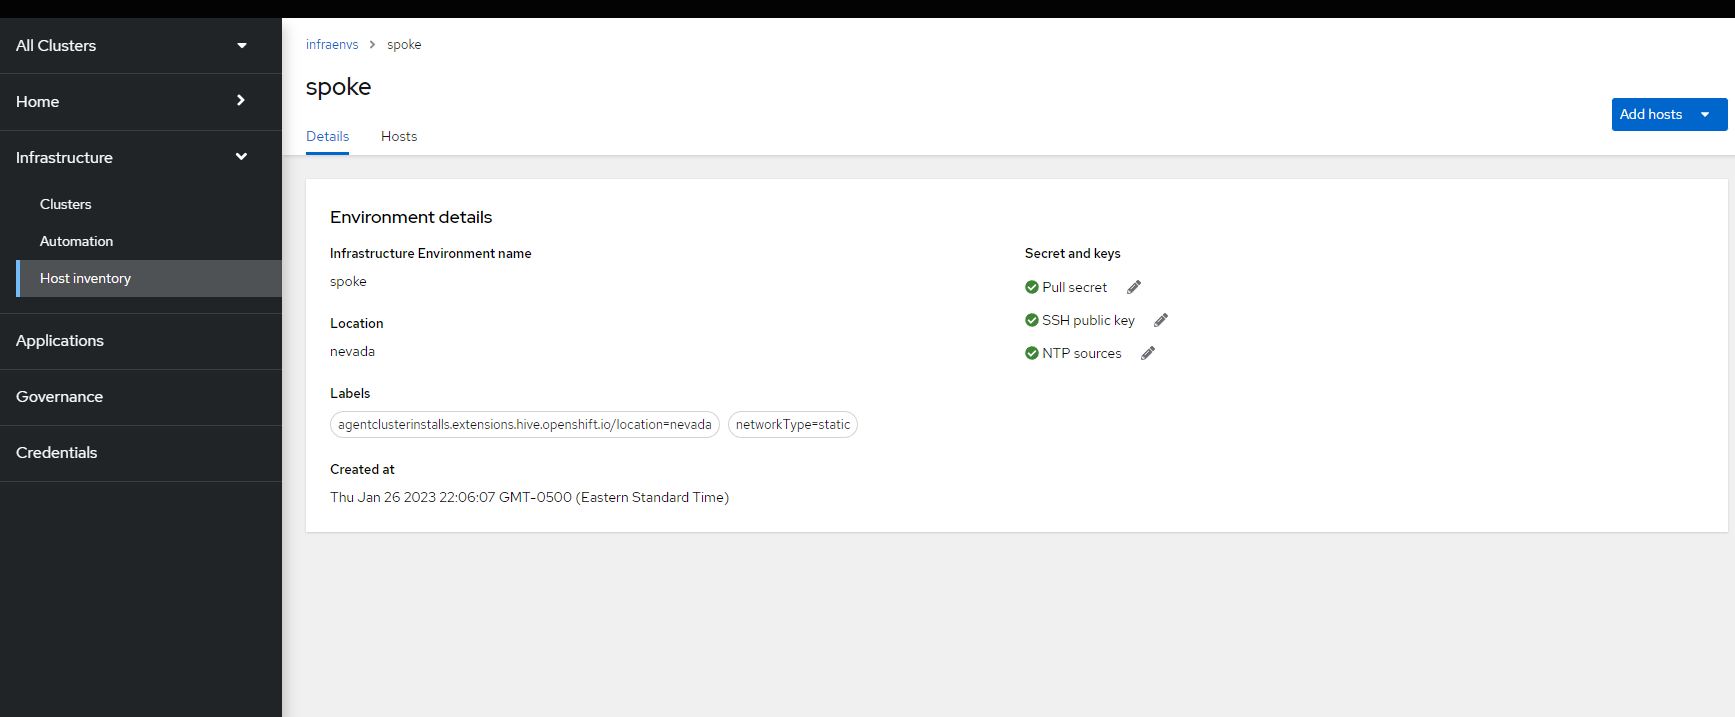
Creating Infrastructure Environment and Bare-Metal Host for Spoke Cluster
Some of the screenshots and steps I have above reference a different environment than I currently have setup. A different UUID for the virtual machine may be used here but everything else is the same.
Here are the steps
- Go to ACM GUI and select "Infrastructure --> Host Inventory"
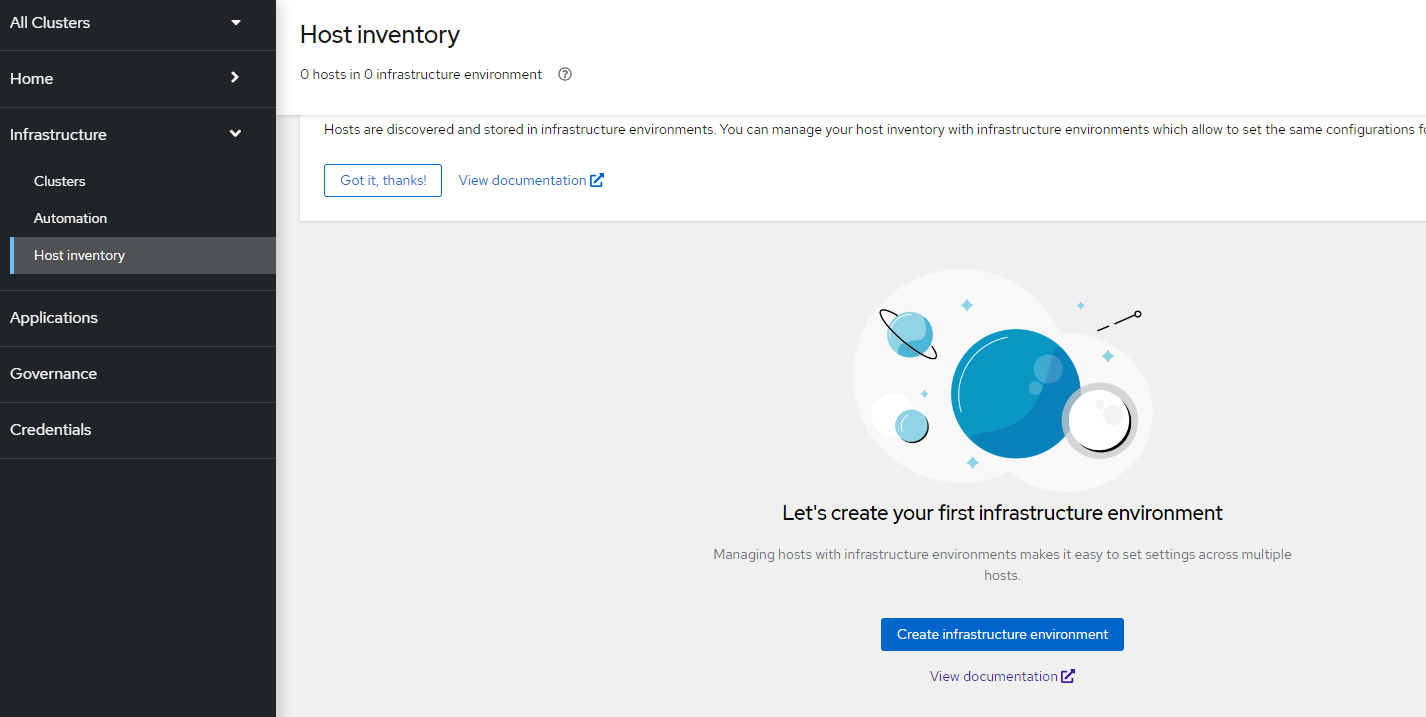
2. Click on "Create Infrastructure Environment"
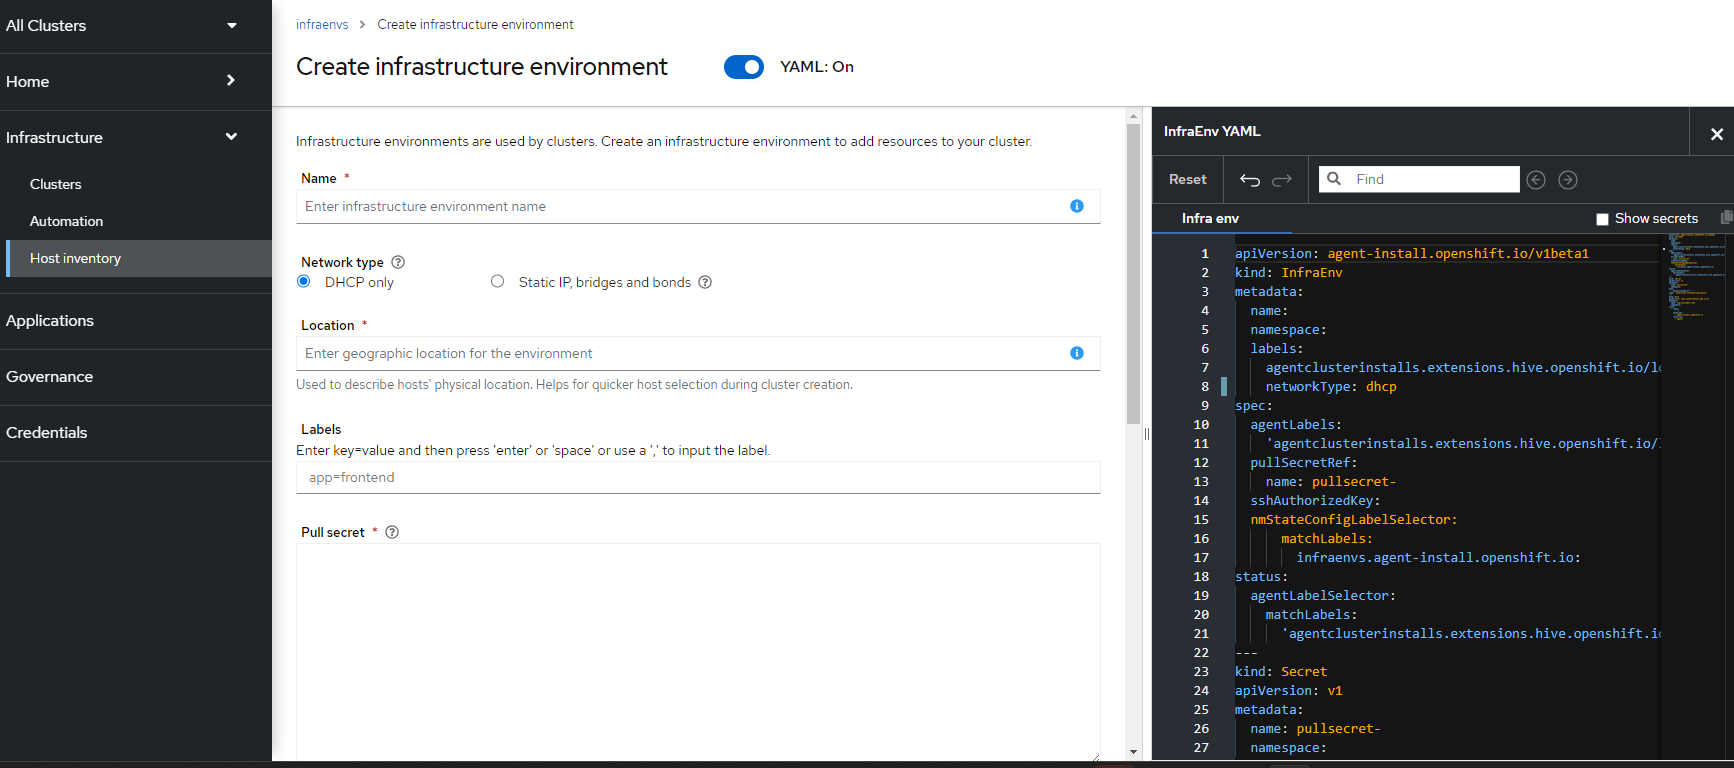
3. On this screen, you will be able to assign a name to the infrastructure environment. In this case, I like to either use a datacenter-name, location, or potential name of the cluster that will be formed from the bare-metal resources that will be created.
If you enable the YAML view, you can see the associated YAML object definitions on the right-side of the screen. This adjusts automatically as you fill-out the forms in the wizard. Notice that we see the infraenv and pull secret starting to be defined.
Name: ztp-spoke
Network Type determines if the environment has a DHCP server or if you would like to configure static IP addresses, custom DNS, routes, etc. If using Static, a NMState file will need to be used to configure the NIC settings on the bare-metal hosts in this environment.
Location can be a datacenter, city, state, etc
Labels are any labels you want to apply to this resource
Pull secret is obtained from https://console.redhat.com/openshift/install/pull-secret
SSH public key is the id_rsa.pub file from a jump/bastion server (most likely) in the same datacenter or location as this infrastructure.
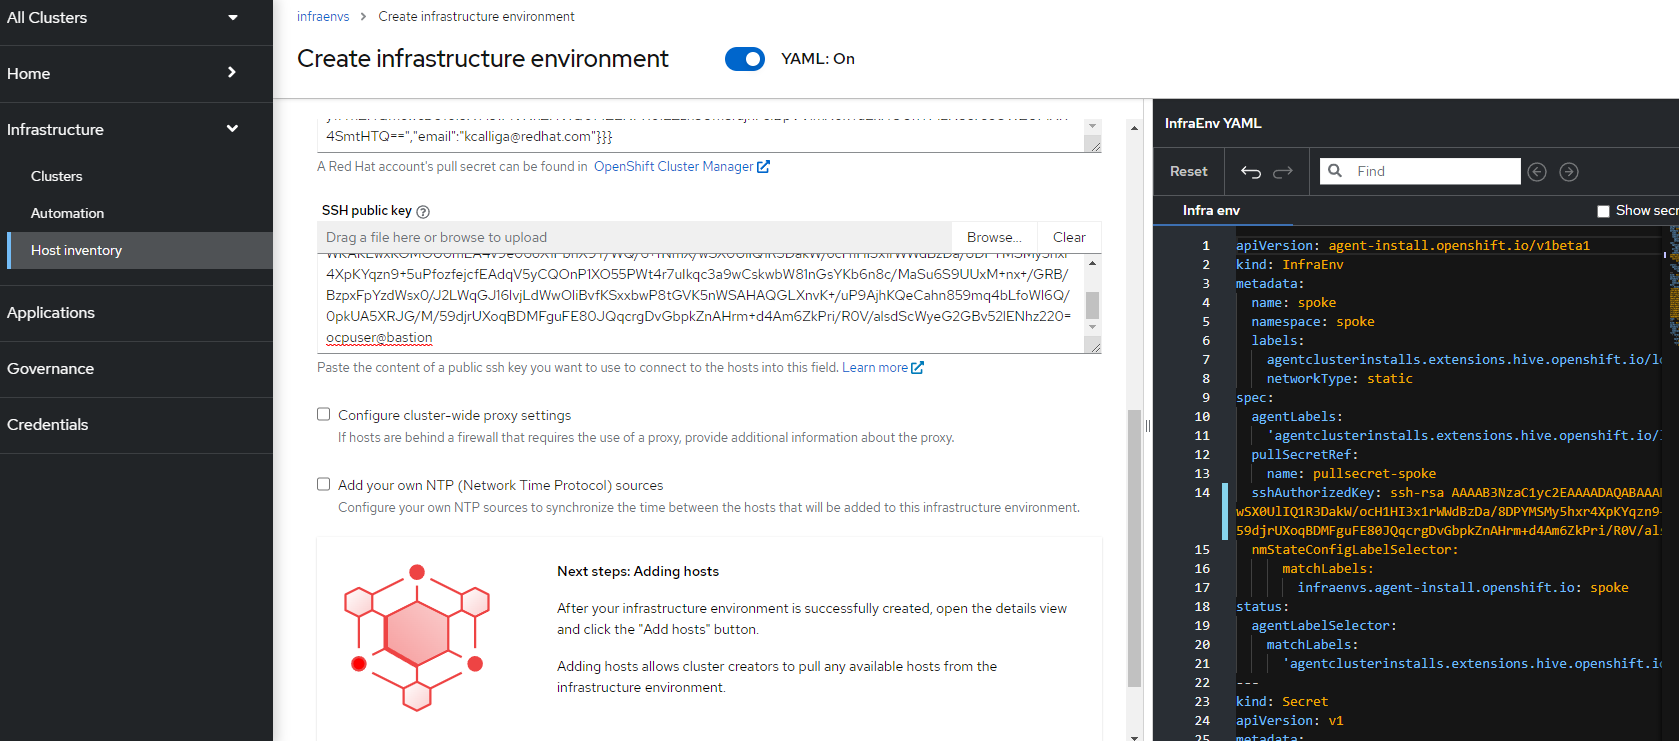
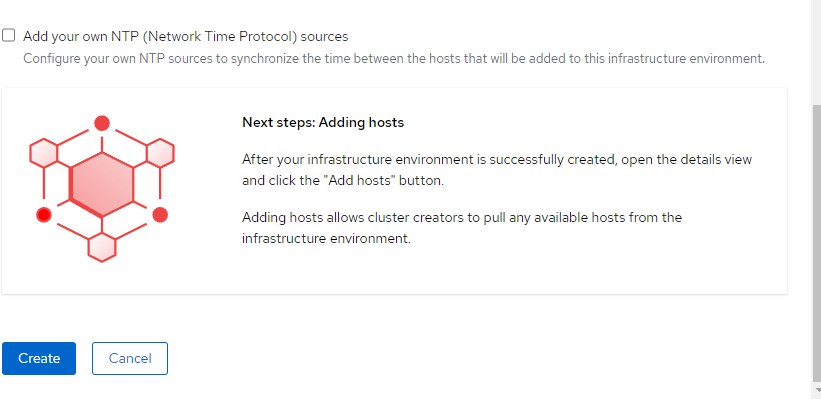
4. There are no cluster-wide proxies or NTP servers in this environment, so I can just click on "Create"
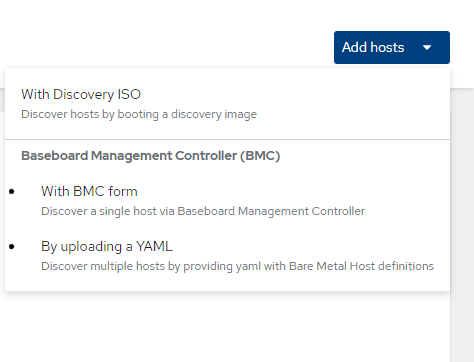
5. On the resulting screen, click on "Add Host"
6. A pop-up will show allowing you to select either to discover this host with discovery ISO (similar to cloud-based assisted installer) or use the BMC controller. We will select "BMC Form"
7. On the following screen, I will use the following values
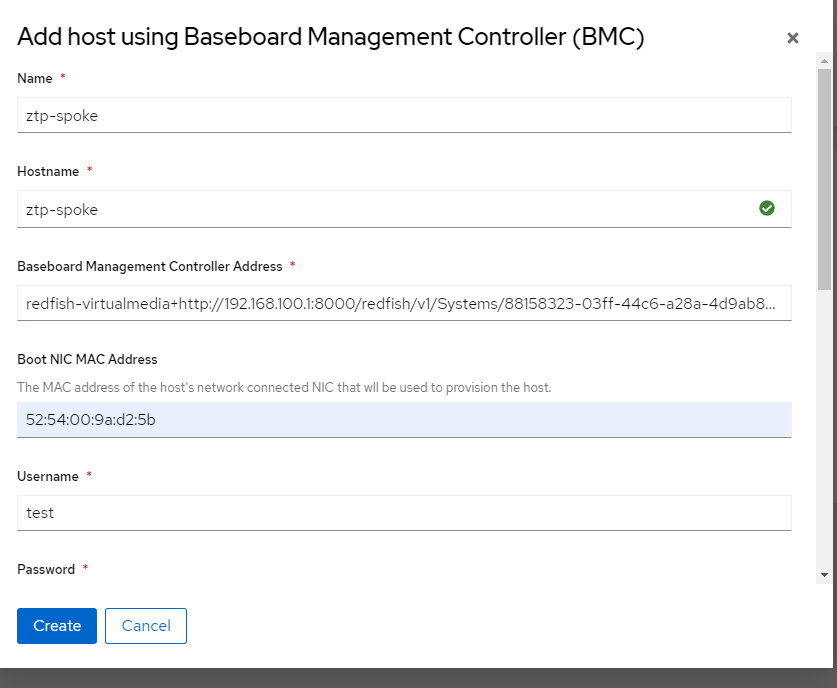
Name: ztp-spoke
Hostname: ztp-spoke
BMC Address: redfish-virtualmedia+http://192.168.100.1:8000/redfish/v1/Systems/88158323-03ff-44c6-a28a-4d9ab894fc6f
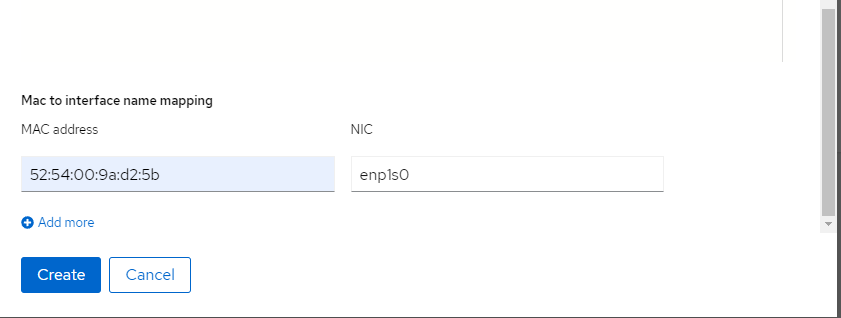
Boot NIC Mac Address: 52:54:00:9a:d2:5b
Username and password can be anything since Redfish/Sushy pod does not have authentication. This is ok for non-production environment
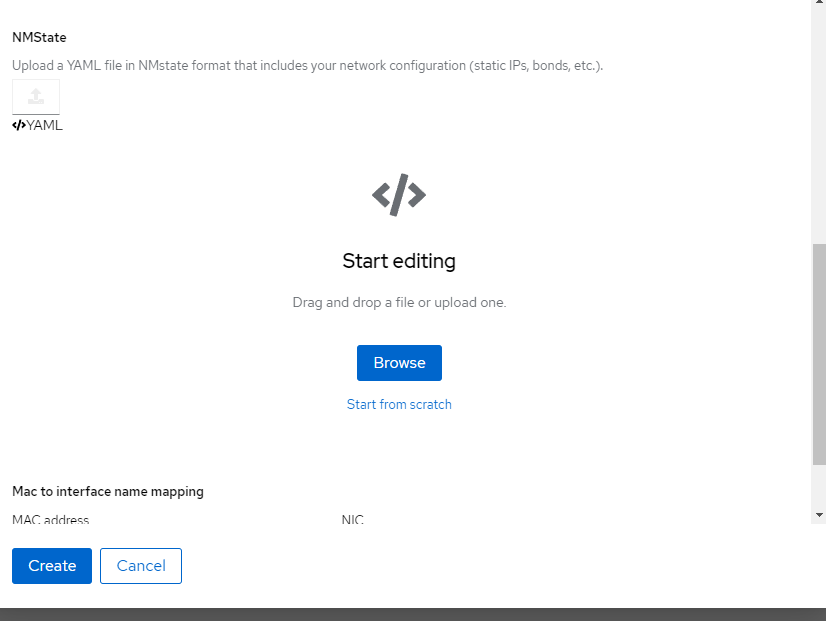
For NMState, I am going to "Start from Scratch" and use the following (I changed the IP addresses to be something different but you get the idea)
interfaces:
  - ipv4:
      address:
        - ip: 192.168.100.2
          prefix-length: 24
      dhcp: false
      enabled: true
    ipv6:
      address:
      - ip: 2605:fff9:1::3
        prefix-length: 64
      enabled: true
      auto-dns: true
      auto-gateway: true
      auto-routes: true
    name: enp1s0
    state: up
    type: ethernet
routes:
  config:
    - destination: 0.0.0.0/0
      next-hop-address: 192.168.100.1
      next-hop-interface: enp1s0
      table-id: 254
dns-resolver:
  config:
    search:
    - ocp-poc-demo.com
    server:
    - 192.168.100.1
Lastly, associate the mac address of the NIC with the enp1s0 interface defined in the above nmstate and click create
On the hosts screen, you should see the host registering and being discovered.
8. To monitor its progress, you can run some oc commands
This first command shows all bare-metal hosts on the cluster if you are unsure of which namespace it is in
oc get bmh -A
Based on the output above, the baremetalhost/bmh is in the ztp-spoke namespace and is called ztp-spoke. It says that it is "Available"
Let's get some more details
oc project ztp-spoke
oc describe bmh ztp-spoke
At the bottom of the output, we see that the following events have occurred. If there were any failures, messages may show up here.

9. Back on the Hosts screen in ACM (Infrastructure --> Host Inventory --> InfraEnv ztp-spoke --> Hosts", you can see more details on the discovered host

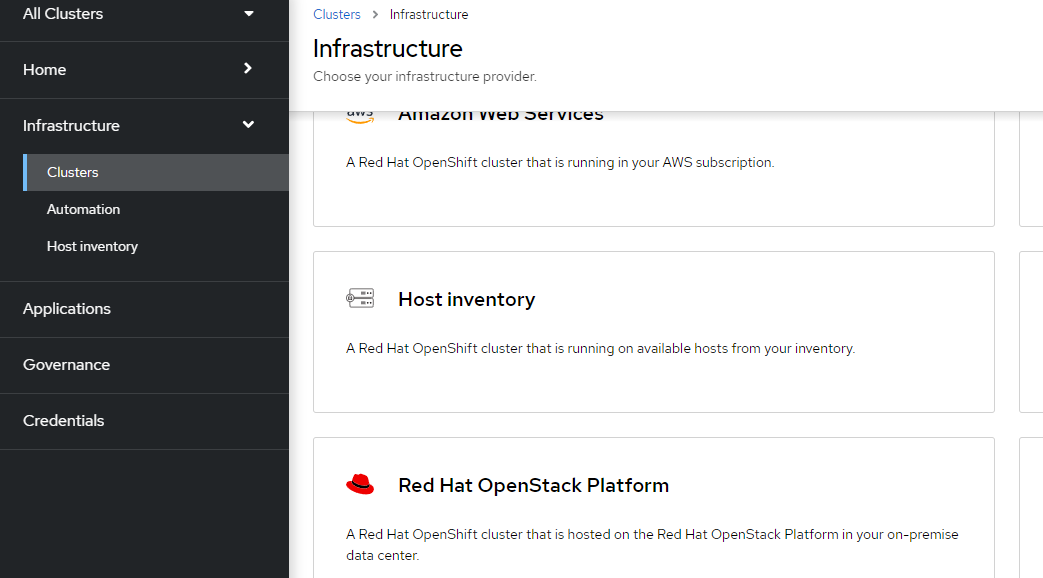
10. To create a cluster from this host, go to Infrastructure --> Clusters and click on "Create Cluster"
11. Choose "Host Inventory"
12. Choose "Standalone" which is the only option
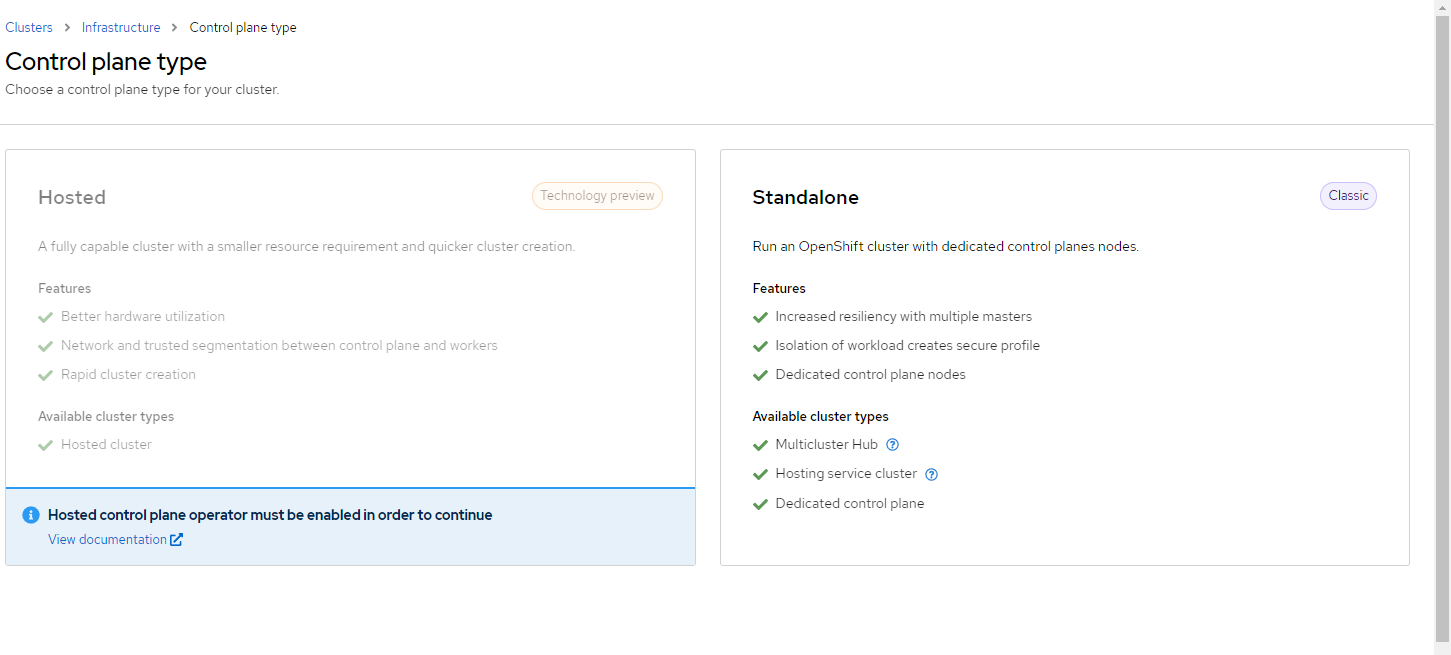
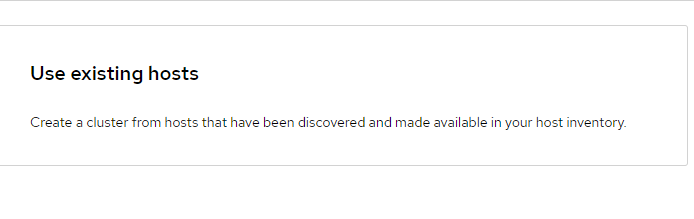
13. Choose "Use Existing Hosts"
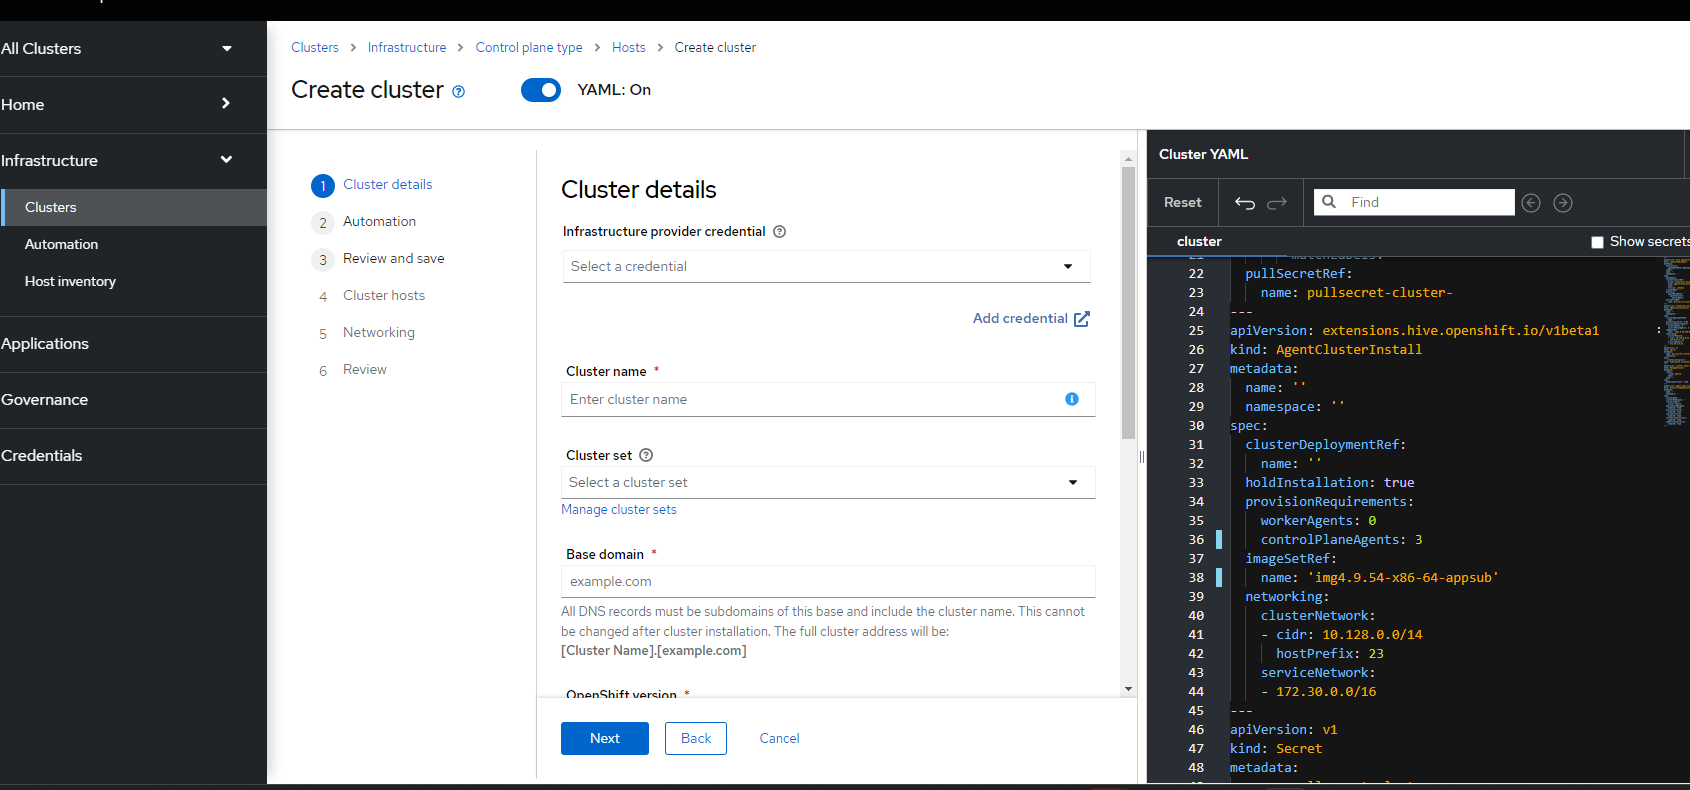
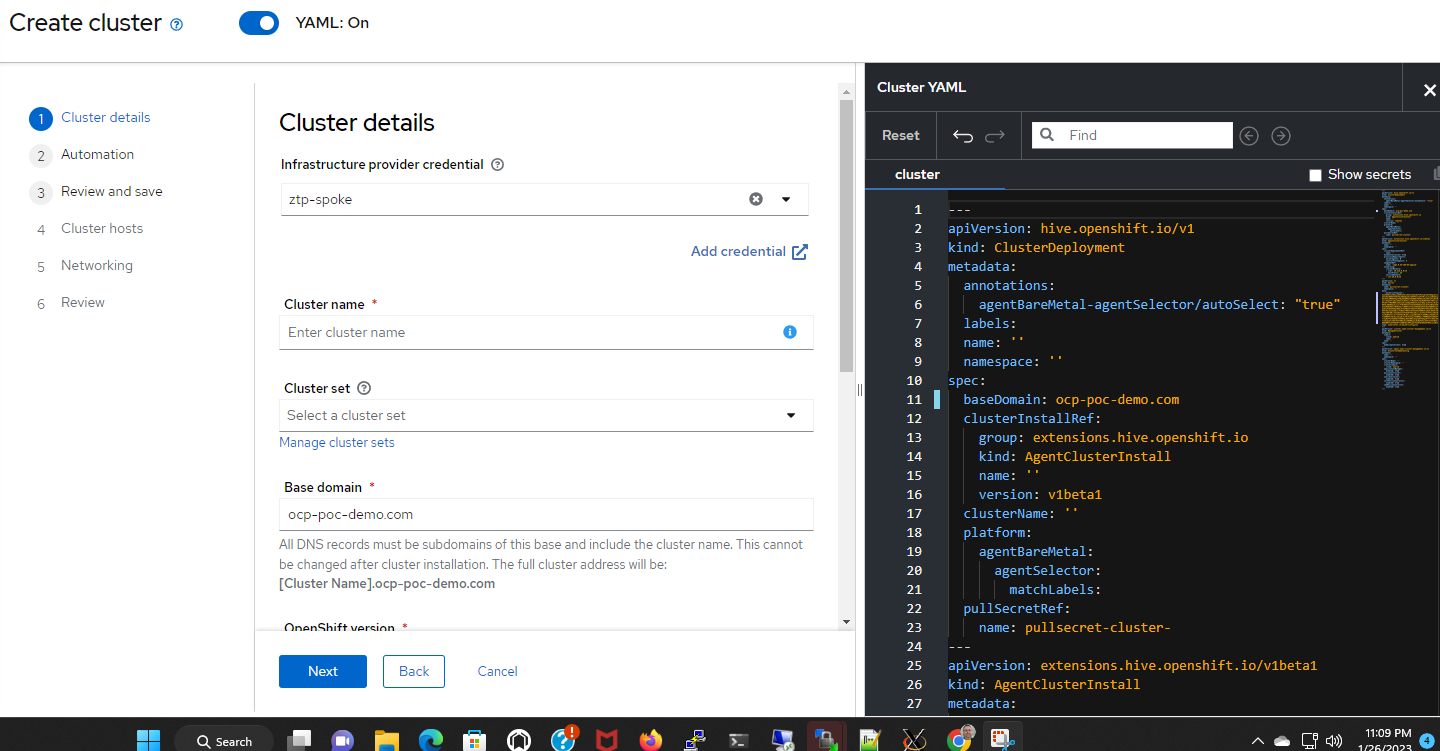
14. On the "Cluster Details" Screen, click "Add Credentials" if you have not already defined a credential.
15. This will bring up a screen to choose the type of credential. Pick "Host Inventory"
16. Fill out the following information (or to match your setup)

I called my credential ztp-spoke and also used the same namespace (ztp-spoke) that was used for the infraenv earlier. ocp-poc-demo.com is a domain that I own which is used for demo purposes.
Put in your pull secret and SSH key and then hit "Add" on the resulting screen.
17. On the original screen, choose the "ztp-spoke" credential that was just created. Notice that the base-domain changes to reference ocp-poc-demo.com (based on credential)
Here are some other values that were filled-in
ClusterName: spoke
ClusterSet: Default (this is a default group for managed clusters in ACM)
Openshift Version: 4.11.25
Install SNO: Checked
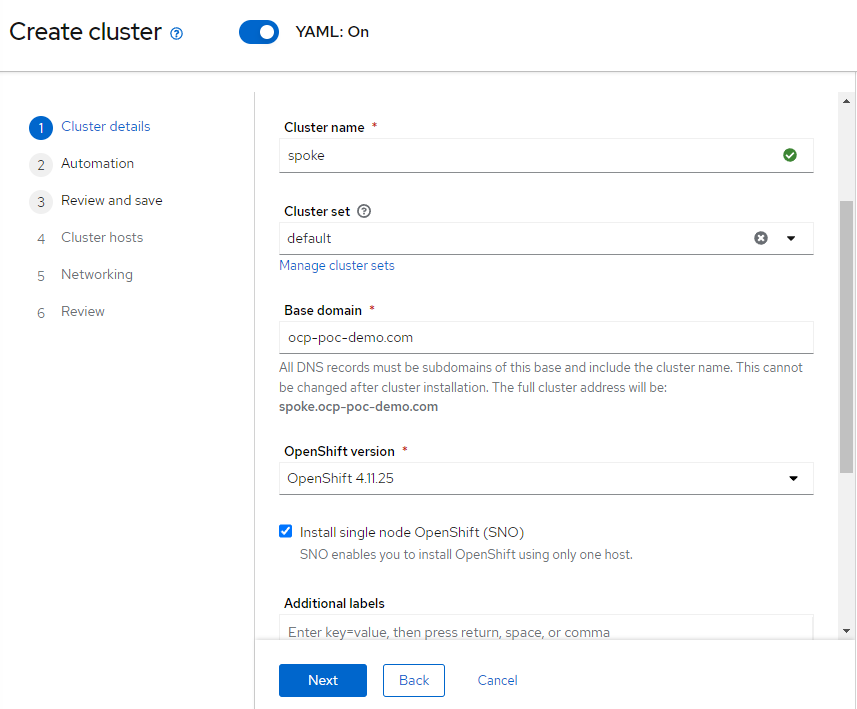
18. Hit "Next"
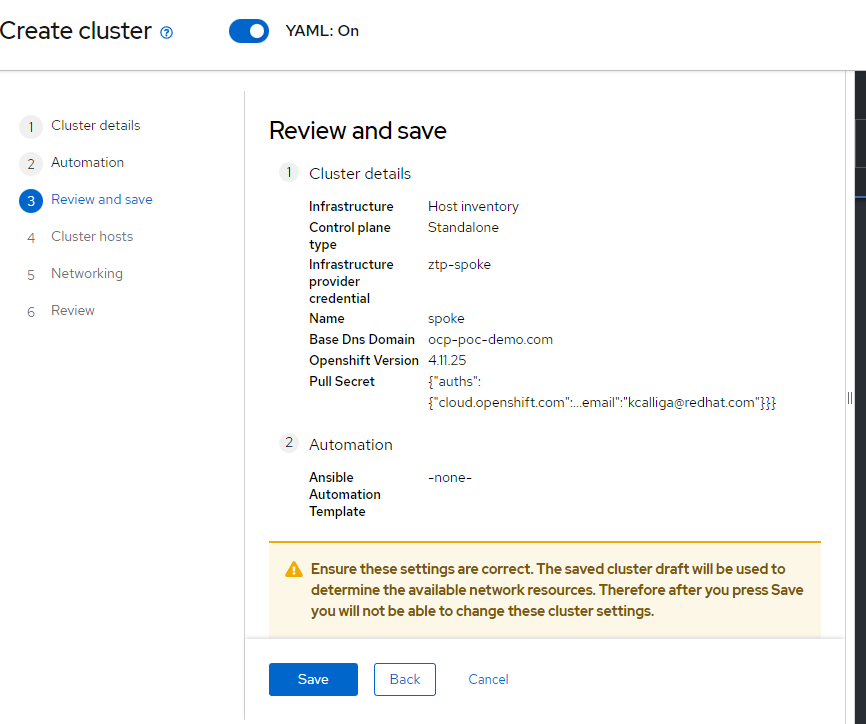
19. There is no Ansible automation, so hit "Next" again.
20. On the last screen, hit "Save"
21. Since only one Baremetal host exists in my environment, it is automatically selected
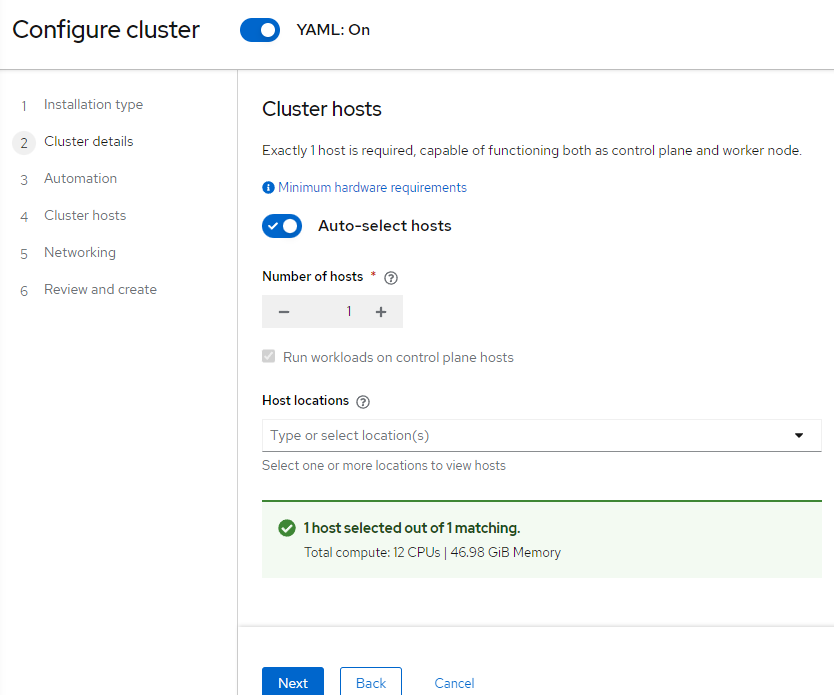
22. Hit "Next". This next part (binding host) may take a few minutes.
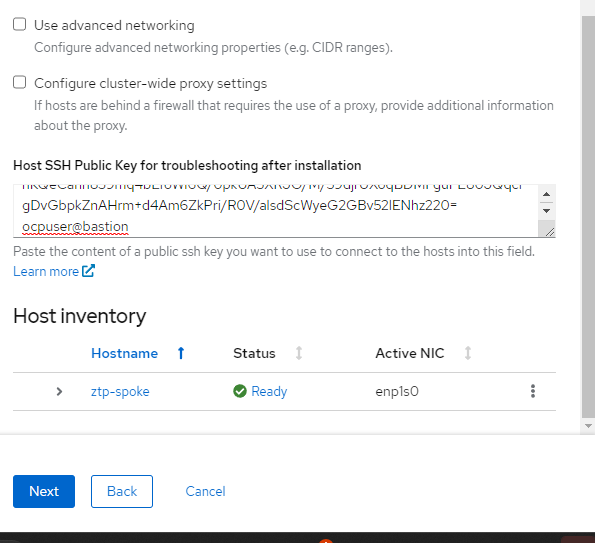
23. In the on-premise (ACM) assisted-service, I can only choose either IPv4 or IPV6. This is not a limitation in the cloud-based installer. The IPV4 address range should be the default
Put in your SSH key and hit "Next"
24. On the last screen, you are given the ability to review the cluster setup and start the install. I would also recommend copying/pasting the contents of the YAML definitions on the right-hand side of the screen. This will be useful for Gitops stuff later.
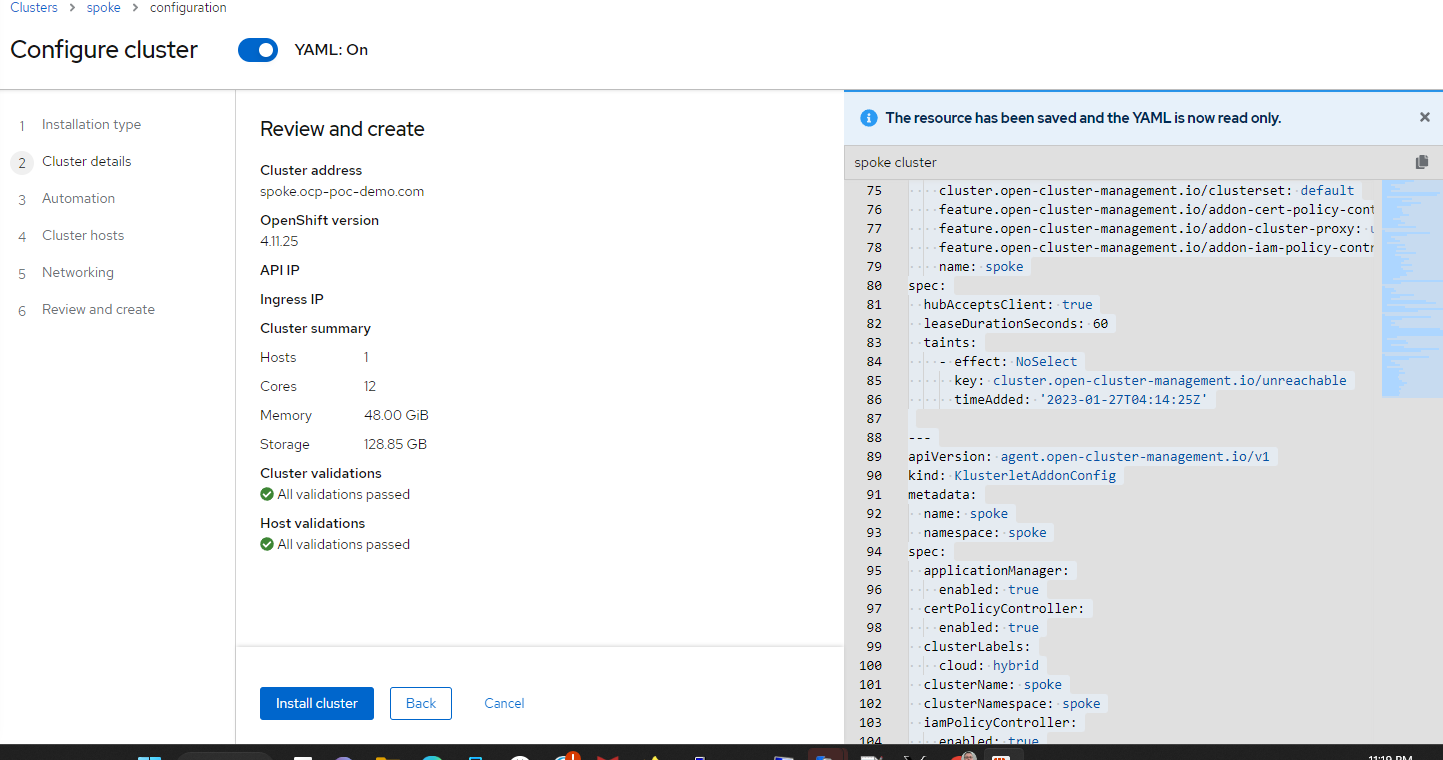
25. Click "Install Cluster"
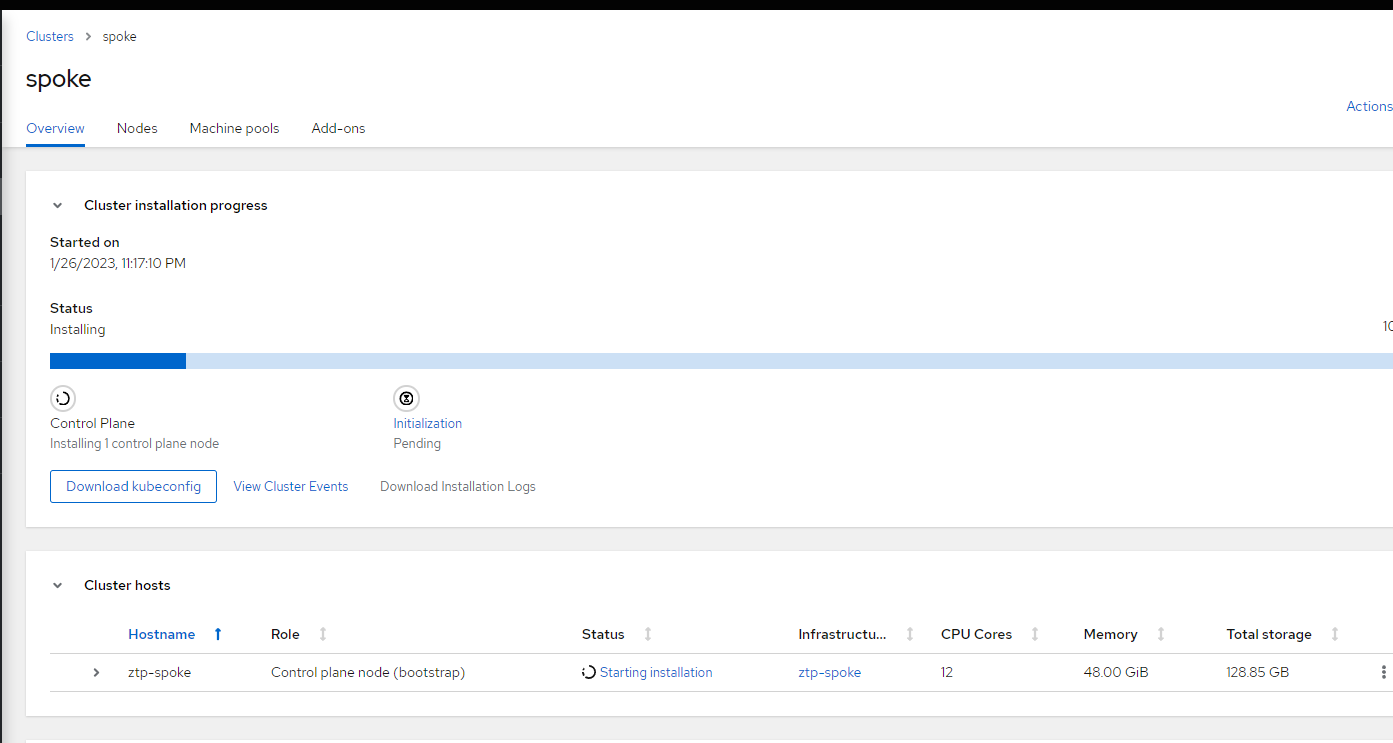
26. On the resulting screen, the cluster install should start and you can watch the progress. At this point, the view will be the same as what you see when doing a cloud-based Assisted install of OCP.
Thanks for reading the article. More to come.