
Custom Image Pull Requirements
The steps mentioned in this article have been tested with OCP 4.6
OCP meets many requirements in regards to being able to pull from additional registries. Typically a user (or group of users) will reside in the same project/namespace. In this project/namespace, an image-pull secret can be defined. However, in some environments, there is a need to have an external registry to be allowed globally.
The reason for this may be due to the cluster administrator not wanting each developer to configure this manually on each project he/she works on. Secondly, let’s assume that the cluster administrator uses one shared-account for the image registry and does not want to share this username/password directly with the users.
Let’s add another factor into this. The cert/ca-chain to the registry needs to be trusted by the cluster.
The Openshift documentation describes a few ways to perform these steps in different sections of the documentation. Some of the steps seem very similar but not exactly the same. In this article, I will share the most direct-way I know to get this working.
Here are some of the links to the documentation I was following. You will see (based on the various documents), that it can be a little confusing to know exactly which steps are relevant to what we are trying to accomplish. Some of the documentation (to me) appears to be different ways to accomplish the same steps (or maybe not):
1. https://docs.openshift.com/container-platform/4.6/openshift_images/managing_images/using-image-pull-secrets.html
This article is useful if you want to set up an image pull secret specific to a project (or group of projects) but not globally. There is mention at the end of this document on how to edit the global-pull secret. We will use a variation of this method.
2. https://docs.openshift.com/container-platform/4.6/registry/configuring-registry-operator.html#images-configuration-cas_configuring-registry-operator
This link should be useful for our purposes because it describes how to add a ca-chain to trust an external registry. This is important in closed environments that don’t use public/Internet certificate authorities.
3. https://docs.openshift.com/container-platform/4.7/cicd/builds/setting-up-trusted-ca.html
This documentation specifies that it is meant for builds. The CA chains added here get put in the /etc/docker.d/<registry>:<port>
4. https://docs.openshift.com/container-platform/4.6/networking/configuring-a-custom-pki.html#nw-proxy-configure-object_configuring-a-custom-pki
One article mentioned that it is recommended to enable the cluster-wide proxy to trust additional CAs eventhough a proxy may/may not be used.
5. https://docs.openshift.com/container-platform/4.6/openshift_images/image-configuration.html#images-configuration-insecure_image-configuration
This article was useful for troubleshooting purposes or if we want to bypass certificate authentication from the cluster-side. We used this if/when we had issues with certificate trust.
Finally, here are the steps I followed
Editing the Global Pull Secret
When updating the global pull secret, the existing OCP pull-secret needs to be used as a base. With this base information, a new registry can be appended.
1. To get the existing cluster pull-secret, run the following commands.
oc project openshift-config
oc edit secret pull-secret
In this pull-secret, there will be a base64 encoded string.
Grab everything after the .dockerconfigjson:
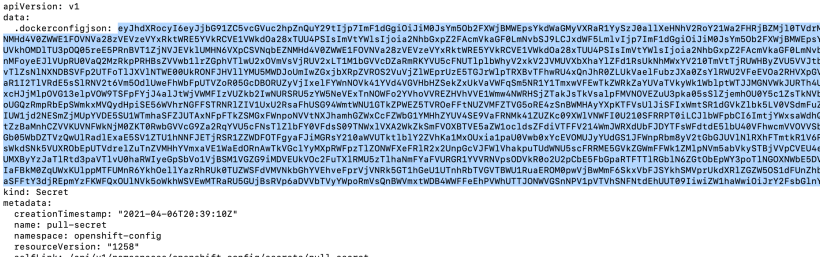
Copy this string to your buffer (CTRL-C)
2. Take this string and run the following command:
echo “<string>” | base64 -d > ocpconfig.json
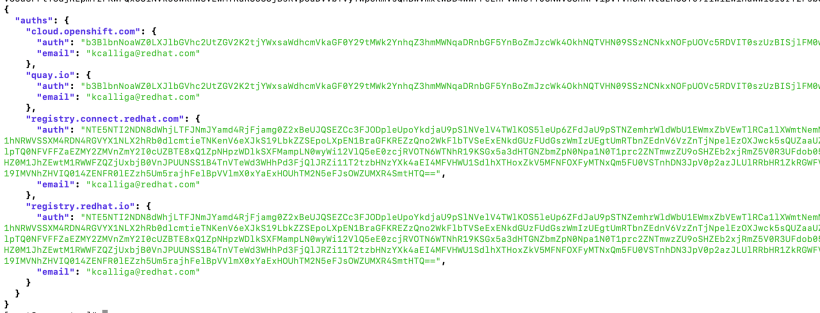
Now, convert this to an easier format (using jq)
cat ocpconfig.json | jq > ocpconfig.jq
Contents of ocpconfig.jq
3. From a server on your network with the docker client, login to the registry that will be added to OCP.
docker login <FQDNOFREGISTRY>
Provide your username/password credentials.
After a succesful login, the registry name and encrypted password will be stored on this host under the /root/.docker/config.json file
4. Grab the part of the file that contains the URL and encrypted auth credentials and put into your buffer (CTRL-C)

5. These contents will need to be inserted into the ocpconfig.jq file we saved earlier.
Follow the same formatting based on the other registry/auth entries.
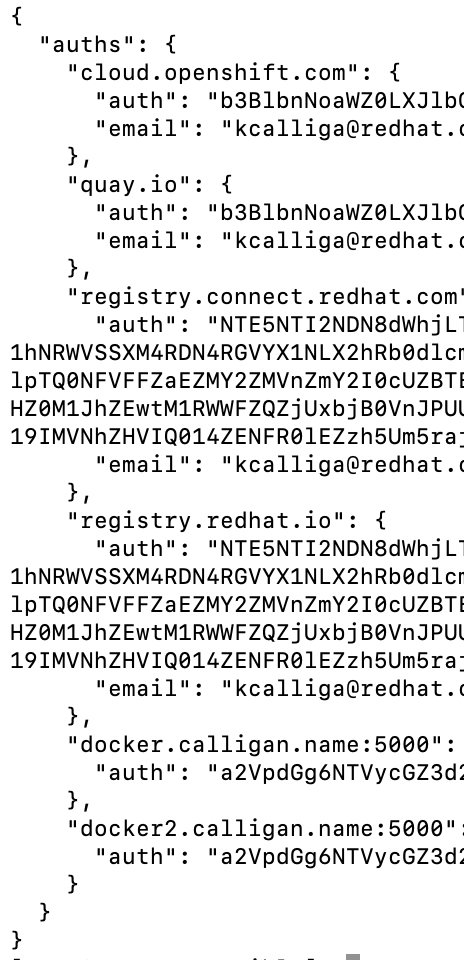
6. Now, verify that there are no spacing or syntax errors by running the following command:
cat ocpconfig.jq|jq
7. If the jq structure of the file is ok, it is now safe to run the following command:
oc set data secret/pull-secret -n openshift-config –from-file=.dockerconfigjson=ocpconfig.jq
After this command is run, all of the master and worker nodes will reboot (one at a time)
Importing the CA Chain (or self-signed cert) of Registry
Our work isn’t done yet. We now need to make sure the cluster trusts the cert-chain of the registry.
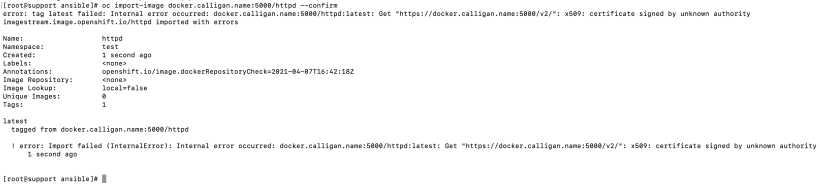
To show that there is more needed to configure this, I created a new project called test and tried to import and image.
oc new-project test
oc import-image docker.calligan.name:5000/httpd –confirm
As you can see, there is a certificate trust issue (IE: cert of registry not trusted by OCP cluster)
We will follow the steps from https://docs.openshift.com/container-platform/4.6/registry/configuring-registry-operator.html#images-configuration-cas_configuring-registry-operator
1. To get the cert of the registry, run the following command
openssl s_client -connect <servername:port> -showcerts
Grab the contents of the cert as shown in the screenshot below and copy to your buffer (CTRL-C)

2. Take the contents of this file and save it. We can call this registry.crt.
3. oc create configmap registry-cas -n openshift-config –from-file=<registryfqdn>..<optionalport>=registry.crt

4. oc patch image.config.openshift.io/cluster –patch ‘{“spec”:{“additionalTrustedCA”:{“name”:”registry-cas”}}}’ –type=merge

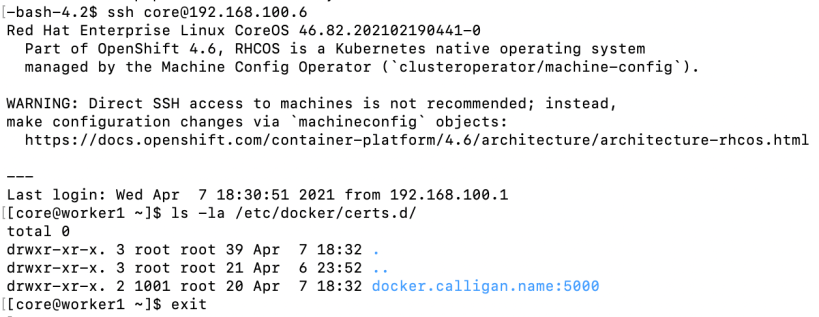
5. Within a few minutes, you should see a directory called <fqdn>:<port> in the /etc/docker/certs.d directory on all of the nodes.
6. Let’s try to do the docker pull again from OCP
oc project test
oc import-image docker.calligan.name:5000/httpd –confirm
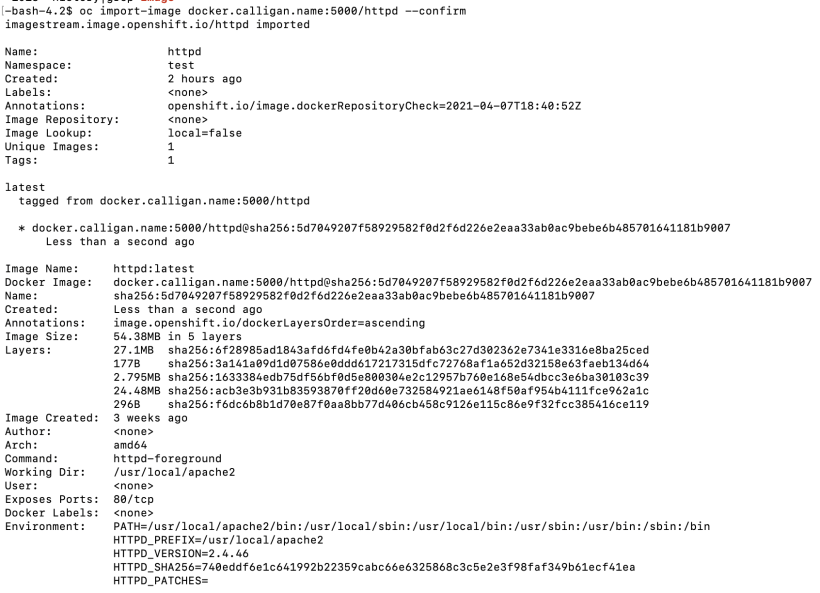
This tells us that the image import was succesful. We are done 🙂