
Managing OCP Infrastructures Using GitOps (Part 1)
This multi-part series will describe the process of using declarative YAML definitions contained in a GitHub repository to describe the desired state of a fleet of OCP clusters.
The walkthrough will only include building a managing cluster (which will include ACM) and adding a SNO (single-node) cluster as a managed cluster but this process can be adapted to managing a large number of clusters. LibVirt/KVM virtualization will be used in these examples due to limitations in my lab environment.
The term ZTP (Zero-Touch Provisioning) has been used very often to describe these processes, but I am not going to use that term here as much due to the fact that it causes confusion (this is my opinion). There are many different groups within Red Hat that are formalizing these processes. The processes are becoming somewhat standardized, so my hope is there will be an official ZTP process that becomes a standard and is supportable in the near future. Even though some of my code will have references to ZTP, don't get too caught up on it being a product. It is really a process and some parts of it are subject to change (and they will). Nonetheless, these building blocks will help with learning the foundations which will be needed regardless of the exact steps to be used in the future.
Topics to be covered in this article:
1. High-level overview of Process
2. GitHub YAML Definition Layout
3. Setting-up Environment to Demonstrate Process
A. Installing SNO (single-node) Hub Cluster
B. Installing ACM on Hub Cluster
C. Configuring Provisioning Resources
D. Enabling RedFish/SushyTools on Libvirt Hypervisor
4. Creating ZTP-SPOKE-01 Managed Cluster
A. Applying Definitions for ZTP-SPOKE-01 Cluster
B. Ways to Troubleshoot and Monitor Progress of Agent/Cluster Installs
High-level Overview of Process
Using a declarative state as defined within a GitHub repository provides many different benefits in regards to managing OCP clusters. These YAML definitions are a single source of truth and it also allows system-owners to more easily document how the managed clusters are setup. Instead of running a bunch of "OC" commands to describe the cluster setup, one can look at the layout of the files in the GitHub repo.
This first article won't use the GitHub repo but will show the layout of YAML definitions which describe a cluster that will eventually be deployed automatically using a GitOps pipeline (follow-on articles will cover this). It's important to understand this process in detail and not make things too complicated early on. At this point, the resources will be deployed manually.
A SNO (single-node) hub cluster will be built inside of Libvirt/KVM. The cloud-based Assisted Installer will be used for this. After the hub cluster is installed, ACM (Advanced Cluster Management) including the MultiCluster hub will be installed. Lastly, some provisioning resources will be created which enable Bare-Metal operator, Ironic, Assisted-Agent, and Assisted-Image resources.
Here is some additional information on these resources:
Advanced Cluster Management: This is the operator that will be installed on the hub cluster to manage the deployment of cluster resources including application and security policies, etc.
Assisted-Agent: This is essentially the local Assisted Installer much like the one at https://console.redhat.com/openshift/assisted-installer/ and is used to discover and check status of bare-metal hosts that are becoming OCP nodes. More information on this project can be located at:
 openshift
Assisted-Image: Definition from official site. This service customizes and serves RHCOS images for the Assisted Installer Service. It downloads a set of RHCOS images on startup based on config and responds to a single API endpoint to allow a user to download a customized image for use with assisted service.
Bare-Metal Operator: Definition from official site
The Bare Metal Operator implements a Kubernetes API for managing bare metal hosts. It maintains an inventory of available hosts as instances of the BareMetalHost Custom Resource Definition. The Bare Metal Operator knows how to:
- Inspect the host’s hardware details and report them on the corresponding
BareMetalHost. This includes information about CPUs, RAM, disks, NICs, and more. - Provision hosts with a desired image.
- Clean a host’s disk contents before or after provisioning.
Hive: Definition from official site. API driven OpenShift 4 cluster provisioning and management. Hive is an operator which runs as a service on top of Kubernetes/OpenShift. The Hive service can be used to provision and perform initial configuration of OpenShift clusters.
Ironic: Definition from official site. Ironic is an open source project that fully manages bare metal infrastructure. It discovers bare-metal nodes, catalogs them in a management database, and manages the entire server lifecycle including enrolling, provisioning, maintenance, and decommissioning.
After the hub resources are created, we will get into applying the YAML files which describe the cluster to be built and managed by the hub cluster. The term node in this workflow is the node that will become the ztp-spoke-01 SNO cluster. At a very-basic level (more explanation will be provided later), the YAML files (described next) are consumed which instantiate the following workflow.
- Managed cluster resource is created and populated inside of ACM GUI.
- Based on the install manifests that are consumed in the YAMLs, an ISO is generated with specific machine-config-settings and network configuration (using NmState).
- The Bare-Metal operator talks to BMC (DRAC/ILO/Sushy) to boot up the ISO image which is hosted on the Assisted-Image resource.
- The Assisted-Service (similar to cloud based Assisted Installer) watches the boot process of the node using the Assisted-Agent
- Communication will happen between the agent and the assisted-service which helps the node to be discovered.
- If the resources are sufficient on the node, the process of installing the cluster will continue.
- If any errors occur during this part of the process, you can log into the ACM GUI and/or Assisted-Service to look at logs. There are also "OC" commands and resources that can be described to troubleshoot any issues. This troubleshooting process will be described more shortly.
My managing cluster is going to be called ztp-hub-01 and the managed cluster will be called ztp-spoke-01.
GitHub YAML Definition Layout
Sample code is located at https://github.com/kcalliga/gitops-blog
The files are numbered to show the order in which these resources are created on the managing cluster. You don't need to understand every detail with these just yet. Later in this post, I will explain each of these some more and show you what is happening as we are deploying each of these YAML definitions.
Here are the files that make up an install of the ztp-spoke-01 cluster.
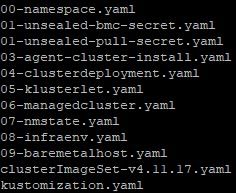
00-namespace.yaml: This file creates a namespace on the managing cluster to house the resources that will be created next.
01-unsealed-pull-secret.yaml: This file contains the public pull secret or a pull secret specific to your own registry (mostly in disconnected environments). These login credentials will be used to download the OCP images. To obtain your Openshift pull secret, go to https://console.redhat.com/openshift/install/pull-secret. If this file is being stored on a GitHub repo, it would be best to encrypt this secret using Sealed Secrets. More on this in a follow-on blog post.
01-unsealed-bmc-secret.yaml: This file contains the credentials that are used to power-on, power-off, reset, and mount the installation ISO needed to discover the OCP host and eventually do an install. In this demonstration, since Libvirt/KVM is being used, you'll be shown how to interact with this system using Sushy Tools. If this file is being stored on a GitHub repo, it would be best to encrypt this secret using Sealed Secrets. More on this in a follow-on blog post.
03-agent-cluster-install.yaml: This file contains many of the elements that were in the install-config.yaml to include type of network (OpenshiftSDN or OVNKubernetes), network configuration, and SSH keys. There is also reference to the clusterImageSet which will be used with this install which provides the information needed for the ISO to download OCP images.
04-clusterdeployment.yaml: This file contains some of the same information that would be used in an install-config.yaml. Be sure to use the same name (in this example ztp-spoke-01) throughout. The install will be treated as bare-metal type install (we will work with Bare-Metal operator later). The pull secretRef is a reference to the name specified in the 01-unsealed-pull-secret.yaml that was created earlier. The clusterInstallRef is a link back to 03-agent-cluster-install.yaml.
05-klusterlet.yaml: This file describes which features will be enabled that are under the control of ACM (Advanced Cluster Management). When a cluster is managed by ACM, there are 3 major components that ACM provides which are the iamPolicyController (for security policies), policyController (for general or application policies), and searchCollector (makes it easier to discover resources on managed cluster especially when using ACM GUI search functionality).
Also, this resource describes labels that will be applied to the managed cluster. These labels can be used to group similar clusters together in order to apply various policy settings through ACM tooling.
06-managedCluster.yaml: This file describes some of the settings that will take effect when this cluster is instantiated inside of ACM.
07-nmState.yaml: If the hosts that make up the OCP cluster do not use DHCP or you want to apply other settings in regards to the machineNetwork settings, these settings would be configured here. Notice that the static IP address, mac address of interface, DNS settings, routing is all setup here.

08-infraenv.yaml: This file is used by assisted service which assists with discovering the bare-metal hosts that will eventually be used in this cluster.
09-baremetalhost.yaml: Describes specifics of the bare-metal host that will eventually be provisioned including the path to the first disk device (/dev/vda in this case), the RedFish/Sushy API to help mount the ISOs to boot this host, and the BMC credentials which will be used to authenticate to the RedFish/Sushy API. This API helps emulate BMC type functions on are typically not available in the type of environment that is being deployed in this example (LibVirt/KVM).
See this article from Brandon Jozsa for more details. We will be using some of this information later on.
https://cloudcult.dev/sushy-emulator-redfish-for-the-virtualization-nation/
Setting Up Environment to Demonstrate Process
This tutorial will demonstrate how to setup a single hub cluster (ztp-hub-01) and a cluster called ztp-spoke-01 which will be automatically provisioned based on the information contained in this blog post.
LibVirt/KVM is being used in this environment. Both the ztp-hub-01 and ztp-spoke-01 nodes have the following specs.
CPU: 8 VCPU
RAM: 32GB
Boot order for both VMs is to look at the primary boot disk first and then the CD-ROM ISO.
At least one NIC card needs to be used on each VM. Take note of the mac-addresses as this information will be needed later. I am using a NAT to allow my VMs to reach the Internet for now. Doing this in a disconnected manner will be described in a follow-on article.
ztp-hub-01 has two virtio disks. The first is the boot disk (/dev/vda) and the second is (/dev/vdb) which will be used to provision the topoLVM. This operator takes the raw block device (/dev/vdb) and allows dynamic provisioning of persistent volumes to be used for the assisted-service. The primary drive needs to be at least 120GB in size. The secondary drive is 200GB in this example. The drive can be larger depending on the total size of persistent volumes the cluster will need.
ztp-spoke-01 only needs 8VCPU and 16GB of RAM based on the latest 4.11 SNO documentation, but I have additional available so made it 32GB.
At the time of this writing, OCP 4.11.17 is being used.
Installing SNO (Single-Node Cluster) Hub
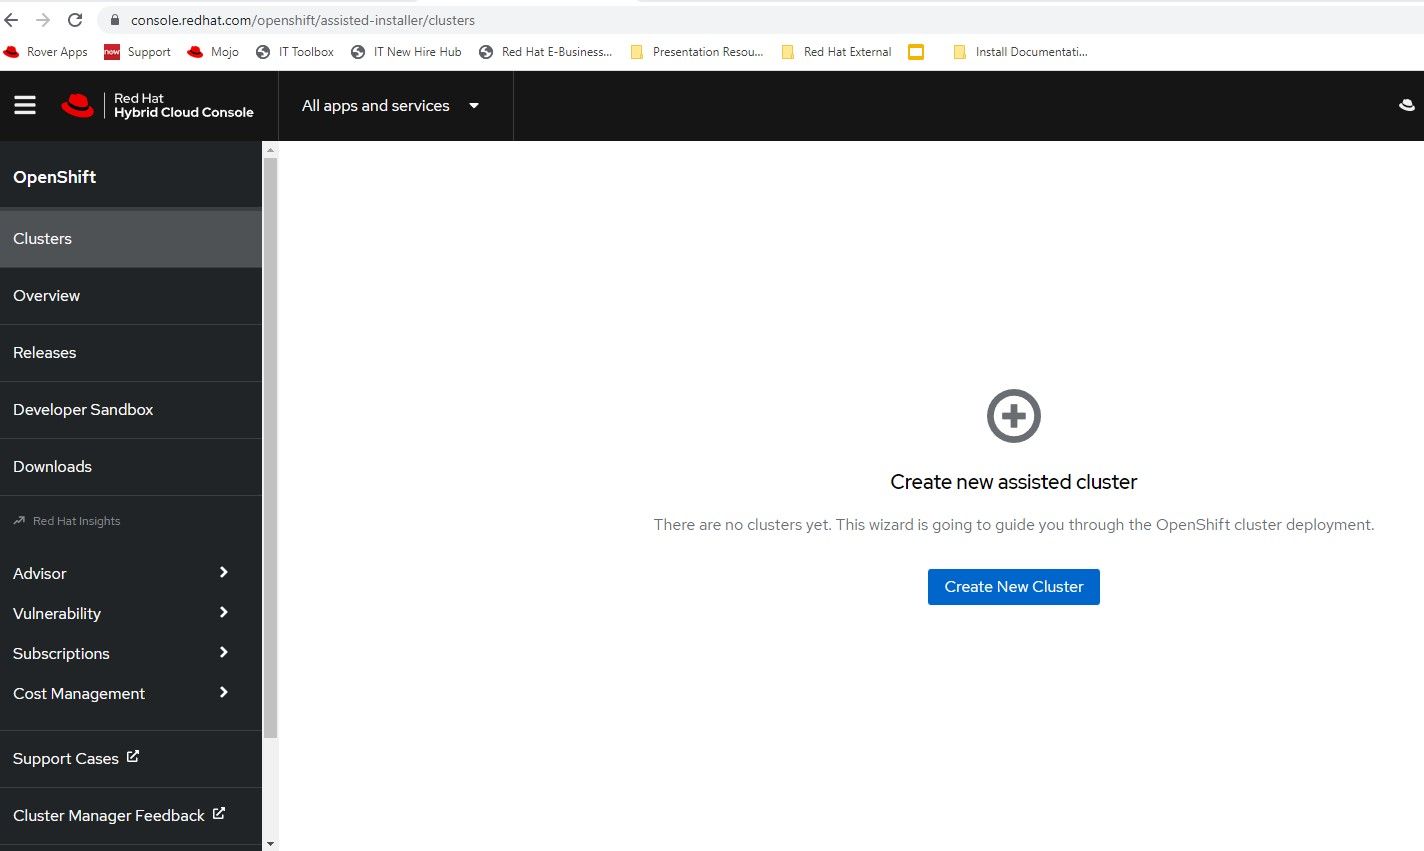
Once the VMs are setup, the cloud-based assisted installer will be used to setup the hub cluster. This is located at https://console.redhat.com/openshift/assisted-installer/
- Click "Create New Cluster"
2. The cluster-name will be ztp-hub-01 in the ocp-poc-demo.local domain. Be sure to have DNS entries for api, api-int, and *.apps.<clustername>.<domain> that point to the node's IP.
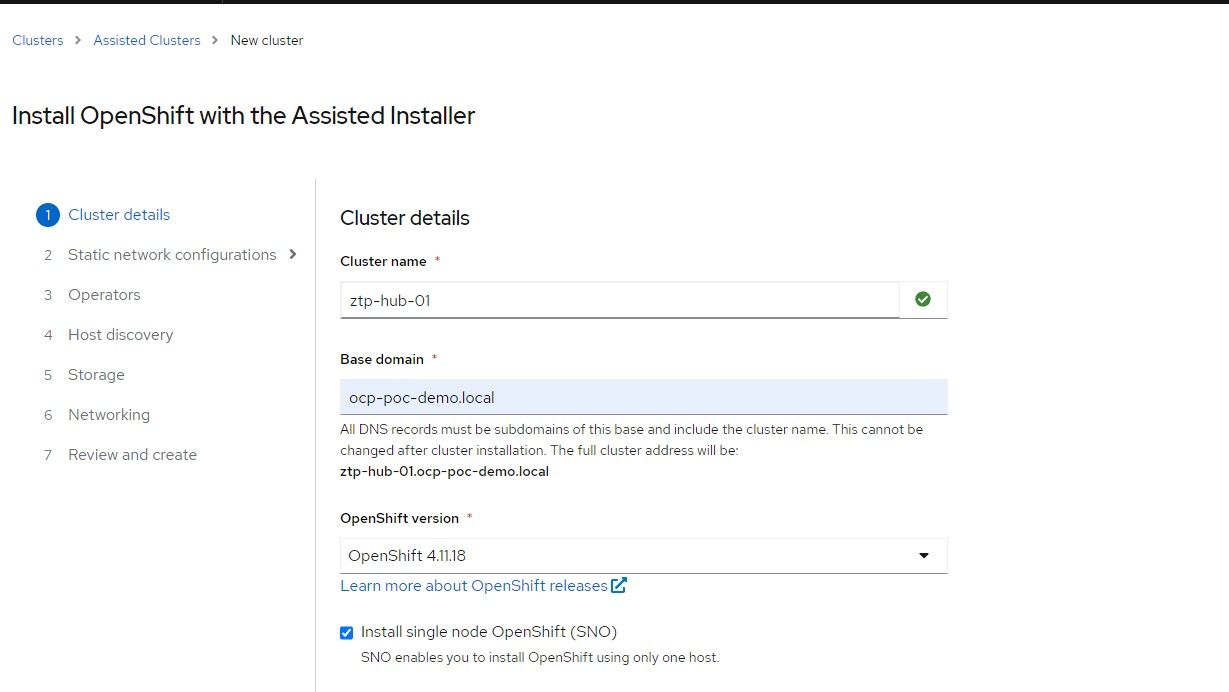
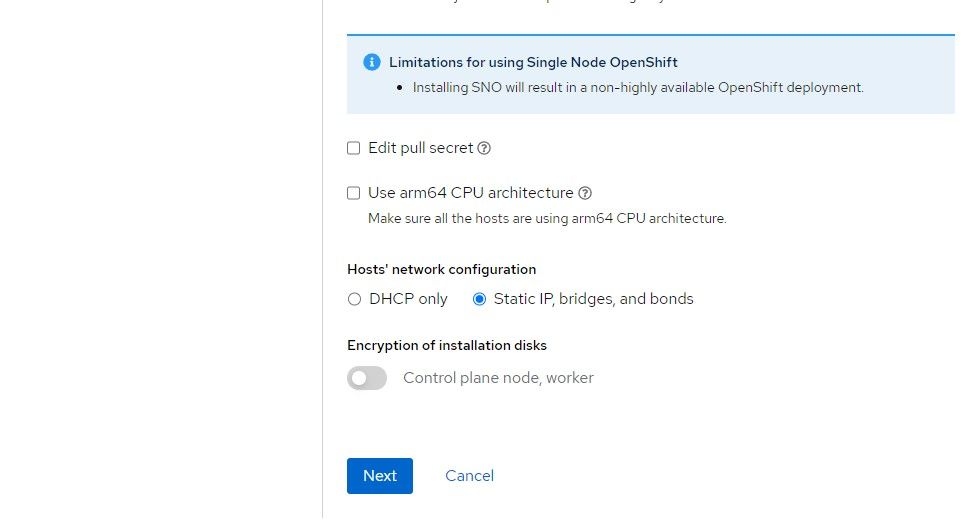
3. Check the box for static IP configuration which means that a network state needs to be defined to allow the ISO to assign the appropriate IP to the node based on the mac-address. Click "Next"
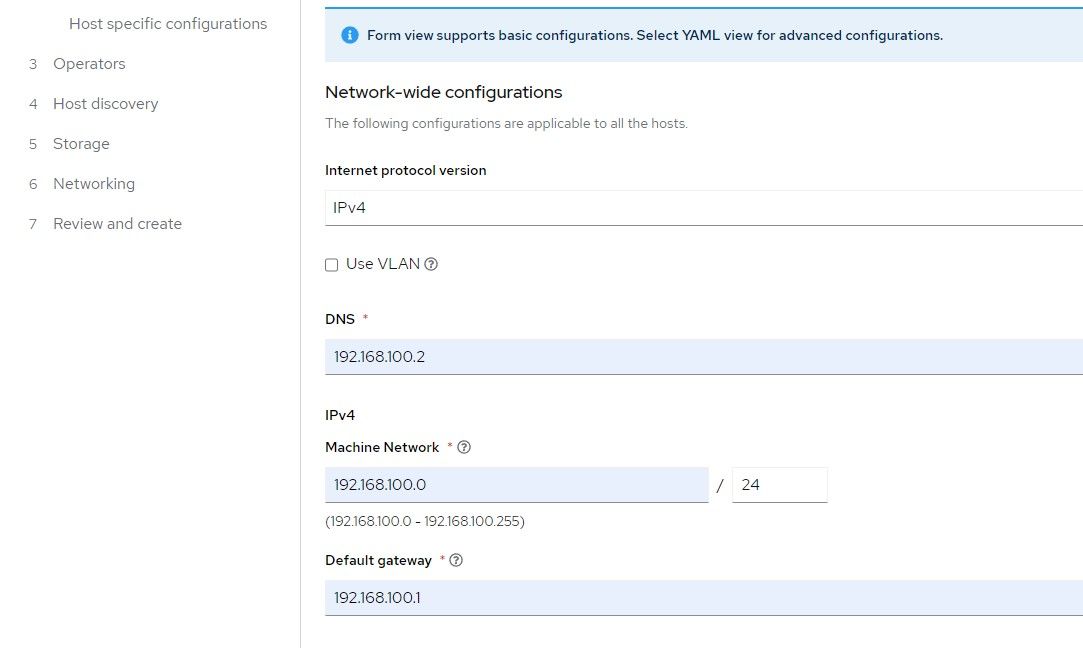
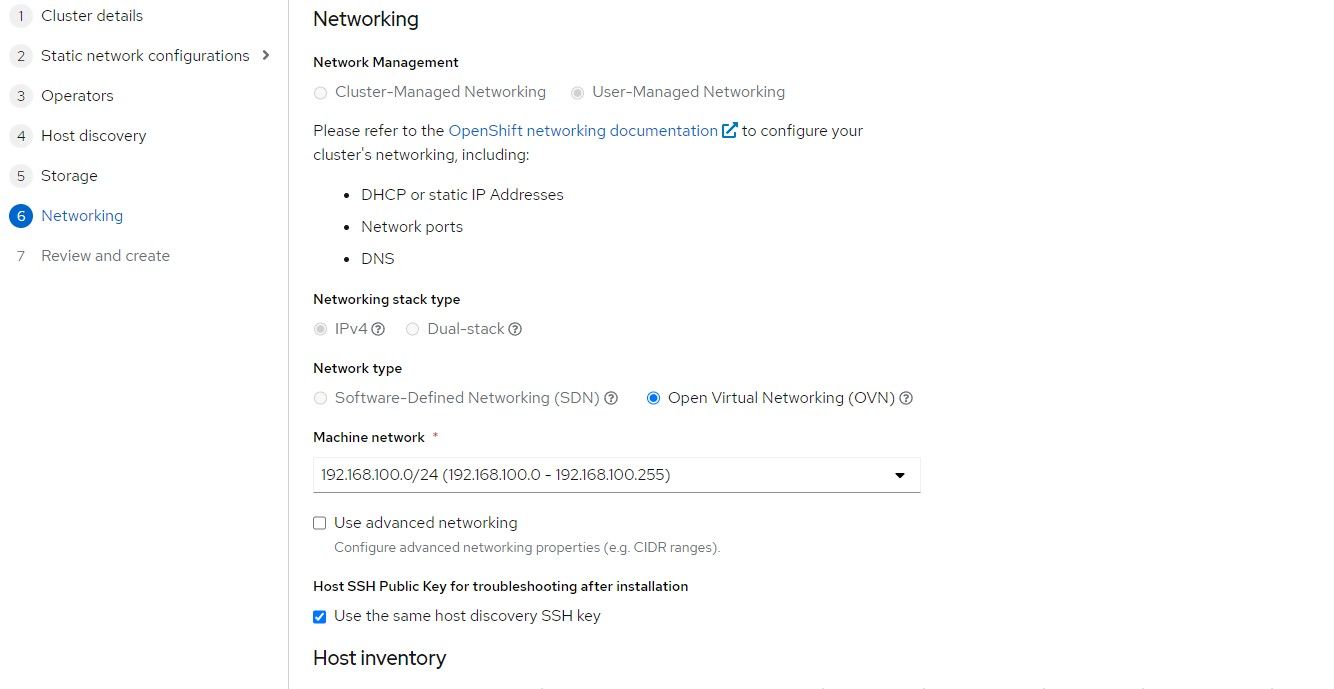
4. Provide the IP schema that will be used. The choices are either IPv4 or dual-stack (both IPv4 and IPv6).
Provide the IP address of the name-server
Machine network is the network that the node will boot to
Gateway is the default route for the Machine network
Click "Next"
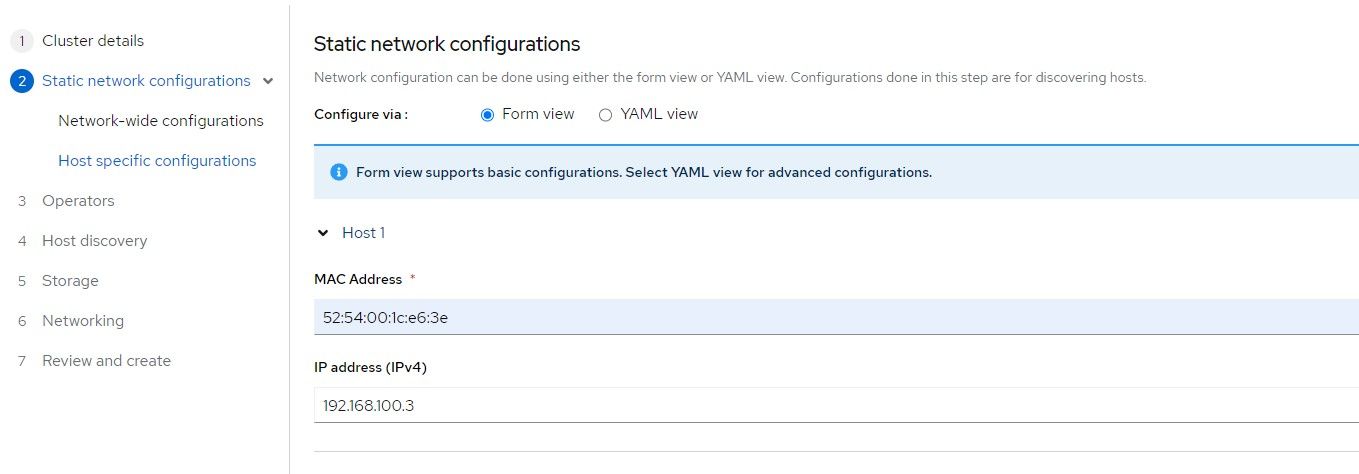
5. Find the mac address of the ztp-hub-01 VM and a free IP address on the Machine network to assign to this node. This will end up being the IP associated with the API and Ingress/Apps since this is a SNO cluster.
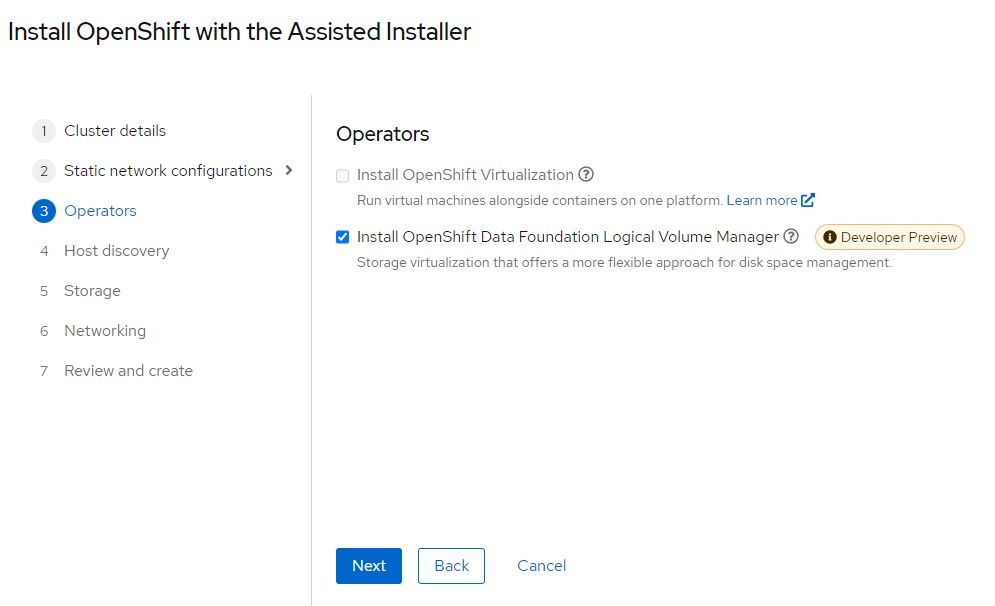
6. Openshift Data Foundation Logical Volume Manager is based off of TopoLVM which was described previously. Check this box.
Click "Next"
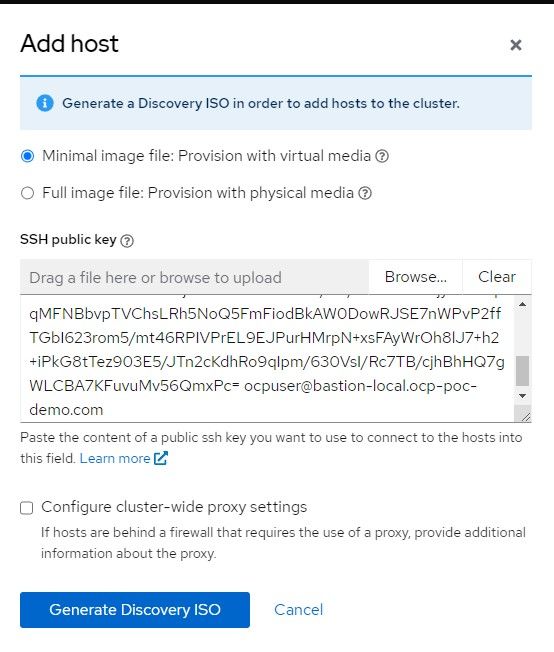
7. Click "Add-Host"
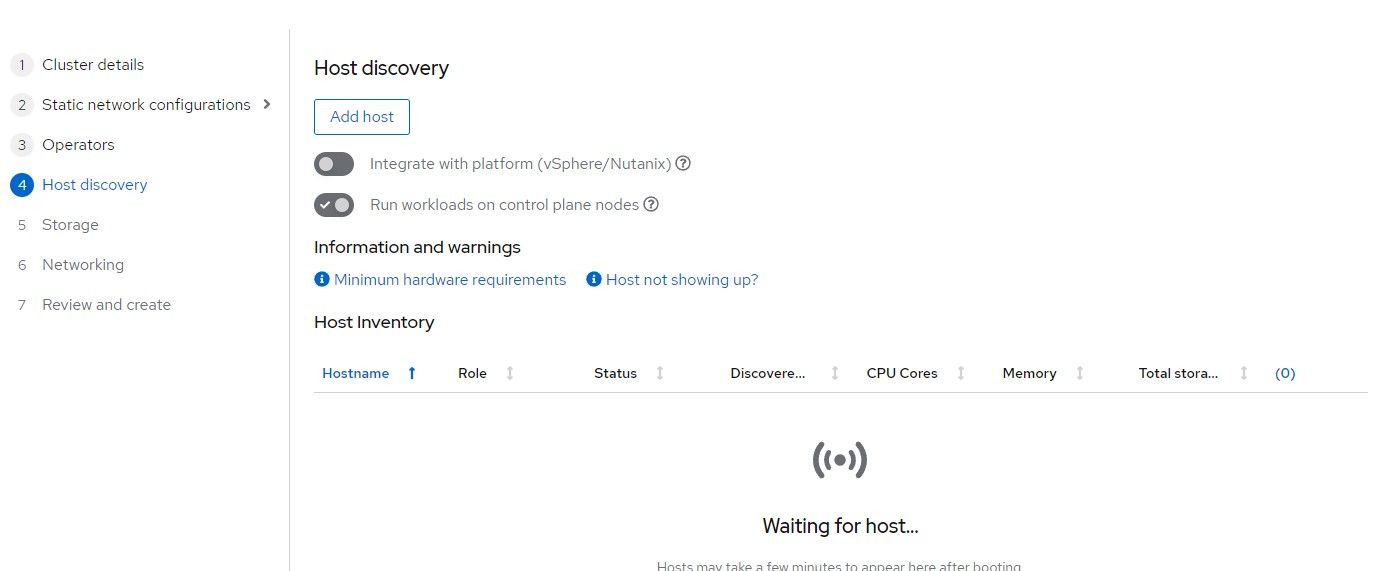
8. Select Minimal image and copy/paste your SSH public key in the box provided. This will be used mostly to troubleshoot install problems. Once the cluster is built, there is an "oc debug node" command that does the same thing.
Click "Generate ISO"
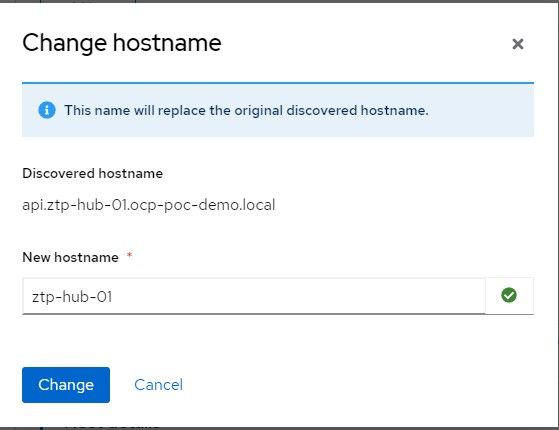
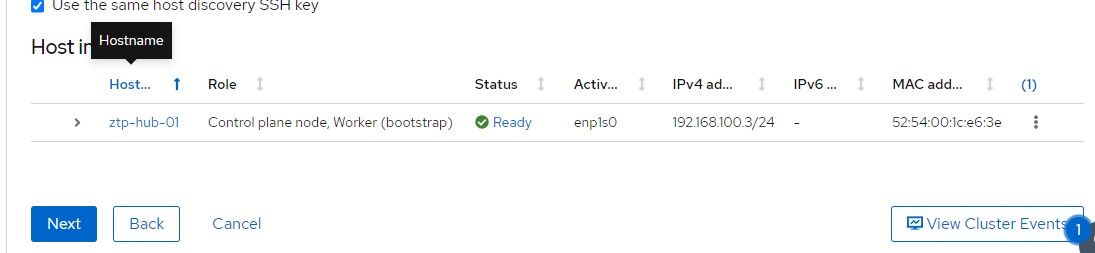
9. Point to that ISO in your VM settings (virt-manager). This will allow the node to be discovered to install the cluster. Some requirements are checked to ensure the minimum required CPU, memory, disk are setup. You can change the hostname here if you'd like.

10. On the bottom of this screen, the disks that were detected are shown. /dev/vda is the installation disk and /dev/vdb will be used Logical Volume Manager/TopoLVM.
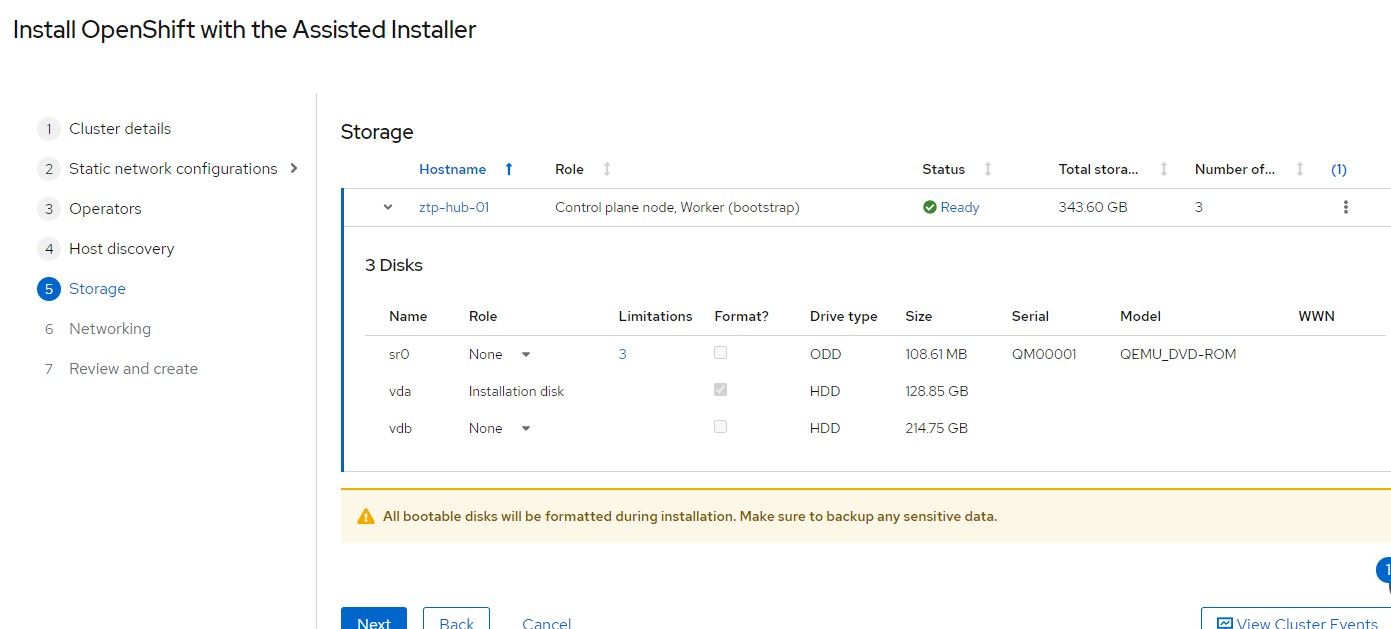
11. The default settings on the next screen will be sufficient.
12. Once the host shows "Ready" status, the "Next" button can be clicked.
13. The last screen can be used to confirm everything. If it looks ok, click "Install Cluster"

14. The install should start and a progress will show within a few minutes.
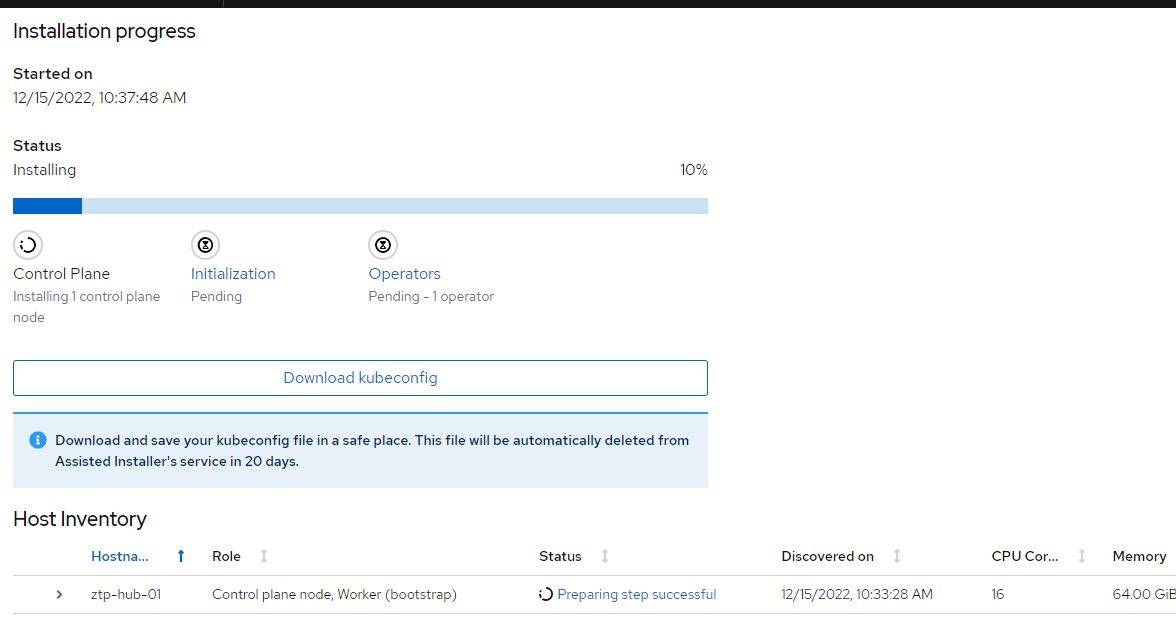
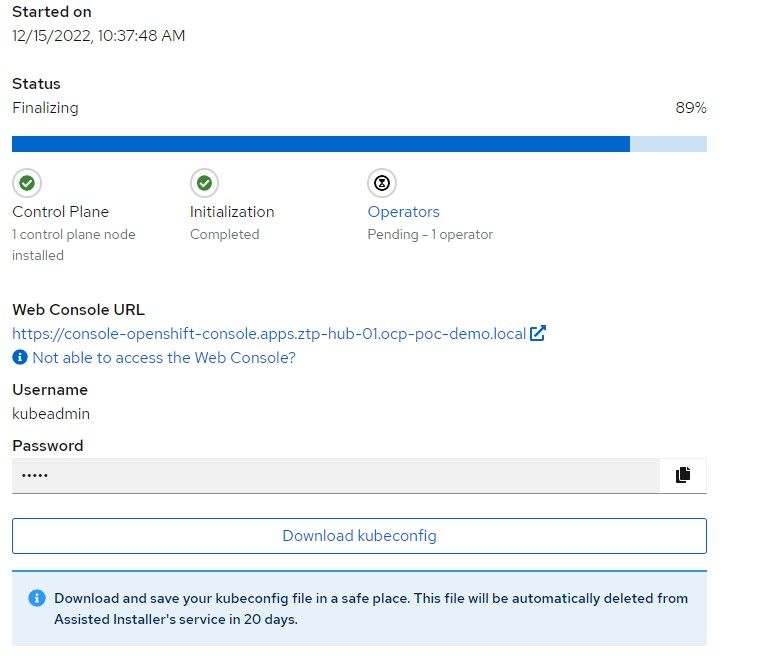
15. When the cluster is almost finished building, the kubeadmin password (used int the console) will be provided along with the kubeconfig. Save the kubeconfig file and make a backup.
Installing ACM on Hub Cluster
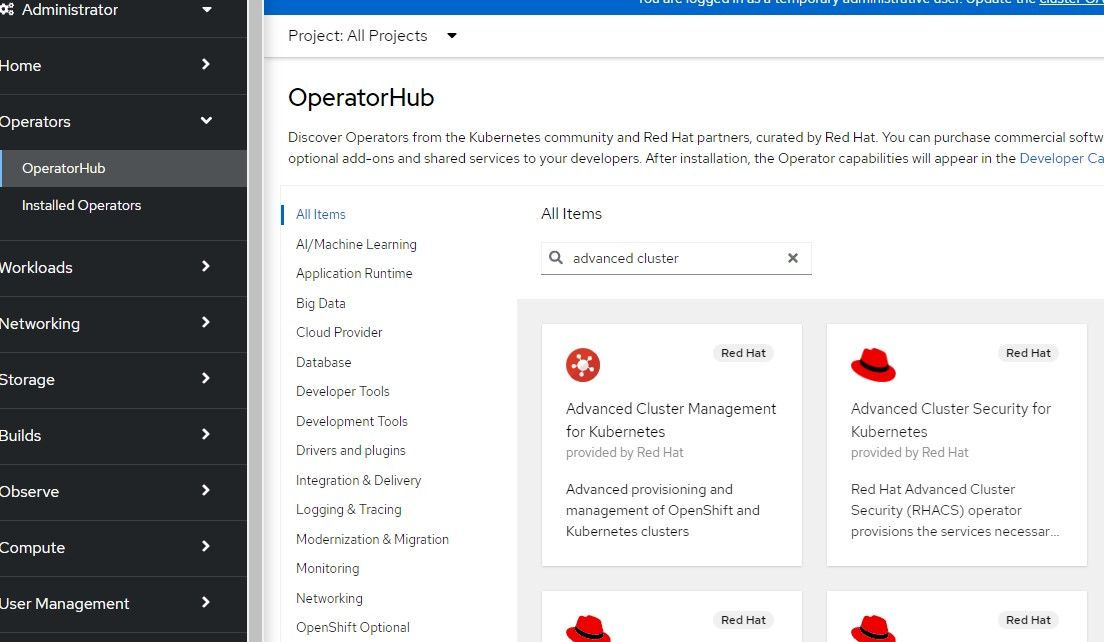
- On the Openshift Web Console, go to Operators --> OperatorHub and search for "Advanced Cluster". The first link will be the Advanced Cluster Management for Kubernetes Operator. Click on that.
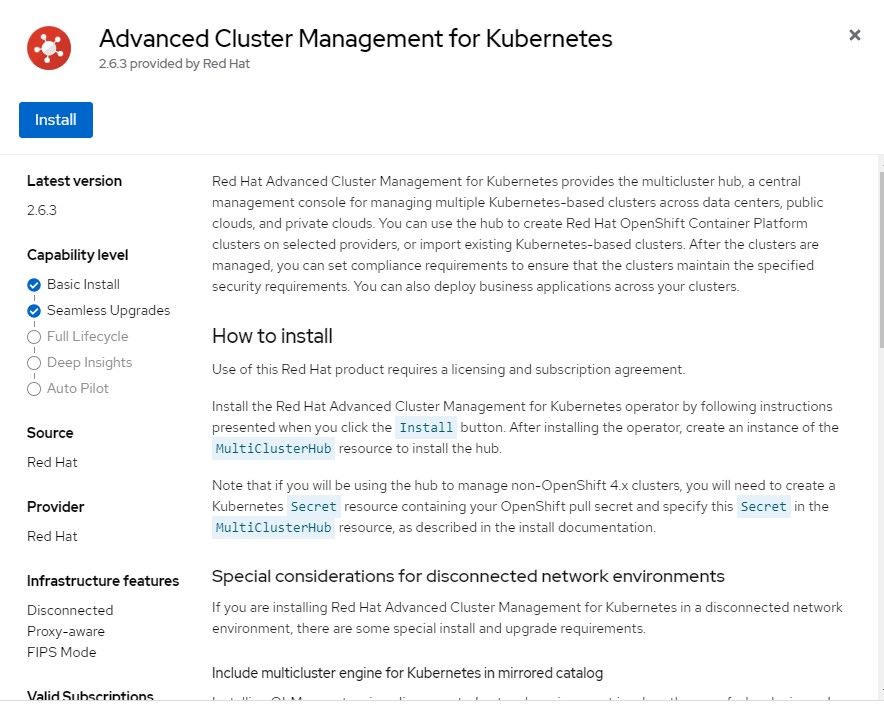
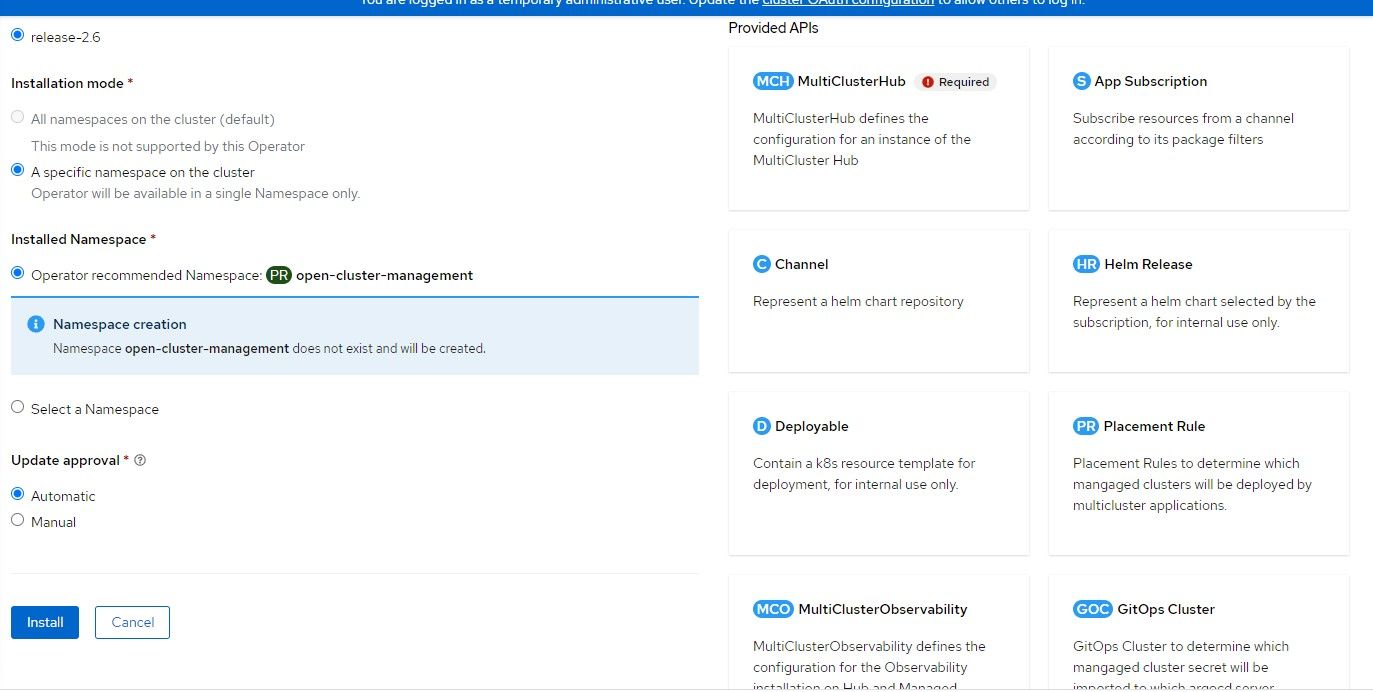
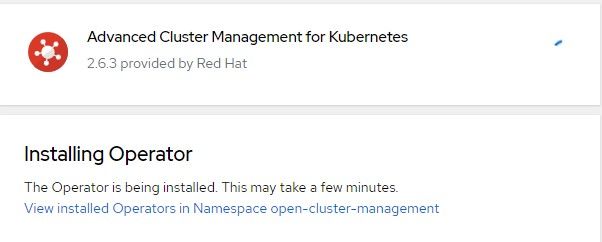
2. The default settings can be applied which will instal version 2.6.3 (at time of this writing).
3. After the operator install shows as completed, an option will appear to implement the MultiClusterHub. Click on that box.
4. Accept the default settings for MultiClusterHub
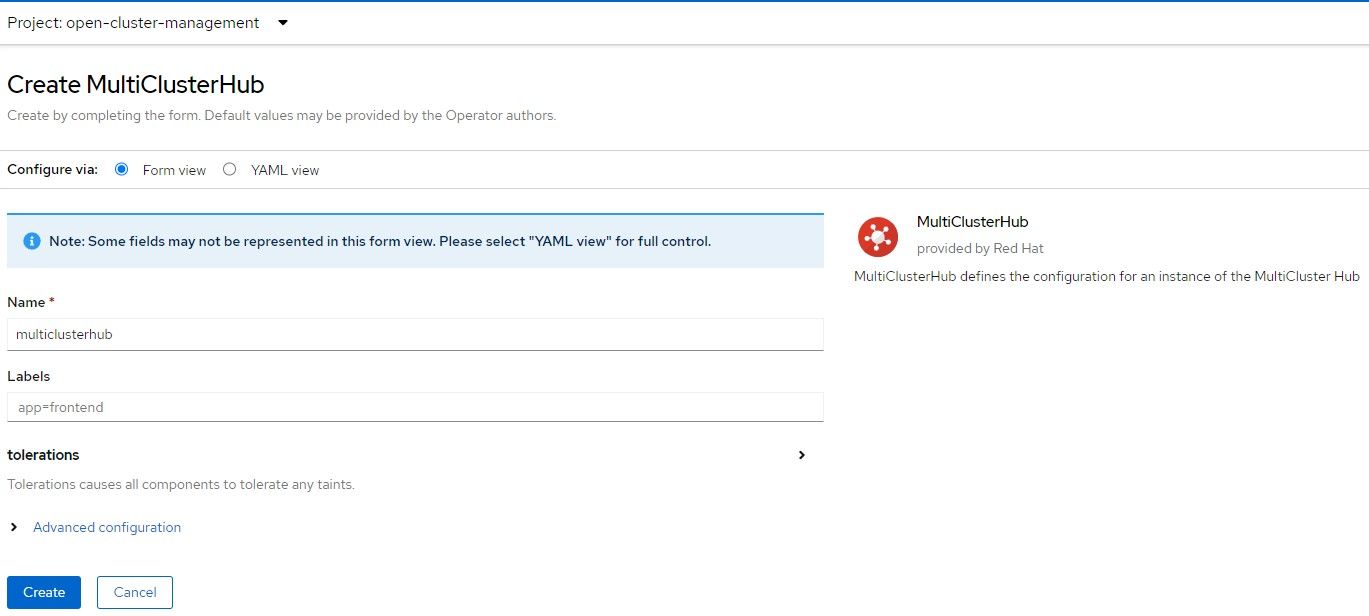
5. The MultiClusterHub will progress from installing status to completed/finished.
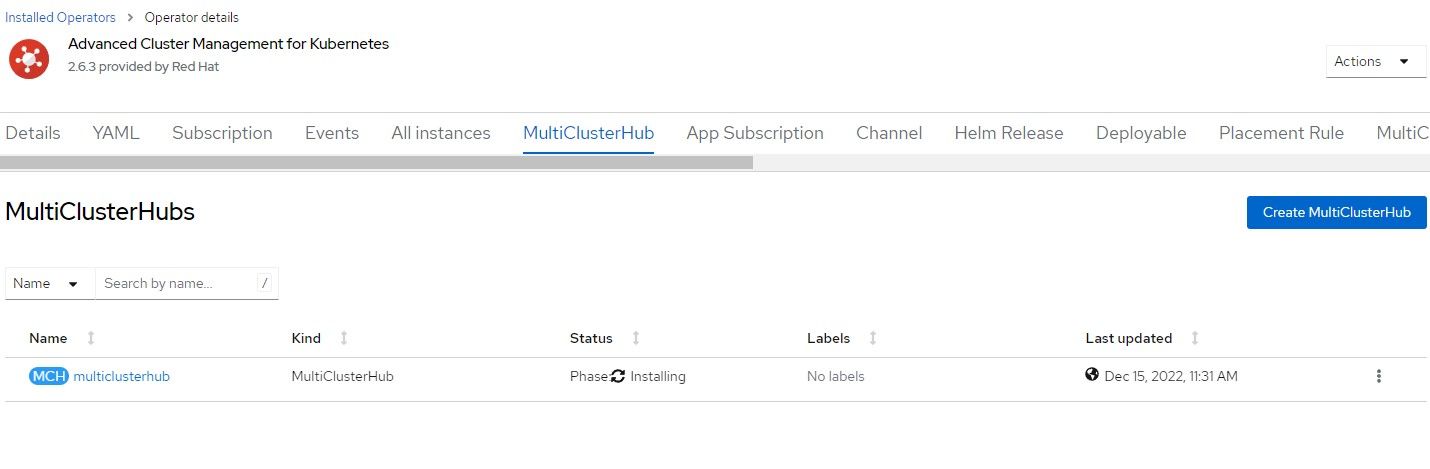
6. Once that object is created, the MultiClusterHub route will be created at multicloud-console.apps.<clustername>.<domainname>. We will visit this again later.
Configuring Provisioning Resources
The GitHub site I mentioned previously will be used from this point on.
kcalligaOnce ACM and the MultiClusterHub are installed, you will want to go to the command line to run some "OC" commands.
- Set your environment variable called KUBECONFIG to point to kubeconfig file that was downloaded earlier.
export KUBECONFIG=<absolute path to kubeconfig>2. Download the OC client if you don't already have it.
3. Clone the GitRepo if you wish.
4. Patch the Hive operator.
oc patch hiveconfig hive --type merge -p '{"spec":{"targetNamespace":"hive","logLevel":"debug","featureGates":{"custom":{"enabled":["AlphaAgentInstallStrategy"]},"featureSet":"Custom"}}}'5. Apply the following provisioning resource (named 00-provsioning.yaml)
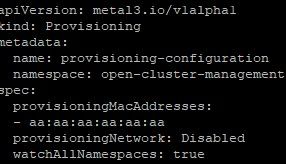
oc apply -f 00-provisioning.yaml
6. To make sure this provisioning resource was created properly, check the openshift-machine-api namespace to see if there are 3 new (metal) pods.
oc project openshift-machine-api
oc get po
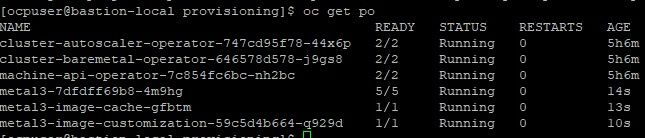
In this output, there are 3 metal pods that were created within the last 15 seconds or so.
7. Now apply the assisted-service configuration as provided in 01-assisted-service-config.yaml
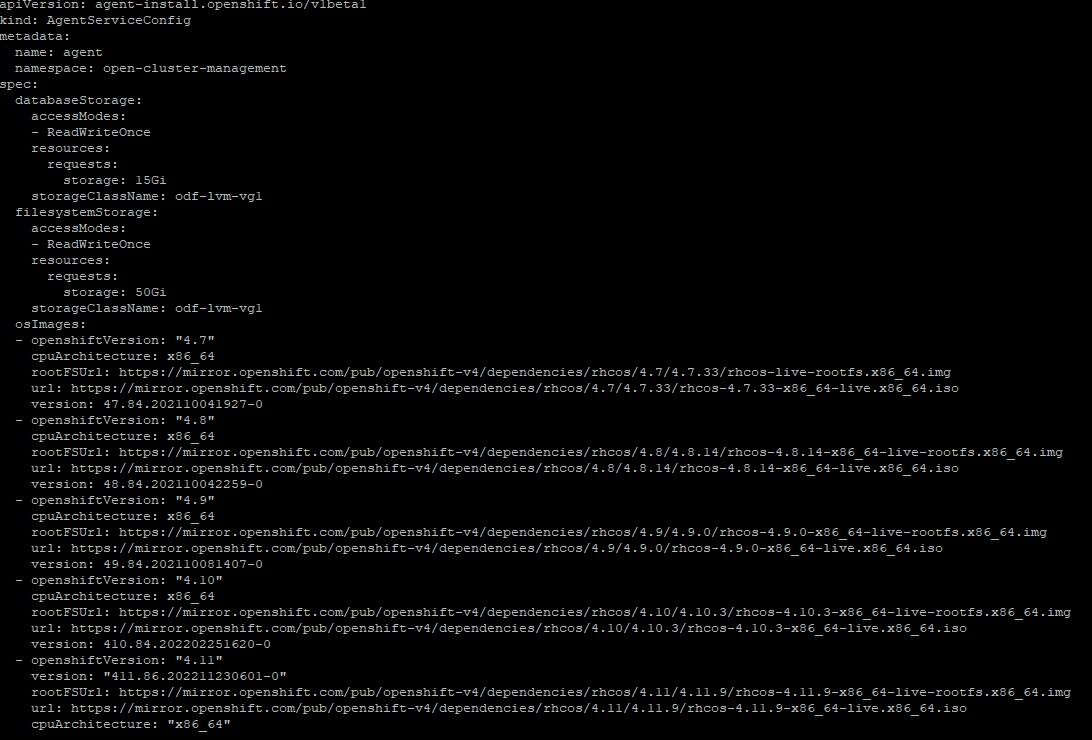
oc apply -f 01-assisted-service-config.yaml

8. Check the "multicluster-engine" namespace for 4 new pods
oc project multicluster-engine
oc get po
The pods associated with the assisted-service and assisted-image service are either started or in the process of starting so this is a good sign.
9. Create the assisted-service configmap which turns more verbose logging on.
oc create -f assisted-service-cm.yaml
Enabling RedFish/SushyTools on Libvirt Hypervisor
I followed another article by Brandon Josza for this. I won't explain the steps in detail since Brandon already explains.
 Brandon B. Jozsa
- On the Hypervisor, run the following commands. Some of these packages/services will already be installed but it is ok to make sure.
sudo dnf install bind-utils libguestfs-tools cloud-init -yy
sudo dnf module install virt -yy
sudo dnf install virt-install -yy
sudo systemctl enable libvirtd --now
2. Install podman
sudo dnf install podman -yy
3. The Sushy container will mount the /etc/sushy directory to the same directory so we will create this configuration.
sudo mkdir -p /etc/sushy/
cat << "EOF" | sudo tee /etc/sushy/sushy-emulator.conf
SUSHY_EMULATOR_LISTEN_IP = u'0.0.0.0'
SUSHY_EMULATOR_LISTEN_PORT = 8000
SUSHY_EMULATOR_SSL_CERT = None
SUSHY_EMULATOR_SSL_KEY = None
SUSHY_EMULATOR_OS_CLOUD = None
SUSHY_EMULATOR_LIBVIRT_URI = u'qemu:///system'
SUSHY_EMULATOR_IGNORE_BOOT_DEVICE = True
SUSHY_EMULATOR_BOOT_LOADER_MAP = {
    u'UEFI': {
        u'x86_64': u'/usr/share/OVMF/OVMF_CODE.secboot.fd'
    },
    u'Legacy': {
        u'x86_64': None
    }
}
EOF
4. Now, let's start the SushyTools container
export SUSHY_TOOLS_IMAGE=${SUSHY_TOOLS_IMAGE:-"quay.io/metal3-io/sushy-tools"}
sudo podman create --net host --privileged --name sushy-emulator -v "/etc/sushy":/etc/sushy -v "/var/run/libvirt":/var/run/libvirt "${SUSHY_TOOLS_IMAGE}" sushy-emulator -i :: -p 8000 --config /etc/sushy/sushy-emulator.conf
5. Open up port 8000 on firewall if you are running it.
firewall-cmd --add-port=8000/tcp --permanent
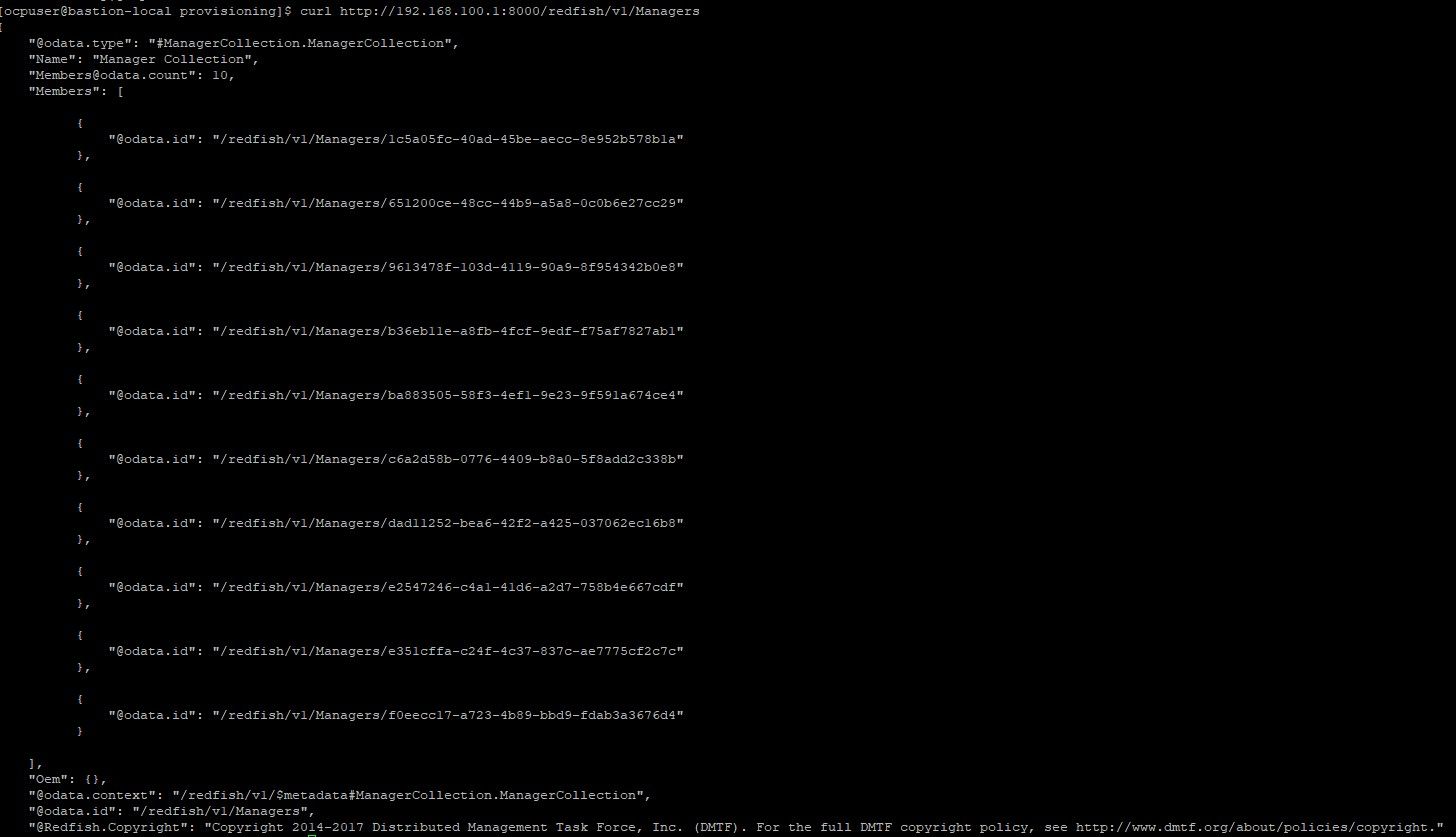
firewall-cmd --reload6. Run a curl command against the following endpoint to ensure your VMs can be discovered. Replace the IP with your appropriate Hypervisor IP.
curl http://192.168.100.1:8000/redfish/v1/ManagersHere is some sample output
7. To find the VM that is associated with ztp-spoke-01 (in my environment), open up Virt-Manager
Take note of the UUID which is e2547246-c4a1-41d6-a2d7-758b4e667cdf
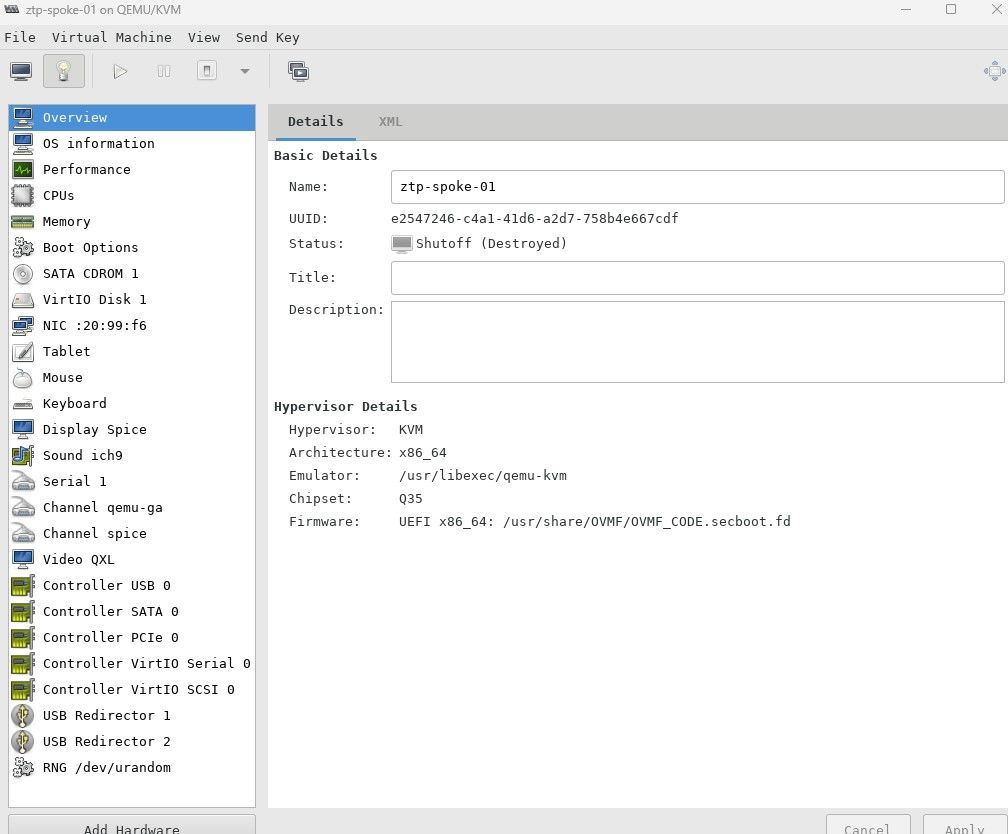
8. In the BareMetal host definition that will be configured in a little bit, this UUID will be used. We can curl this VMs properties by issuing the following command:
curl http://192.168.100.1:8000/redfish/v1/Systems/e2547246-c4a1-41d6-a2d7-758b4e667cdf
The name matches the VM that was created for ztp-spoke-01.
Creating ZTP-SPOKE-01 Managed Cluster
The resources that are in the GitHub repo in the clusters/ztp-spoke-01 directory will be edited for this part. I will show the sample definitions and indicate what would need to be changed.
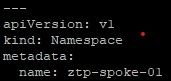
00-namespace.yaml: Can leave this as is if you'd like
---
apiVersion: v1
kind: Namespace
metadata:
  name: ztp-spoke-01
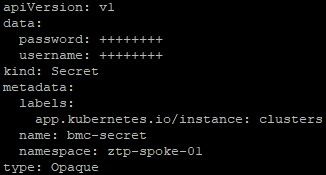
01-unsealed-bmc-secret.yaml: For this pull-secret, you can change the password and username to any value. The RedFish/SushyTools exposes the virtual BMC to LibVirt/KVM with no authentication. Since this is only a proof-0f-concept, it is not a big deal but you would want to ensure that this API is firewalled or on an internal network if used in production.
To create this resource on the command line, issue the following command
oc create secret generic --from-literal=username=test --from-literal=password=test bmc-secret -n ztp-spoke-01 -o yamlapiVersion: v1
data:
password: ++++++++
username: ++++++++
kind: Secret
metadata:
labels:
app.kubernetes.io/instance: clusters
name: bmc-secret
namespace: ztp-spoke-01
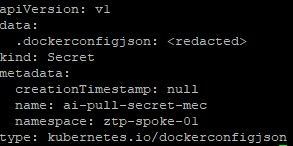
type: Opaque01-unsealed-pull-secret.yaml: This is created by taking your Openshift Pull Secret and saving this as json file. I called mine pull-secret.json and ran the following command to create this resource.
oc create secret docker-registry --from-file=.dockerconfigjson=pull-secret.json pull-secret -n ztp-spoke-01 -o yamlapiVersion: v1
data:
.dockerconfigjson: <redacted>
kind: Secret
metadata:
creationTimestamp: null
name: pull-secret
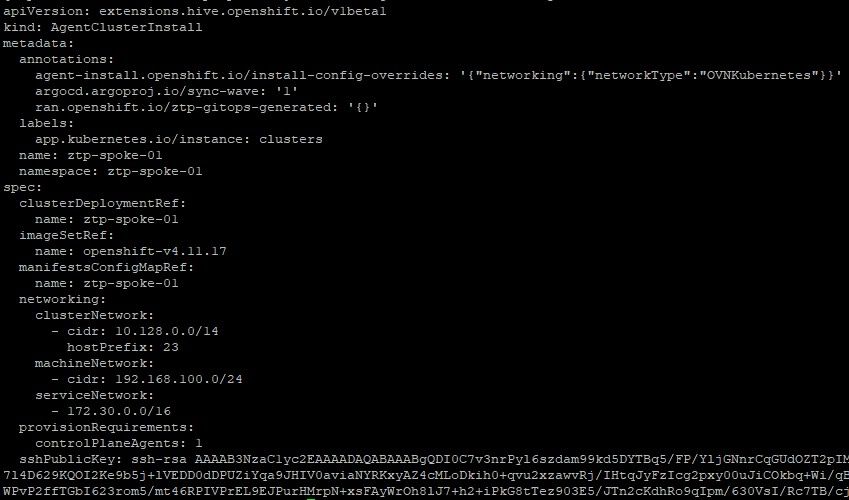
namespace: ztp-spoke-0103-agent-cluster-install.yaml: Change the following parts of the configuration to match your environment.
name: can keep as ztp-spoke-01 for this purpose
namespace: can keep as ztp-spoke-01 for this purpose-
Networking Config is defaults with OVNKubernetes which is ok.
Public SSH Key that will be used. Put all on one line
apiVersion: extensions.hive.openshift.io/v1beta1
kind: AgentClusterInstall
metadata:
annotations:
agent-install.openshift.io/install-config-overrides: '{"networking":{"networkType":"OVNKubernetes"}}'
argocd.argoproj.io/sync-wave: '1'
ran.openshift.io/ztp-gitops-generated: '{}'
labels:
app.kubernetes.io/instance: clusters
name: ztp-spoke-01
namespace: ztp-spoke-01
spec:
clusterDeploymentRef:
name: ztp-spoke-01
imageSetRef:
name: openshift-v4.11.17
# manifestsConfigMapRef:
# name: ztp-spoke-01
networking:
clusterNetwork:
- cidr: 10.128.0.0/14
hostPrefix: 23
machineNetwork:
- cidr: 192.168.100.0/24
serviceNetwork:
- 172.30.0.0/16
provisionRequirements:
controlPlaneAgents: 1
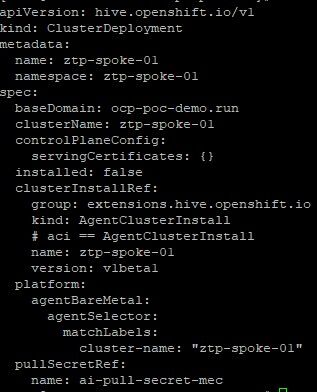
sshPublicKey: ssh-rsa AAAAB3NzaC1yc2EAAAADAQABAAABgQDI0C7v3nrPyl6szdam99kd5DYTBq5/FP/YljGNnrCqGUdOZT2pIMppWTx9C/JgB2Qw/iVGYBT7sAOw1rbCP/47jJpx/QSmiIxPLhVcdeUMRwea7q7e+Gm94t7TJWKpb6X3clsz0K3bjtZ5Khy/FSn/xgZ1kNGp6oaKi7l4D629KQOI2Ke9b5j+lVEDD0dDPUZiYqa9JHIV0aviaNYRKxyAZ4cMLoDkih0+qvu2xzawvRj/IHtqJyFzIcg2pxy00uJiCOkbq+Wi/qBCfWIydt7auknE4ITAs1CTCVR6a9zLSjXlNXr287XxTlrodd/6w/rIJz8CUtKsjyn6JzIq1qMFNBbvpTVChsLRh5NoQ5FmFiodBkAW0DowRJSE7nWPvP2ffTGbI623rom5/mt46RPIVPrEL9EJPurHMrpN+xsFAyWrOh8lJ7+h2+iPkG8tTez903E5/JTn2cKdhRo9qIpm/630VsI/Rc7TB/cjhBhHQ7gWLCBA7KFuvuMv56QmxPc= ocpuser@bastion-local.ocp-poc-demo.com04-clusterdeployment.yaml:
basedomain is the only thing you will need to change and any reference to ztp-spoke-01 if you are using a different cluster-name
apiVersion: hive.openshift.io/v1
kind: ClusterDeployment
metadata:
name: ztp-spoke-01
namespace: ztp-spoke-01
spec:
baseDomain: ocp-poc-demo.run
clusterName: ztp-spoke-01
controlPlaneConfig:
servingCertificates: {}
installed: false
clusterInstallRef:
group: extensions.hive.openshift.io
kind: AgentClusterInstall
# aci == AgentClusterInstall
name: ztp-spoke-01
version: v1beta1
platform:
agentBareMetal:
agentSelector:
matchLabels:
cluster-name: "ztp-spoke-01"
pullSecretRef:
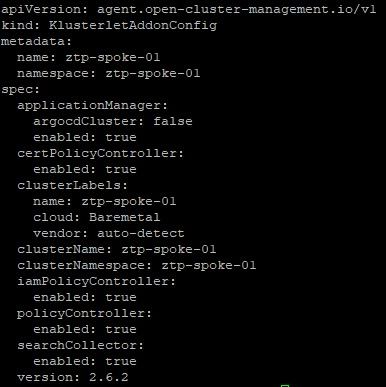
name: pull-secret05-klusterlet.yaml:
You can keep this as it is for now (as long as you are using ztp-spoke-01 name)
apiVersion: agent.open-cluster-management.io/v1
kind: KlusterletAddonConfig
metadata:
name: ztp-spoke-01
namespace: ztp-spoke-01
spec:
applicationManager:
argocdCluster: false
enabled: true
certPolicyController:
enabled: true
clusterLabels:
name: ztp-spoke-01
cloud: Baremetal
vendor: auto-detect
clusterName: ztp-spoke-01
clusterNamespace: ztp-spoke-01
iamPolicyController:
enabled: true
policyController:
enabled: true
searchCollector:
enabled: true
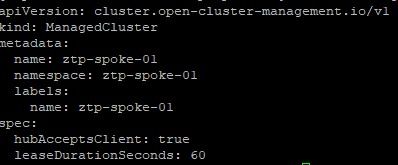
version: 2.6.206-managedcluster.yaml:
Can keep this the same
apiVersion: cluster.open-cluster-management.io/v1
kind: ManagedCluster
metadata:
  name: ztp-spoke-01
  namespace: ztp-spoke-01
  labels:
    name: ztp-spoke-01
spec:
  hubAcceptsClient: true
  leaseDurationSeconds: 60
07-nmstate.yaml:
This will need to be changed to reference the appropriate search-domain, DNS server, IP address, netmask, gateway and the associated mac address for the first interface of the ztp-spoke-01 VM.
apiVersion: agent-install.openshift.io/v1beta1
kind: NMStateConfig
metadata:
name: ztp-spoke-01
namespace: ztp-spoke-01
labels:
cluster-name: ztp-spoke-01
spec:
config:
dns-resolver:
config:
search:
- ocp-poc-demo.run
server:
- 192.168.100.2
interfaces:
- ipv4:
address:
- ip: 192.168.100.8
prefix-length: 24
dhcp: false
enabled: true
ipv6:
enabled: false
macAddress: '52:54:00:20:99:f6'
name: enp1s0
state: up
type: ethernet
routes:
config:
- destination: 0.0.0.0/0
next-hop-address: 192.168.100.1
next-hop-interface: enp1s0
table-id: 254
interfaces:
- macAddress: '52:54:00:20:99:f6'
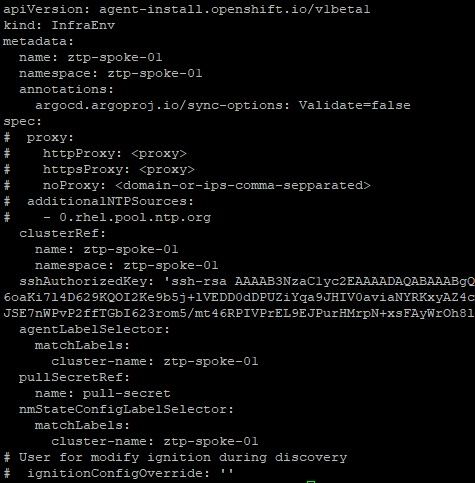
name: enp1s008-infraenv.yaml:
The only change should be SSH key
apiVersion: agent-install.openshift.io/v1beta1
kind: InfraEnv
metadata:
name: ztp-spoke-01
namespace: ztp-spoke-01
annotations:
argocd.argoproj.io/sync-options: Validate=false
spec:
# proxy:
# httpProxy: <proxy>
# httpsProxy: <proxy>
# noProxy: <domain-or-ips-comma-sepparated>
# additionalNTPSources:
# - 0.rhel.pool.ntp.org
clusterRef:
name: ztp-spoke-01
namespace: ztp-spoke-01
sshAuthorizedKey: 'ssh-rsa AAAAB3NzaC1yc2EAAAADAQABAAABgQDI0C7v3nrPyl6szdam99kd5DYTBq5/FP/YljGNnrCqGUdOZT2pIMppWTx9C/JgB2Qw/iVGYBT7sAOw1rbCP/47jJpx/QSmiIxPLhVcdeUMRwea7q7e+Gm94t7TJWKpb6X3clsz0K3bjtZ5Khy/FSn/xgZ1kNGp6oaKi7l4D629KQOI2Ke9b5j+lVEDD0dDPUZiYqa9JHIV0aviaNYRKxyAZ4cMLoDkih0+qvu2xzawvRj/IHtqJyFzIcg2pxy00uJiCOkbq+Wi/qBCfWIydt7auknE4ITAs1CTCVR6a9zLSjXlNXr287XxTlrodd/6w/rIJz8CUtKsjyn6JzIq1qMFNBbvpTVChsLRh5NoQ5FmFiodBkAW0DowRJSE7nWPvP2ffTGbI623rom5/mt46RPIVPrEL9EJPurHMrpN+xsFAyWrOh8lJ7+h2+iPkG8tTez903E5/JTn2cKdhRo9qIpm/630VsI/Rc7TB/cjhBhHQ7gWLCBA7KFuvuMv56QmxPc= ocpuser@bastion-local.ocp-poc-demo.com'
agentLabelSelector:
matchLabels:
cluster-name: ztp-spoke-01
pullSecretRef:
name: pull-secret
nmStateConfigLabelSelector:
matchLabels:
cluster-name: ztp-spoke-01
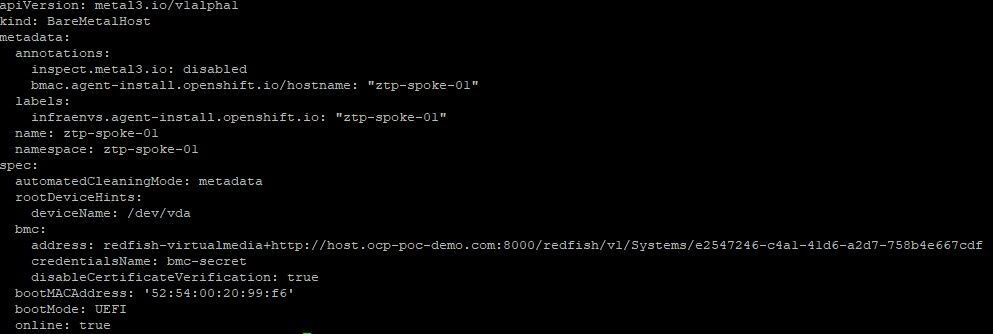
# User for modify ignition du09-baremetalhost.yaml:
The only change to be made here is to point to the correct Hypervisor DNS name/IP and to reference the UUID of the ztp-spoke-01 VM that was discovered earlier.
apiVersion: metal3.io/v1alpha1
kind: BareMetalHost
metadata:
  annotations:
    inspect.metal3.io: disabled
    bmac.agent-install.openshift.io/hostname: "ztp-spoke-01"
  labels:
    infraenvs.agent-install.openshift.io: "ztp-spoke-01"
  name: ztp-spoke-01
  namespace: ztp-spoke-01
spec:
  automatedCleaningMode: metadata
  rootDeviceHints:
    deviceName: /dev/vda
  bmc:
    address: redfish-virtualmedia+http://host.ocp-poc-demo.com:8000/redfish/v1/Systems/e2547246-c4a1-41d6-a2d7-758b4e667cdf
    credentialsName: bmc-secret
    disableCertificateVerification: true
  bootMACAddress: '52:54:00:20:99:f6'
  bootMode: UEFI
  online: true
clusterImageSet-4.11.17.yaml:
This can be the same and applied at any point
apiVersion: hive.openshift.io/v1
kind: ClusterImageSet
metadata:
  annotations:
    apps.open-cluster-management.io/hosting-subscription: open-cluster-management/hive-clusterimagesets-subscription-fast-0
    apps.open-cluster-management.io/reconcile-option: merge
  labels:
    app: hive-clusterimagesets
    app.kubernetes.io/managed-by: Helm
    channel: fast
    subscription-pause: "false"
    visible: "false"
  name: openshift-v4.11.0
spec:
  releaseImage: quay.io/openshift-release-dev/ocp-release:4.11.17-x86_64
Applying the Definitions for the ZTP-SPOKE-01 Cluster
This section will show what happens as the configuration for ztp-spoke-01 cluster is applied, how to monitor progress, and how to troubleshoot.
Please ensure that the VM called ztp-spoke-01 is powered-off since it will automatically be powered-on once the following manifests are applied.
- Create 4.11.17 ClusterImageSet.
oc create -f clusterImageSet-v4.11.17.yaml2. Apply the 01-namespace.yaml which is just a namespace that will house the objects that will be created next.
oc create -f 01-namespace.yaml
3. Create the bmc secret and pull-secret in the ztp-spoke-01 namespace.
oc create -f 01-unsealed-bmc-secret.yaml
oc create -f 01-unsealed-pull-secret.yaml
4. Create the AgentClusterInstall
oc create -f 03-agent-cluster-install.yamlTo monitor it's progress and check for any errors, run the following commands
oc describe AgentClusterInstall ztp-spoke-01 -n ztp-spoke-01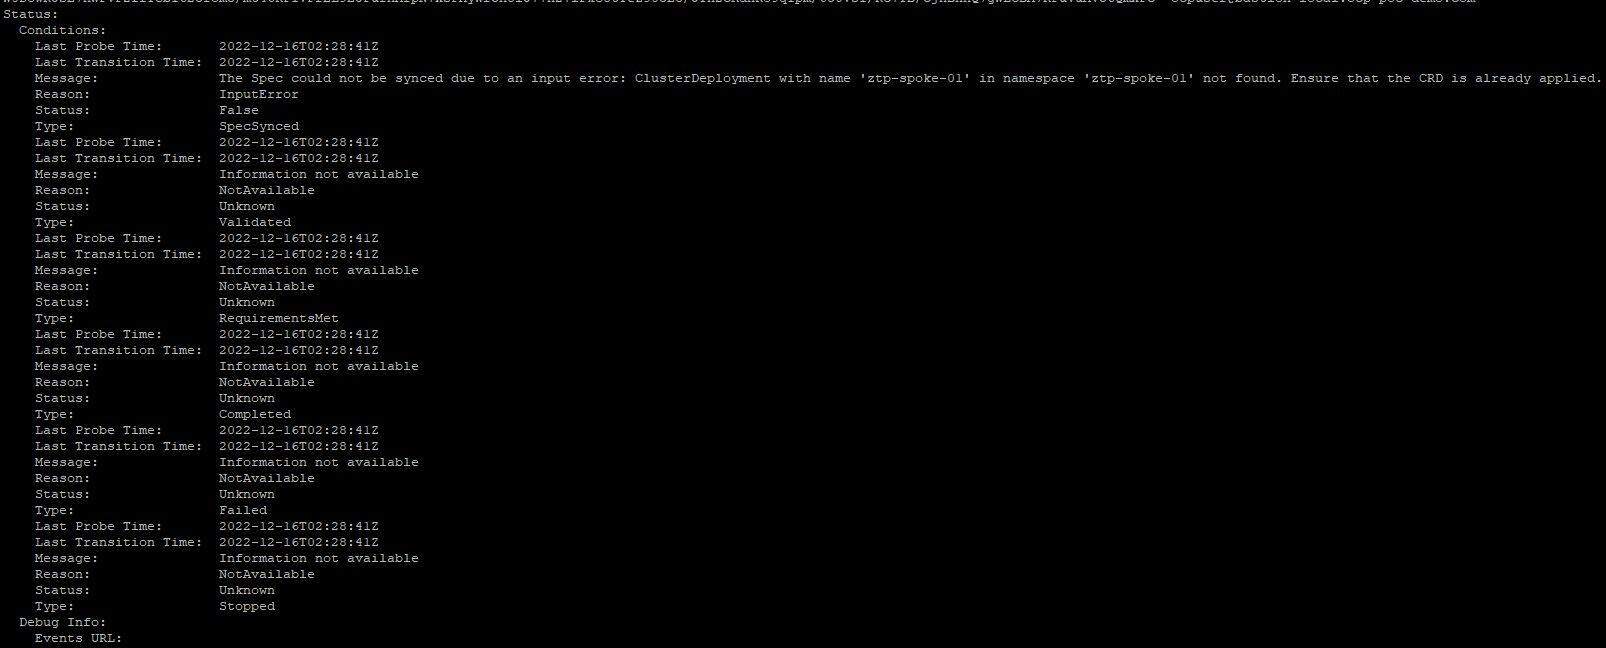
In the above screenshot, you will see that the resource can't be created due to the following message:
The Spec could not be synced due to an input error: ClusterDeployment with name 'ztp-spoke-01' in namespace 'ztp-spoke-01' not found. Ensure that the CRD is already applied.
There is no ClusterDeployment yet. This will be created next.
5. Create the ClusterDeployment
oc create -f 04-clusterdeployment.yamlNow, let's look at the AgentClusterInstall again
oc describe AgentClusterInstall ztp-spoke-01 -n ztp-spoke-01Now, there is some additional information
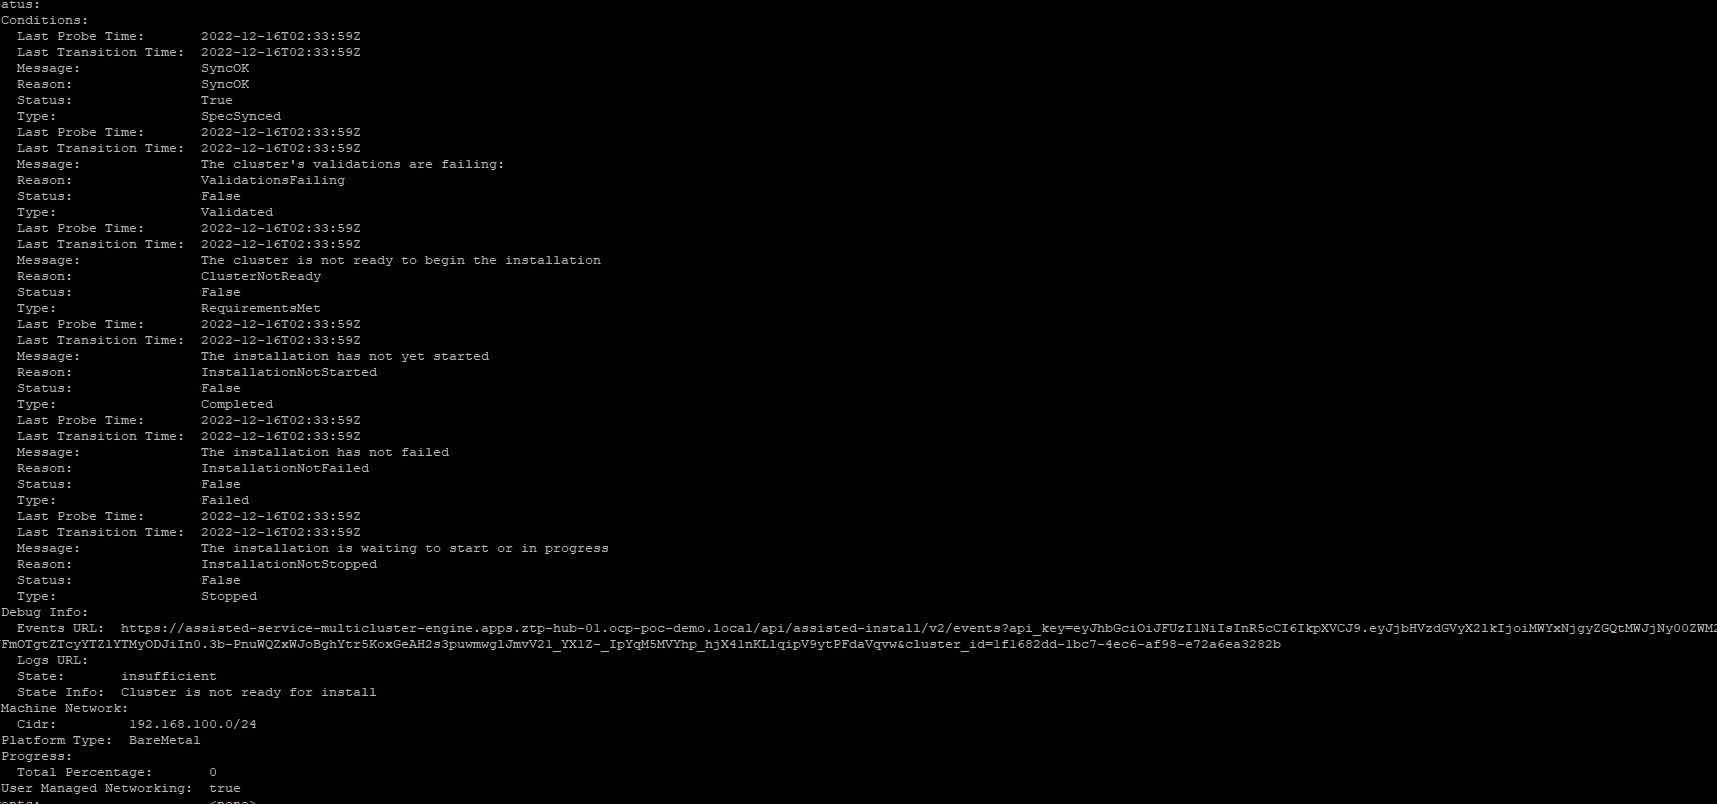
The messages say:
Hosts - Data:
  Id:       all-hosts-are-ready-to-install
  Message:  All hosts in the cluster are ready to install.
  Status:   success
  Id:       sufficient-masters-count
  Message:  Single-node clusters must have a single control plane node and no workers.
  Status:   failure
And
Status:
Conditions:
Last Probe Time: 2022-12-16T02:33:59Z
Last Transition Time: 2022-12-16T02:33:59Z
Message: SyncOK
Reason: SyncOK
Status: True
Type: SpecSynced
Last Probe Time: 2022-12-16T02:34:40Z
Last Transition Time: 2022-12-16T02:34:40Z
Message: The cluster's validations are failing: Single-node clusters must have a single control plane node and no workers.
Reason: ValidationsFailing
Status: False
Type: Validated
Last Probe Time: 2022-12-16T02:33:59Z
Last Transition Time: 2022-12-16T02:33:59Z
Message: The cluster is not ready to begin the installation
Reason: ClusterNotReady
Status: False
Type: RequirementsMet
Last Probe Time: 2022-12-16T02:33:59Z
Last Transition Time: 2022-12-16T02:33:59Z
Message: The installation has not yet started
Reason: InstallationNotStarted
There is also an assisted-service events URL shown in the output which may show some more information. Here is the message:
[{"cluster_id":"1f1682dd-1bc7-4ec6-af98-e72a6ea3282b","event_time":"2022-12-16T02:33:59.210Z","message":"Successfully registered cluster","name":"cluster_registration_succeeded","severity":"info"},{"cluster_id":"1f1682dd-1bc7-4ec6-af98-e72a6ea3282b","event_time":"2022-12-16T02:33:59.274Z","message":"Custom install config was applied to the cluster","name":"install_config_applied","severity":"info"}]
This is telling us the install-config was applied but there are no host resources available yet. We still have some other stuff left to do.
6. Create the klusterlet
oc create -f 05-klusterlet.yaml7. Create the NMState (Network Manager State) for the node.
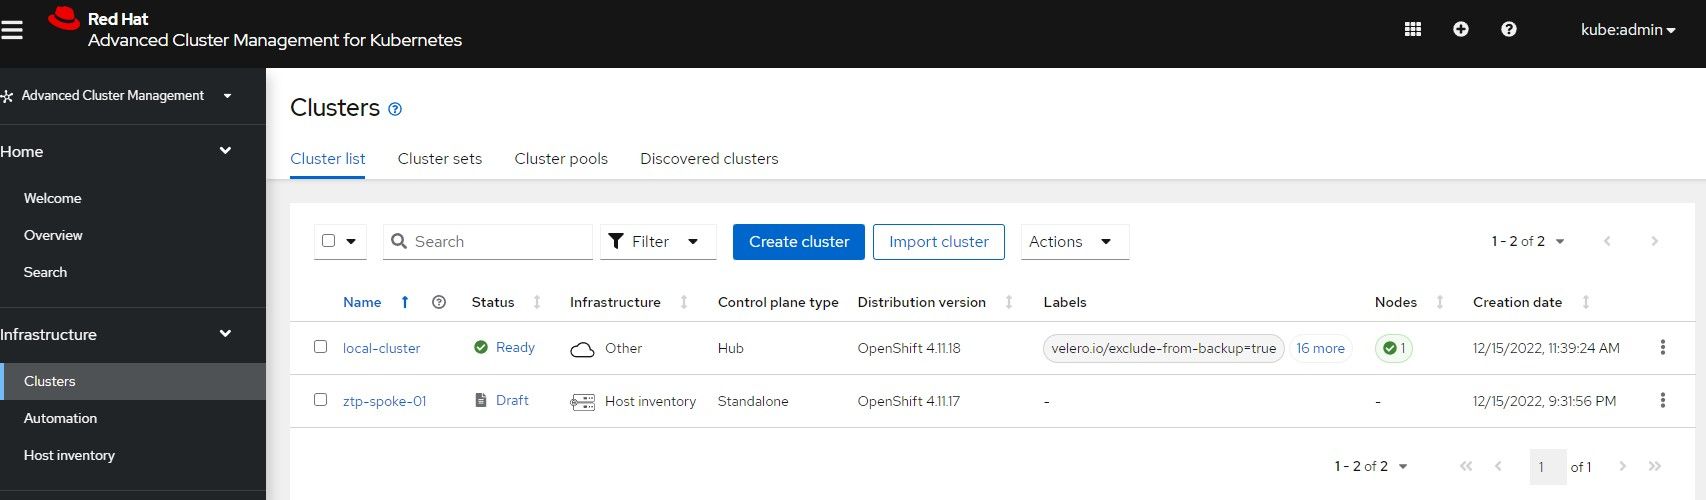
oc create -f 07-nmstate.yamlYou will still see that Advanced Cluster Manager MultiCloud-Console still shows a draft-version of this cluster since the bare-metal host resource has not been created yet.
8. Create the Infrastructure Environment
oc create -f 08-infraenv.yaml9. Lastly, let's create the bare-metal host resource
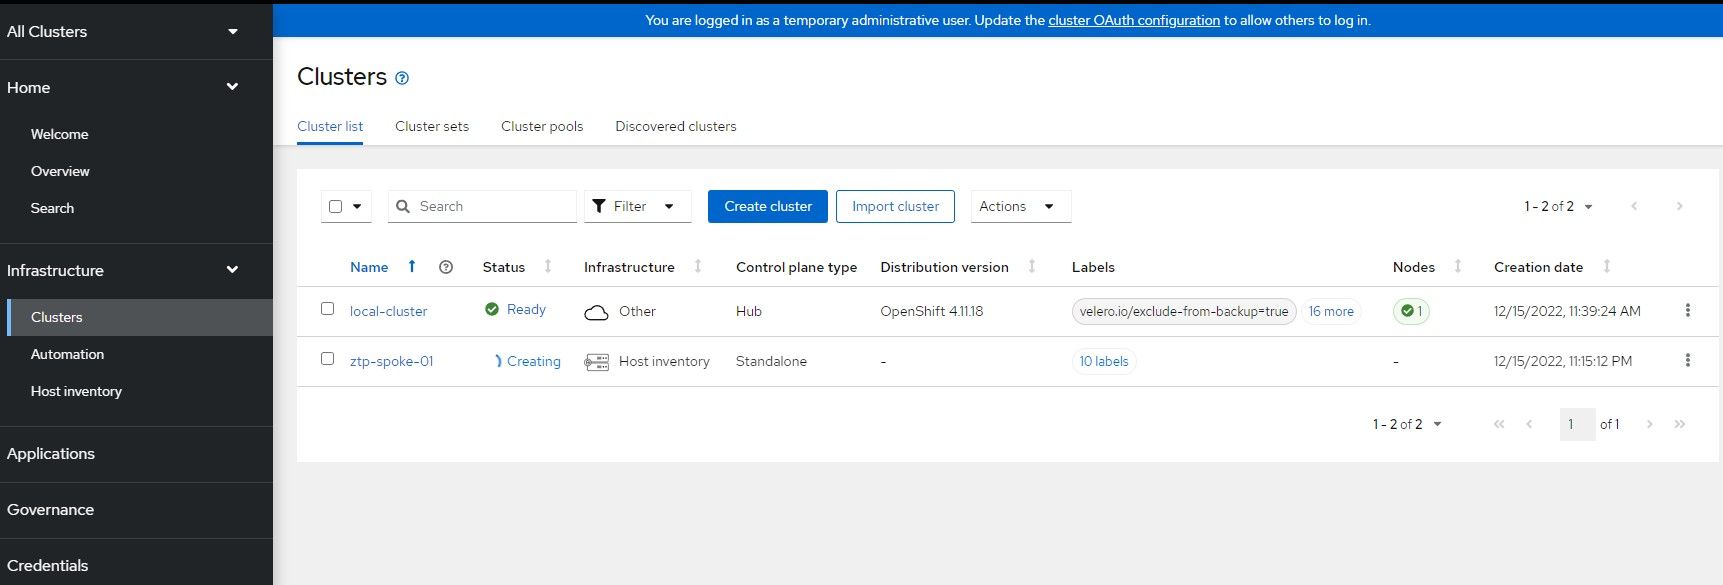
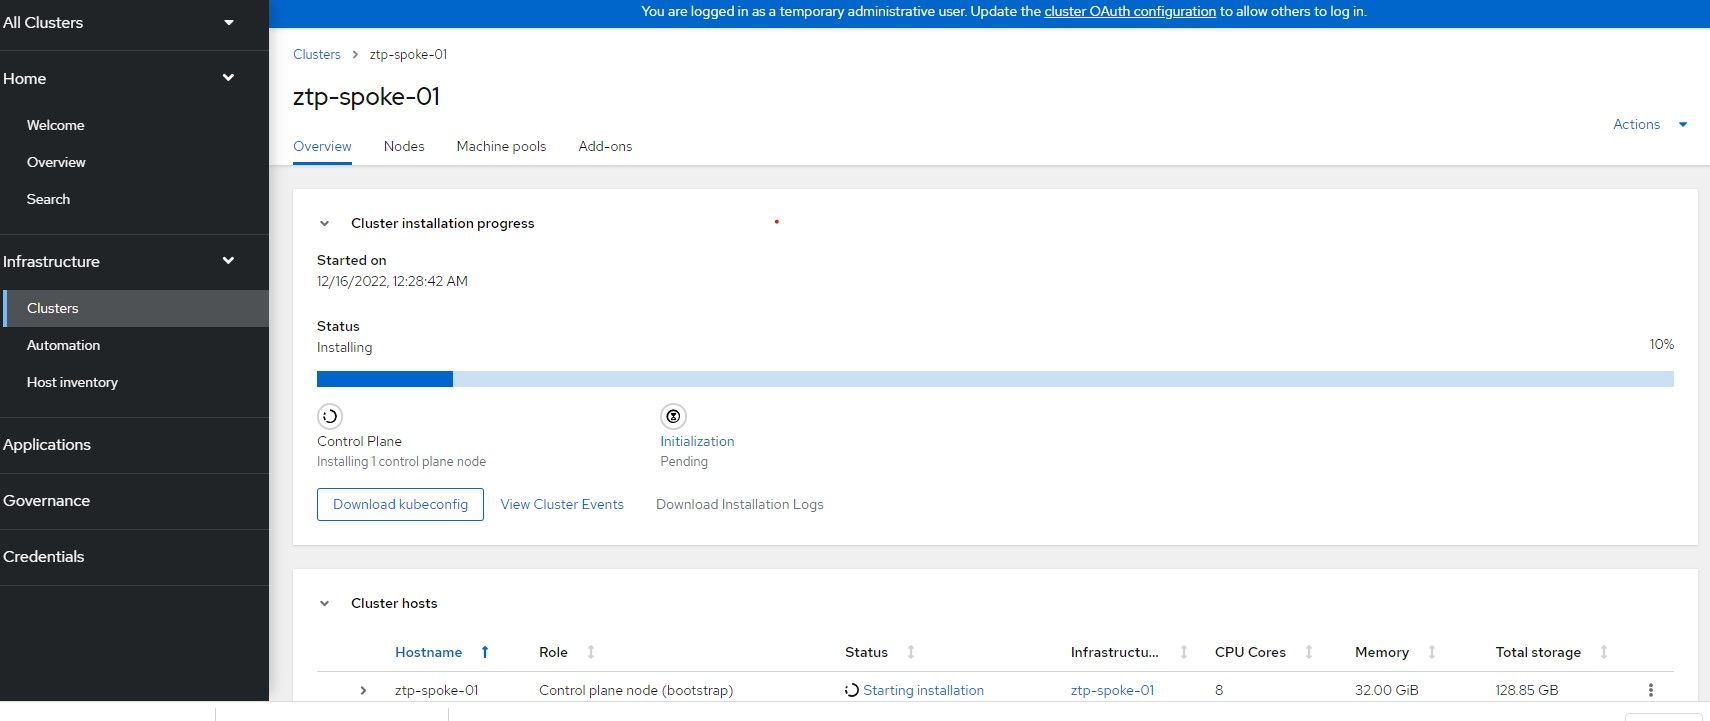
oc create -f 09-baremetalhost.yamlAt this point, the install ztp-spoke-01 bare-metal host which is located in the infrastructure environment called ztp-spoke-01 will show as available in ACM and resources will be discovered. Once it meets the requirements needed to install a cluster (IE: NTP working, VM specs sufficient, etc), the cluster install will start.
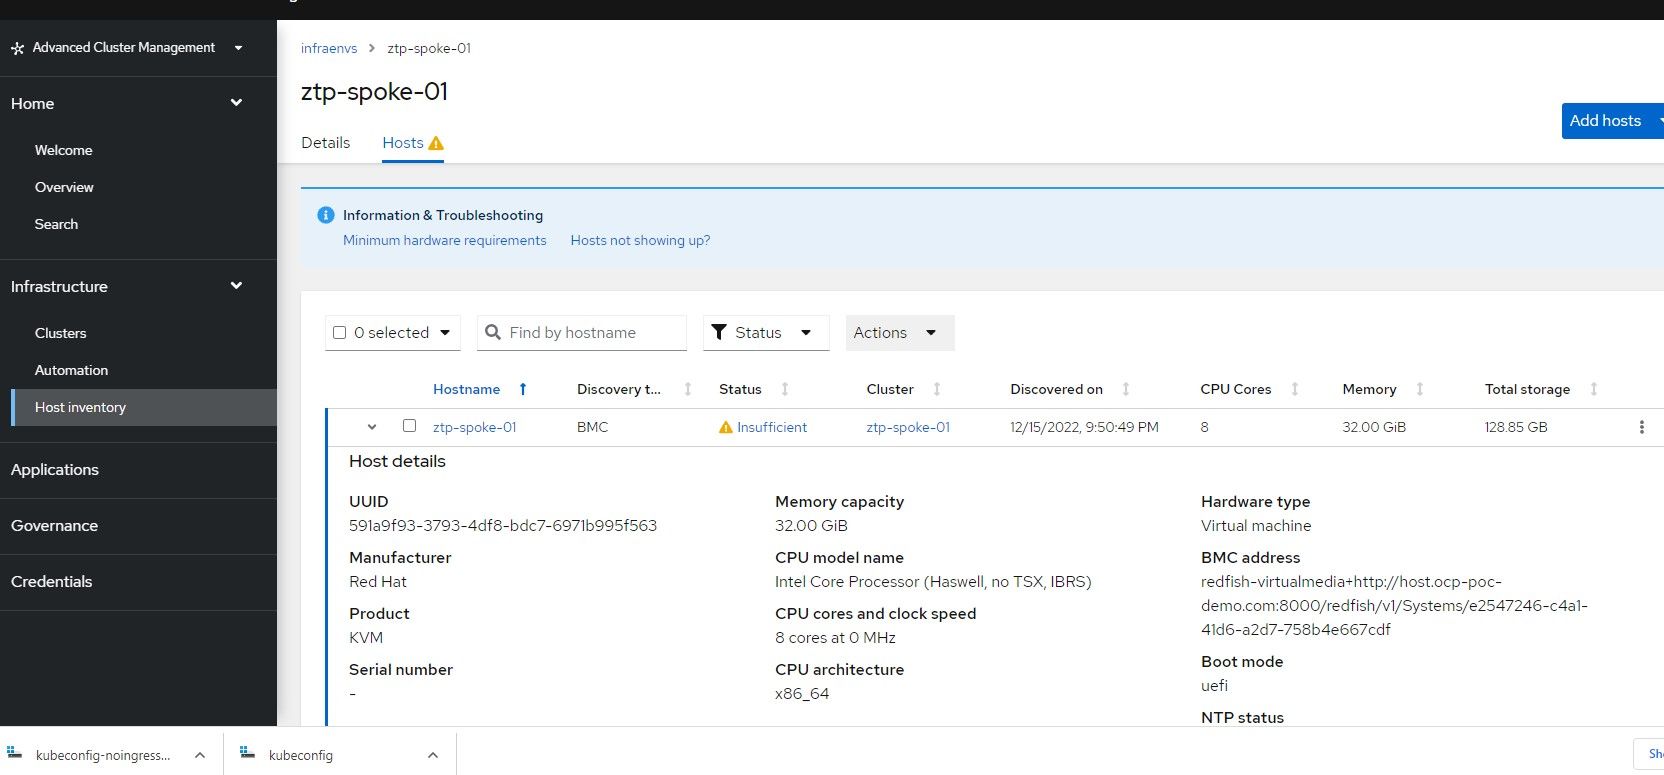
Here are some of the screens that will appear as the cluster is being built inside of the ACM GUI
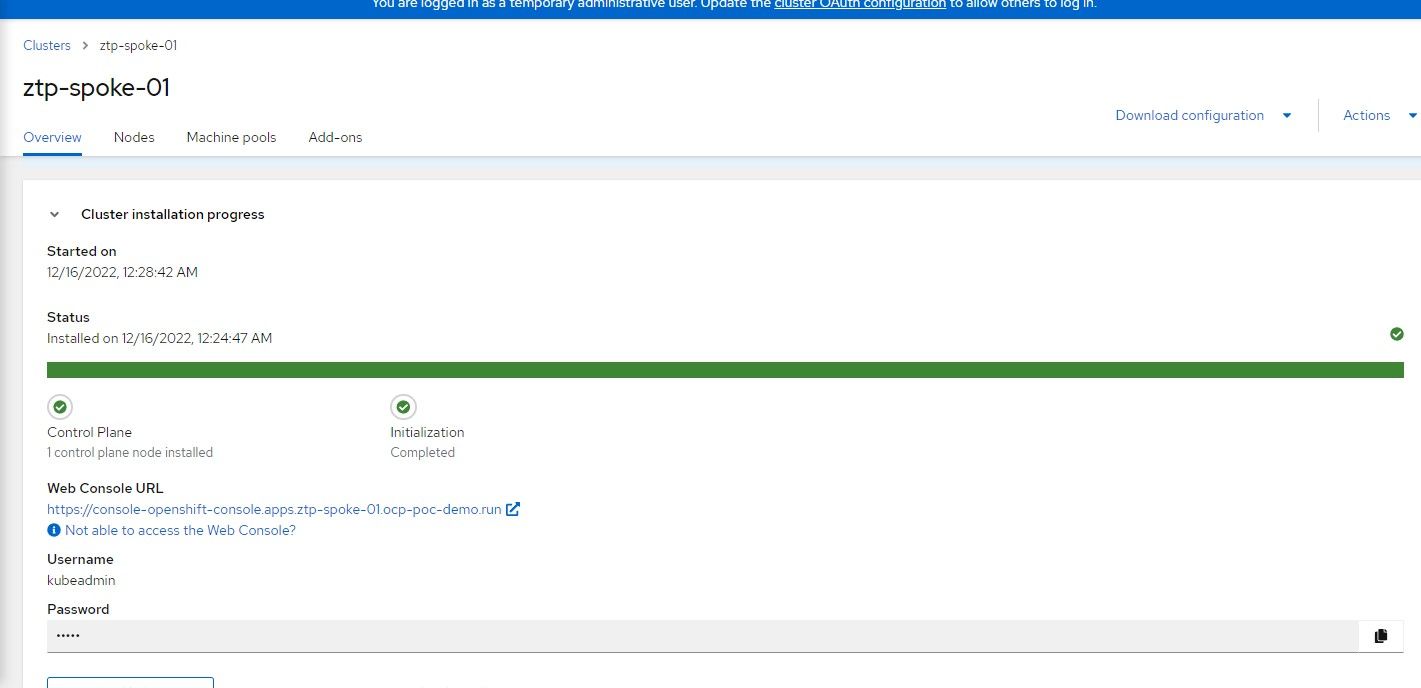
Once the install is finished, you can download the kubeconfig (if you don't already have it) and save the kubeadmin password.
Ways to Troubleshoot and Monitor Progress of Agent/Cluster Installs
The AgentClusterInstall object will show all status information on the host up to the point before the cluster installs. Check status information for more details on any failures.
The clusterDeployment object will show everything that happens after the Agent finishes and the Quay OCP image download starts. Check status information for more details on any failures
Another way to monitor the progress is by SSHing as the core user to the node and running the following commands:
sudo journalctl TAG=agent
# As root user, run:
podman ps -a
podman logs <containerid>
Some oc commands that can be run:
oc logs <assisted-service-pod> -n multicluster-engine|grep -v info
oc logs <metal3 pod> -n openshift-machine-api
Watch the console of the VM using Virt-Manager. This may give you indication of an issue such as the CD-ROM image not booting. In this case, check the boot order. The boot order should check the disk first and CD-ROM second.
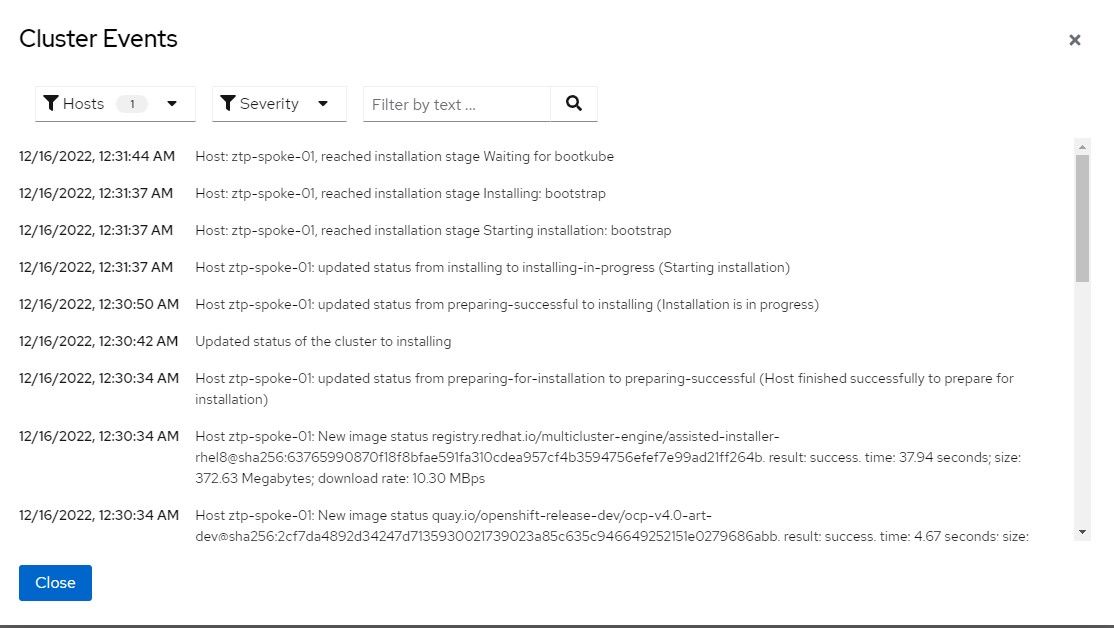
During the cluster install, you can also view cluster events and download installation logs depending on how far in the process the node is in regards to the cluster completing its build.
On the managed cluster (ztp-spoke-01), the ability to download the KUBECONFIG early in the install process helps in some cases since you can run OC commands and watch the clusteroperators as they become available. If there are any other errors and the API is still responding, this can be helpful.